



Leaderboard
-

dvderlm
Club_Member14Points5340Posts -

Yeti
Club_Member9Points12316Posts -

mr brightside
Forum User8Points177Posts -

giaguaro
Forum User7Points37Posts
Popular Content
Showing content with the highest reputation since 09/16/25 in Posts
-
 Anyone else think this reads very spammy as a first post? Just lacks a link to the wonder product to be completely obvious.3 points
 -
Definitely, yes, but I'm not a mod any more, so I'll just leave it at explaining a better option than the product in the spam.2 points
-
2 pointsIt's an ECU bracket, on a car that doesn't have an ECU. VW were planning ahead.2 points
-
 2 pointsUPDATE: I spent an evening sanding the crankshaft and conrod journals, getting them to a state where they weren't smooth to the touch but they were operationally smooth. Plastigauge read that they were still within clearance spec, and an old-timer on a youtube video said not to worry too much about indents running around the bearings, as oil would simply fill those little gaps (not ideal, but not a show-stopper). So I reassembled everything, and the car has been running smoothly for a week now. This weekend, I'm going to drop the sump and verify the state of the oil, conrod/crankshaft play, and the status of the bearings. Looks like what VAG said was impossible, not giving any information in the service manual for bearing replacement saying that as soon as you even undo the crankshaft bolts the engine block has to be replaced, is in fact doable—at least in the short term, as I now need to monitor for longevity—but so far so good!2 points
 -
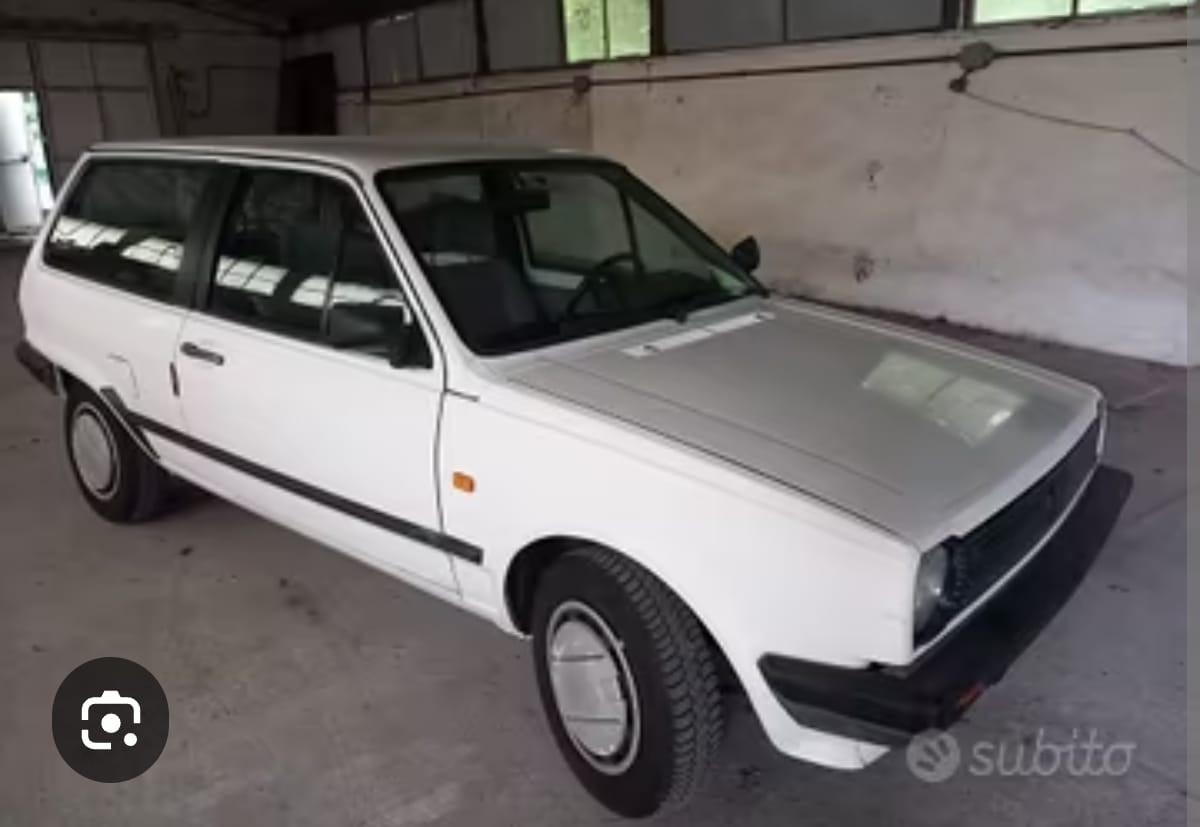
2 pointsHi to everyone and sorry for my English. I did buy the same exact car i had 40 years ago and i am here for a lot of things i wasnt allowed to do in my 20s :)
 2 points
 -
 2 pointsThere will be an ignition on supply on the heater blower switch that might be easier to use rather than that lead from the fusebox and yes I would still protect it with an inline fuse2 points
 -
 2 pointsRemoving Polo's wiring Removing polo's ECU essencials and ecu peripherals. Also removing fused protected power and a set of +5VDC and GNDs that power engine sensors. ECU peripherals ECU essencials This was paired with my speeduino, so I had to remove both. Fused protected This cables go to the inside of the car some are fused others not. VSS (vehicle speed sensor) is here. Injectors +12VDC fused cable is here. A spare +12VDC is also here and ignition protection, also +12VDC. A good set of +5VDC and GNDs are here also, all going to be inhibited.2 points
 -
 2 pointsI'm back to say that Pete has performed his magic trick again. Front windows are now functioning again. What a relief! Thank you Pete, and thank you clubpolo. He and this space are typically what make the Internet a formidable tool – experts ready to help, clearly human testimonies backing up what the experts say, searchable and referenced archives. Social media, Chat-GPT and Discord servers were of no help whatsoever!2 points
 -
 Ok I see, thank you👍 the front tyres don't seem to have noticeable shoulder wear but also before I owned it (only had it a little while) it was only used for like 200 miles a year so maybe it's not had time to create noticeable wear? Not sure. Thanks for that part link though, that does seem like the right one1 point
 -
 1 pointHave been browsing the forums a bit more to see if any one has posted similar issues. After talking with a friend, they said it maybe the thrust bearing but did find a post confirming its the gearbox (same part code as mine, same whining sound when under load). Thankfully they also posted a thread about a replacement box so know what codes I am looking for, so will do that in the parts forum, if I can find a box in the uk from a polo fan instead of a scrapper from europe it would be worth the risk/cost! Thanks for the reply, GT breadvan project sounds ace! Glad to hear you close to MOT, will keep an eye out.1 point
 -
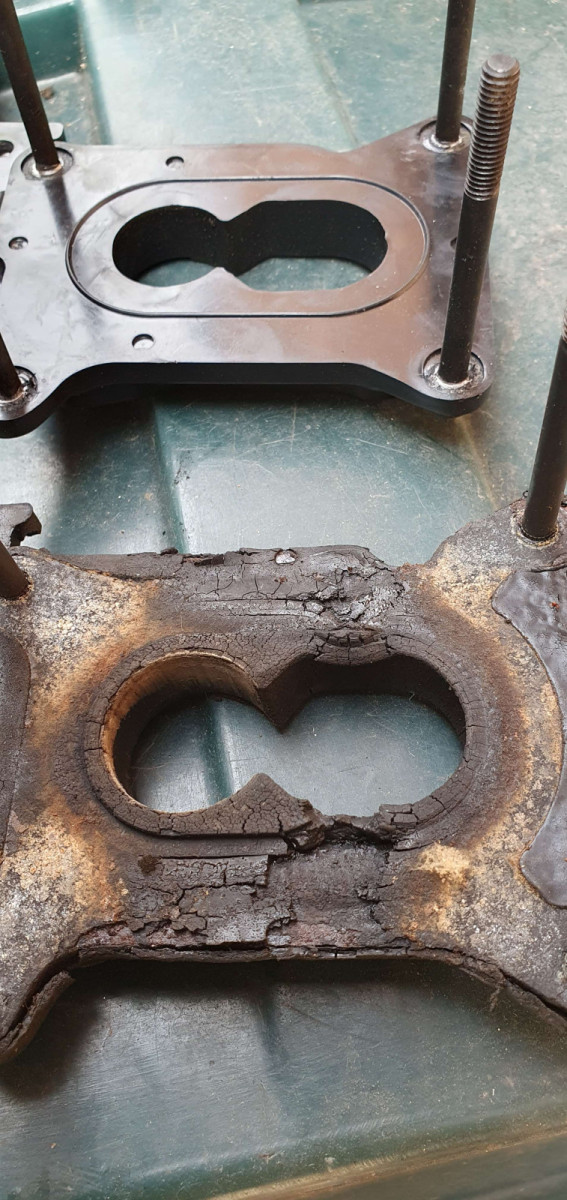
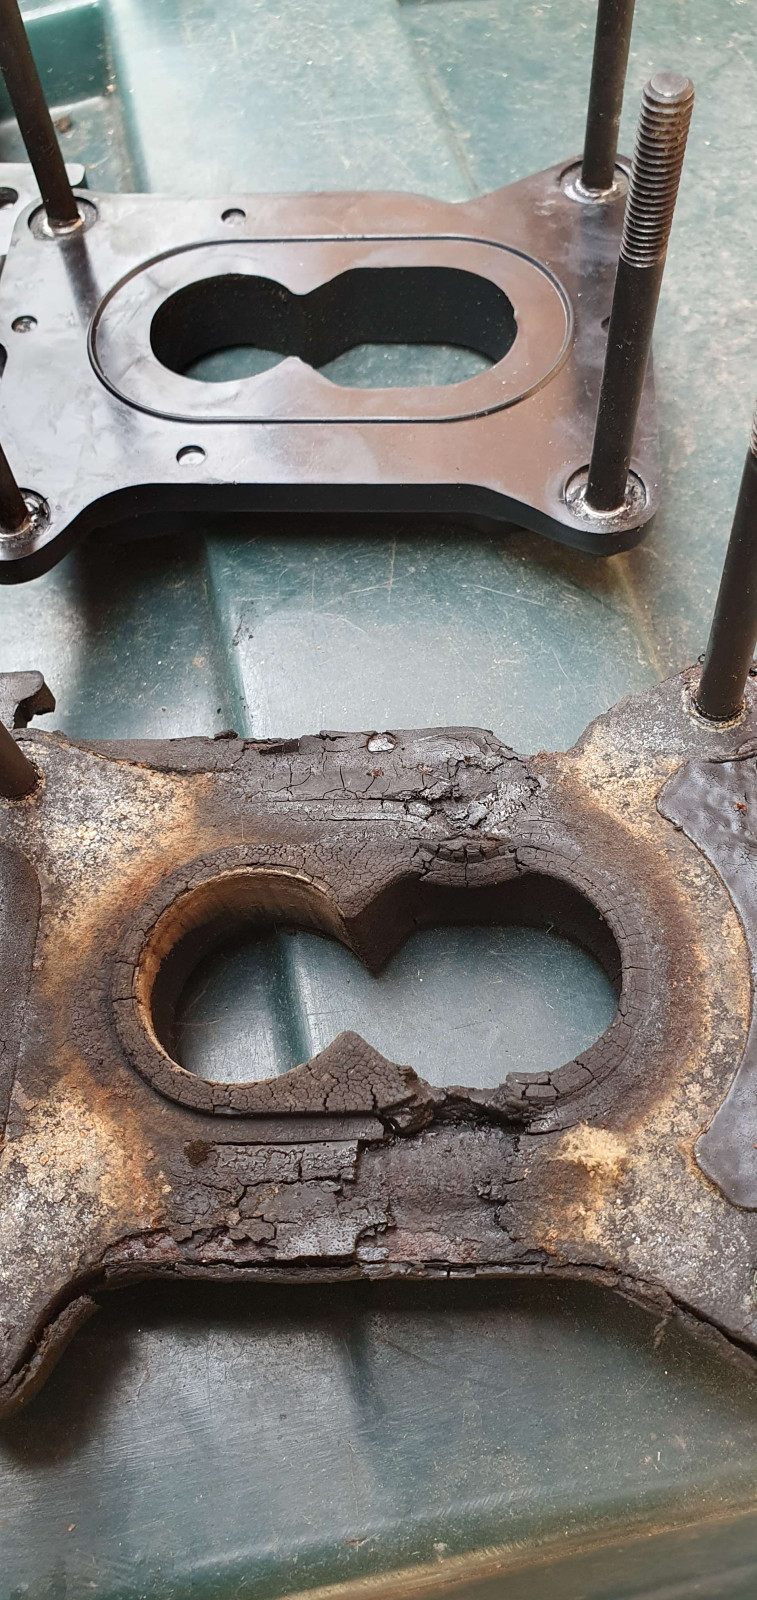
 So, the carb base was definitely a problem. The car started and I managed to make a lap of the block. Sufficiently confident, I tried it again. The engine died completely after a few hundred yards. I made it back by squirting carb cleaner directly into the carb in runs of about 50 yards. I gather, there is no fuel going in at all. I added 5 litres to make sure the tank wasn't empty. I have already replaced the fuel pump and will check the vapour separator. A new one is arriving today. I had replaced it but broke one spout during one of the carb disassemblies. The old one was fine, the floats inside were free. When rebuilding the carb I did not replace the float and needle but it seemed to move freely and the engine used to run fine before the car was parked for ten years. I did not test the accelerator pump throughput. This may be a test of fuel making it to the carb reservoir. I did replace the gaskets, plunger, and cleaned quite a lot of ... that had accumulated over 40 years. The saga continues.
 1 point
 -
Thanks guys! The Formel E seems to have the low end of the high end components. It does have the electric cut-off valve. I tried it, it clicks nicely. Thanks for the diagramme dvderlm! Unfortunately, I can pretty much recite it with my eyes closed by now but this is the right one, indeed! Very helpful assignment of the two vaccum connectors on the side - explosion A. I found a description bun noone explained which one was which :-) I am about to replace the carb mount. I bought one but I have the niggling feeling it's not the right one. Just ordered another one from heritage parts. Once it arrives, I'll take the carb all apart. Again... Need to check the throughput of the accelerator pump, as well. Split base fits the bill, will see. I only just realised what split meant - it splits horizontally between the upper and lower plates; I was looking for vertical cracks. TBC1 point
-
 1 pointIt sure the light unit may have an earth wire but check your getting power first if you do r have a multimeter use a bulb and two bits of wire - good luck it can be a pain in the proverbial thing to Suss it out1 point
 -
 1 pointCrazy 20 years!!! I still have Bluey just hasn't moved from the comfort of the garage for 3 years. I very much miss the polo show and seeing all my polo friends, although I don't especially miss the BBQ in this heat 🥵1 point
 -
 1 pointThanks for the thread! the brake nipples sadly already rounded when I got it so gonna keep tapping and gassing and using mole grips and possibly fire for a week or two, if no success may try your suggestion of bleeding at the hose1 point
 -
As EV's go, I do rather like what I've seen of the ID.Polo. My only real gripe about it is the same as the current Polo, is that it's the same size as a Golf.1 point
-
Update: I've changed the fuel pump I've changed the sedimentation filter I've rebuilt the carb: a very useful link for pierburg 2e3 at https://vwt25.blog/2016/09/15/pierburg-2e3-rebuild-and-adjustments/ After rebuild, the engine started well and died. The carb sucked all the fuel from the sedimentation filter and the engine won't start, unsurprisingly. The plan: Will unplug the fuel inlet before the pump and dip in a bottle of fuel, start the car. If this works, will start chasing the lines to the tank.1 point
-
1 point
-
1 pointShame the distributor hall sender socket is damaged. I may be mistaken but the block oil breather pod and cam cover breather look like they are full of mayonnaise, which would indicate a head gasket failure that caused oil and water to mix, OR, that the car was only used for short journeys. Might be fine. Might be damaged from overheating.1 point
-
1 point
-
1 pointThank you after much fettling last night all is now working as it should replaced a fuse (I could swear it was fine when I first check it ) but started a trace process and found the blown fuse! Thank you for taking the time to reply1 point
-
1 pointWell done. Is it a headlamp switch glow lamp to find the switch in the darkness with engine running? Or maybe the loom designed for Audi 50 with headlight on confirmation lamp in dash?1 point
-
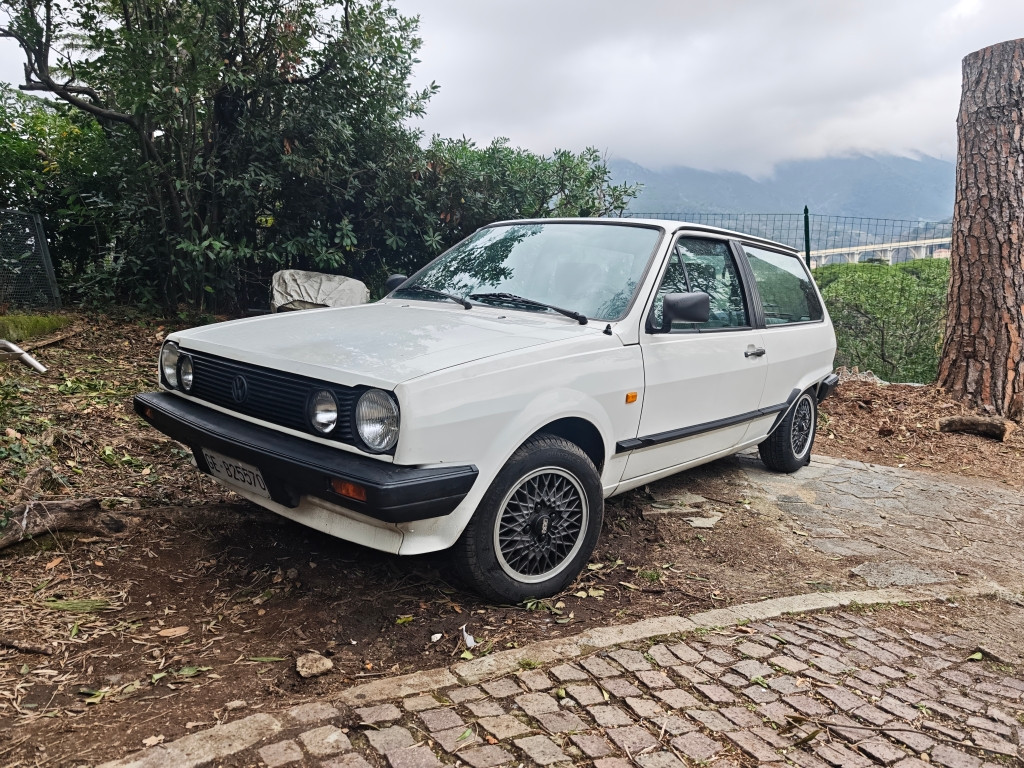
1 pointBang! It was the metal gear. The hole was too wide, exactly as stated in the video I did the procedure and now it works. While I was there, I swapped a pair of led, the factory lamps was stuck I am wondering why the factory headlight switch has lamp but they add a lamp on the frame I also installed a 4 light grill, the factory foglight switch and made a custom install, the 12v come directly from the battery. I plan to have also the headlight draining directly, it increases the Volts and make a brighter light
 1 point
 -
1 pointThat is probably a plastic cog worn or stuck. Might need a specialist to repair it.1 point
-
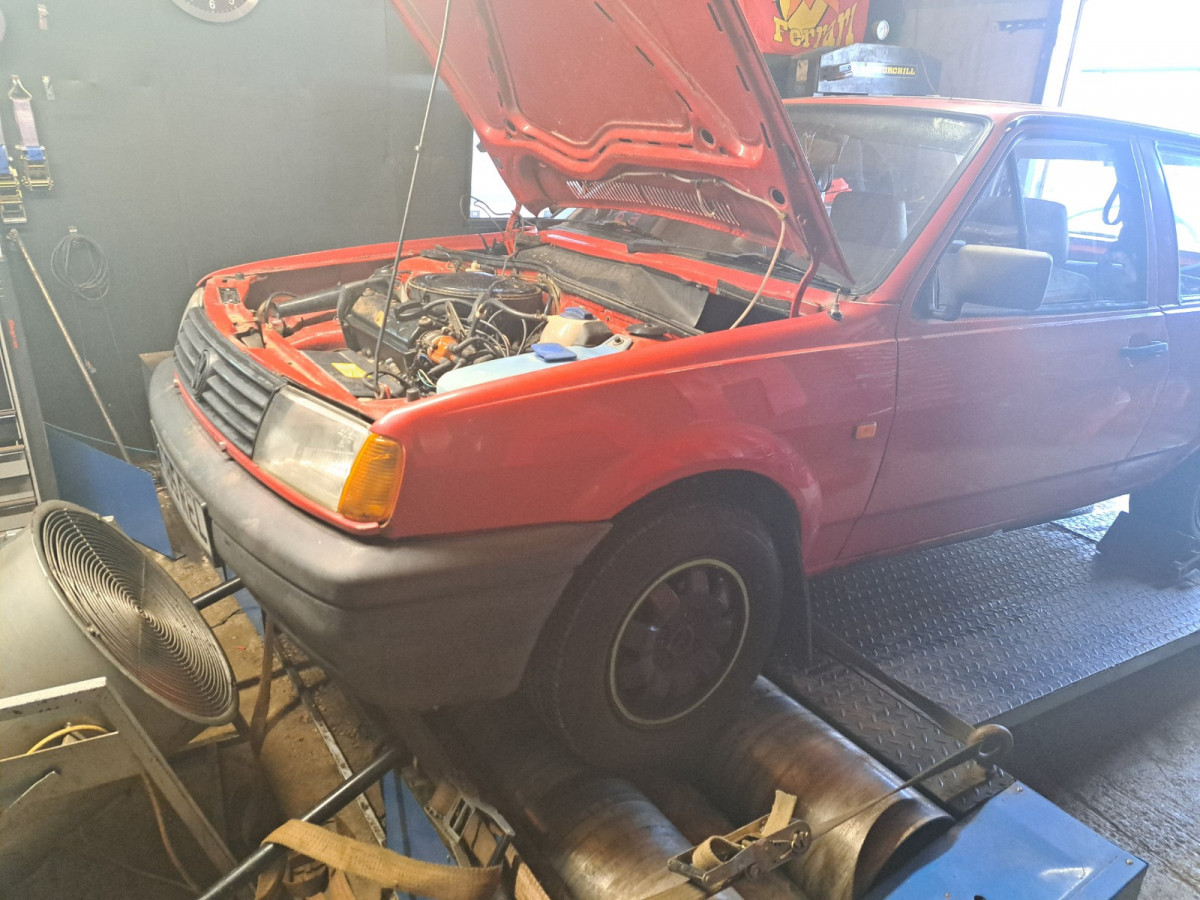
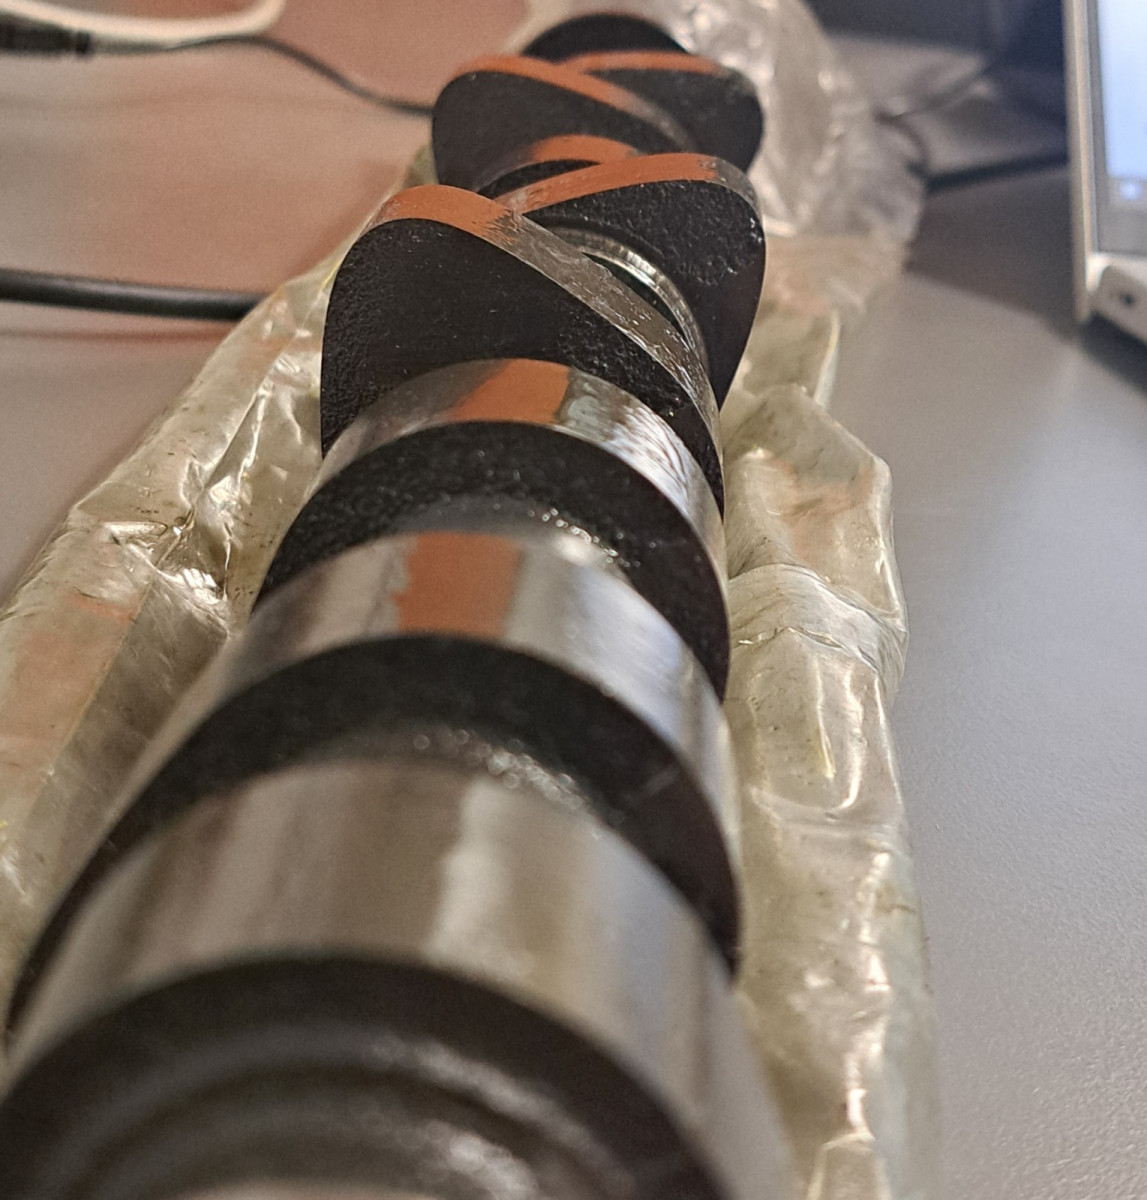
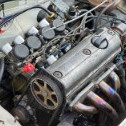
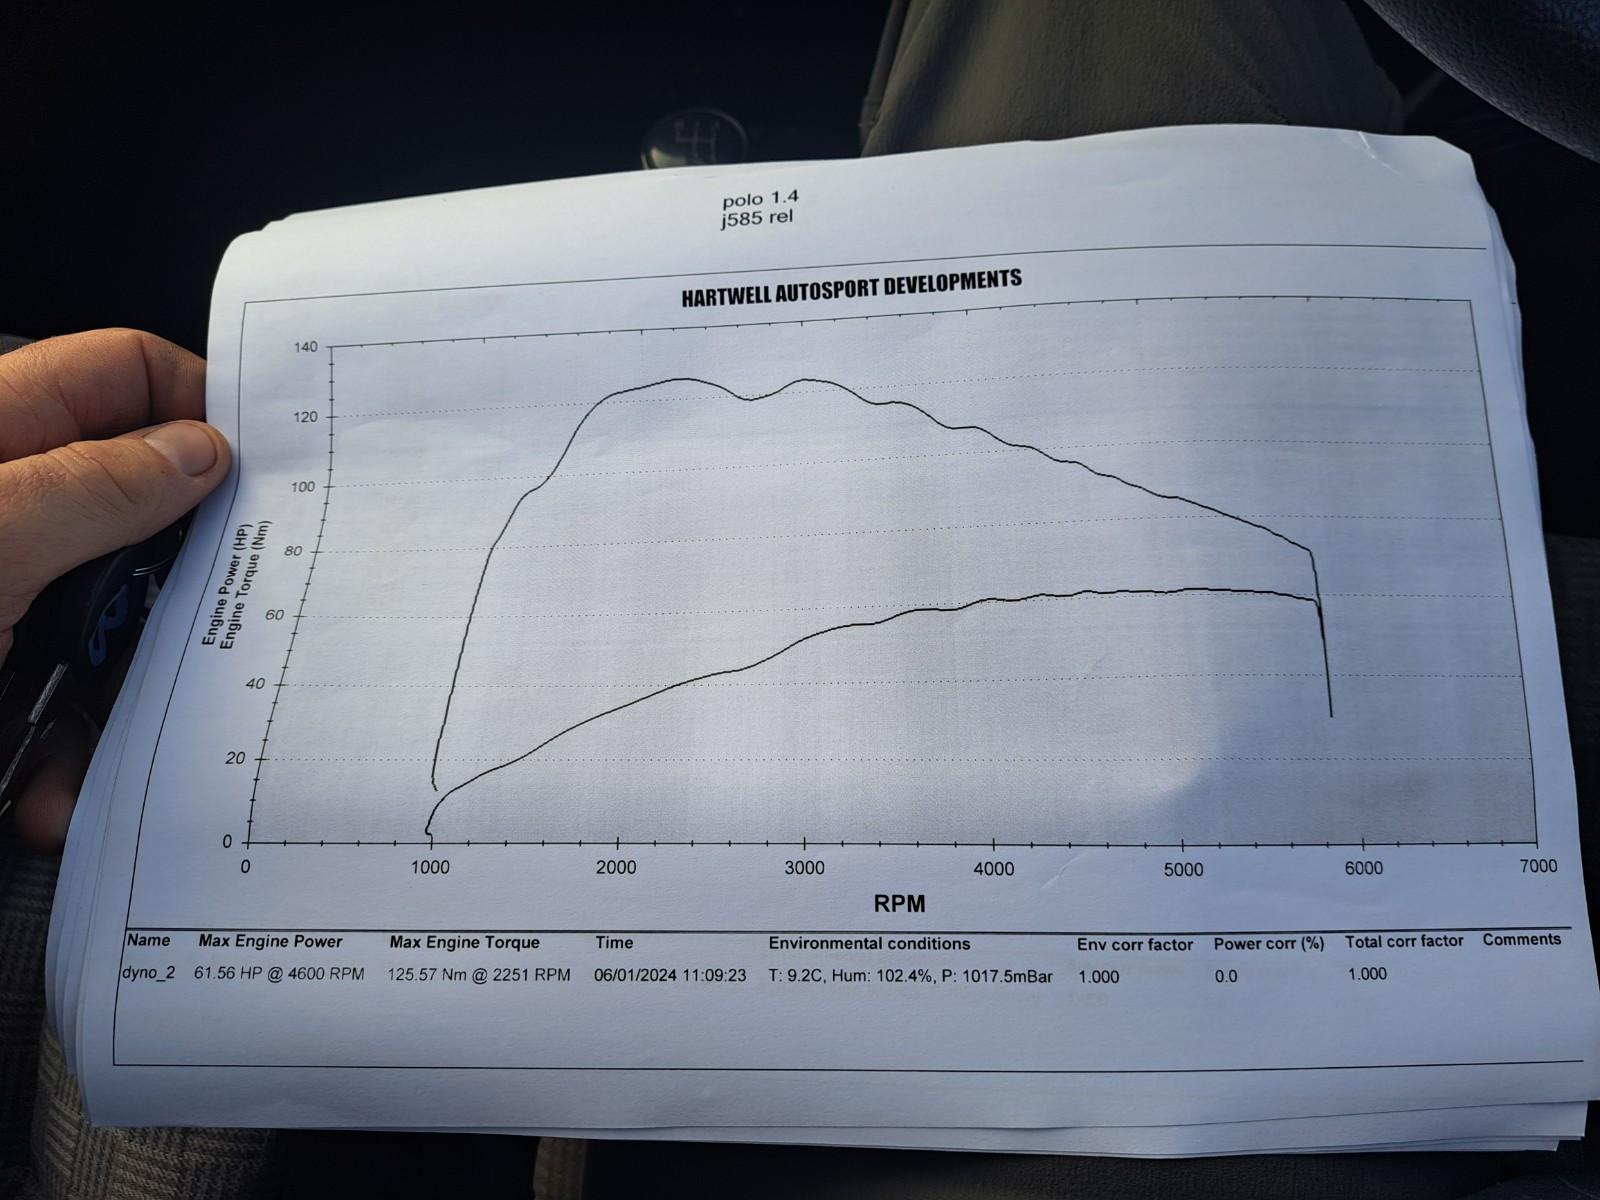
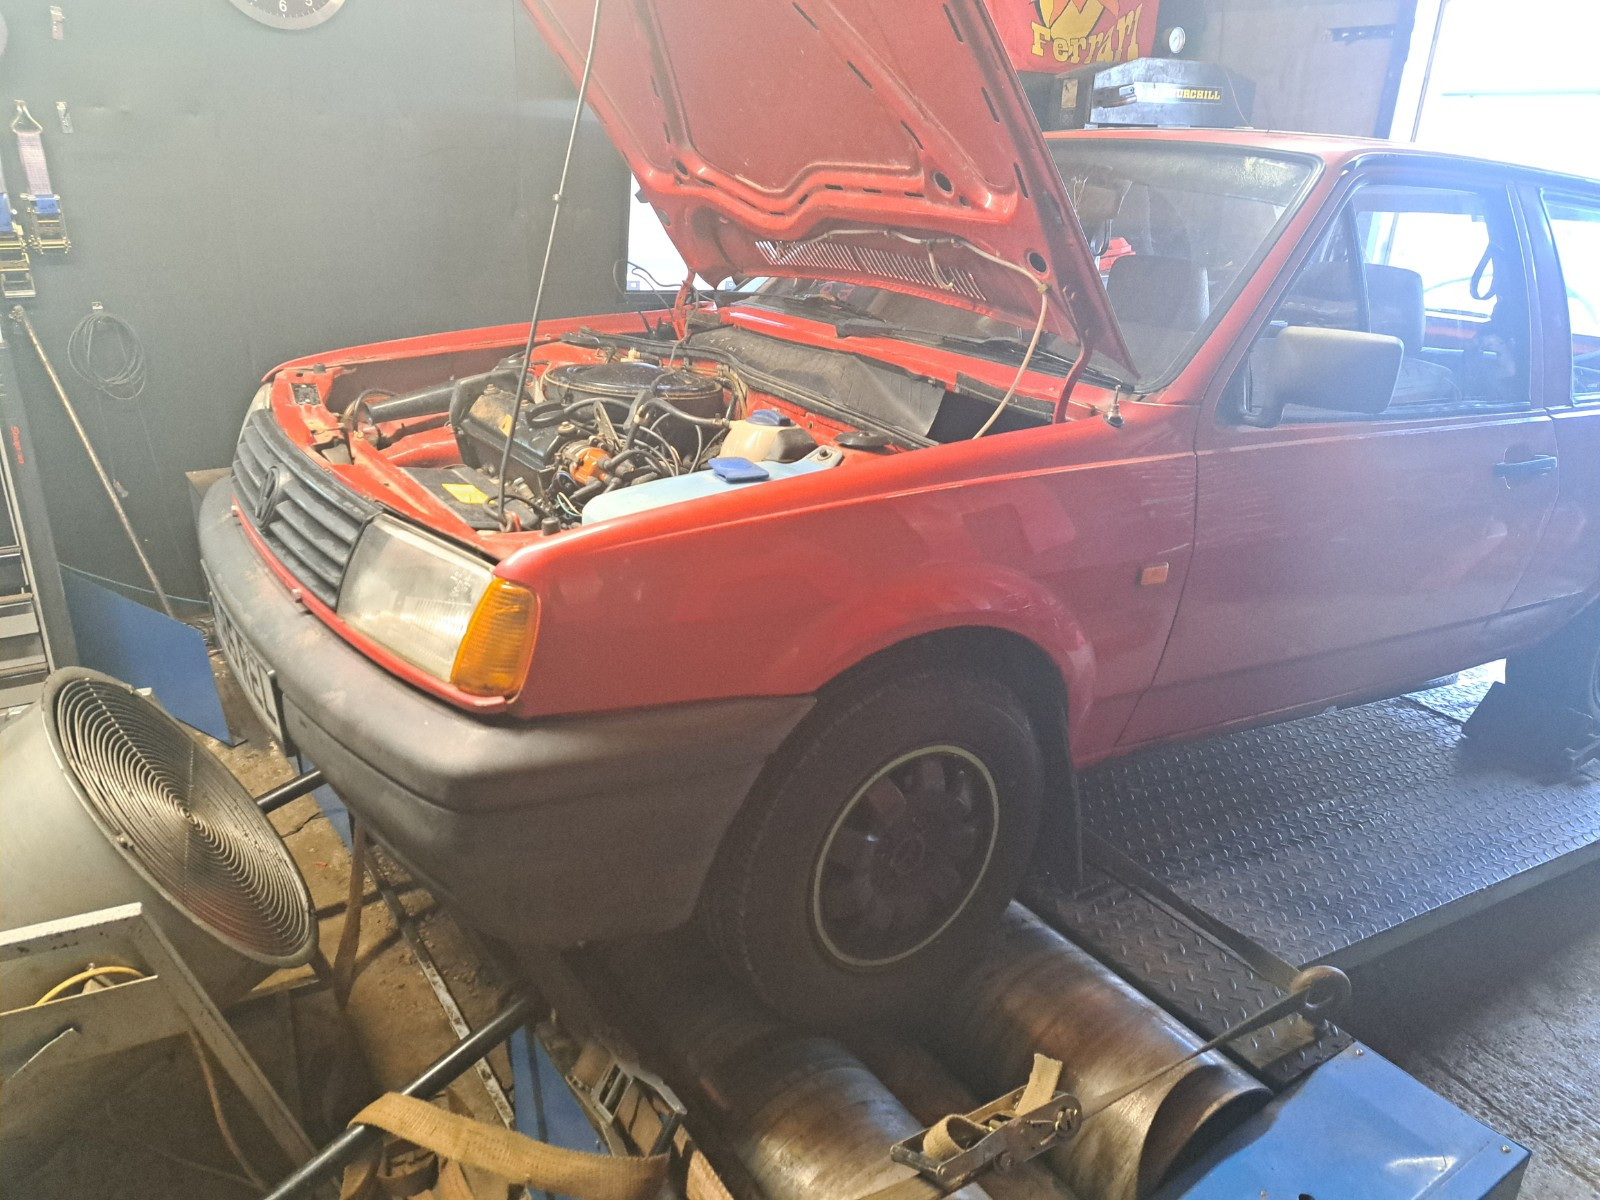
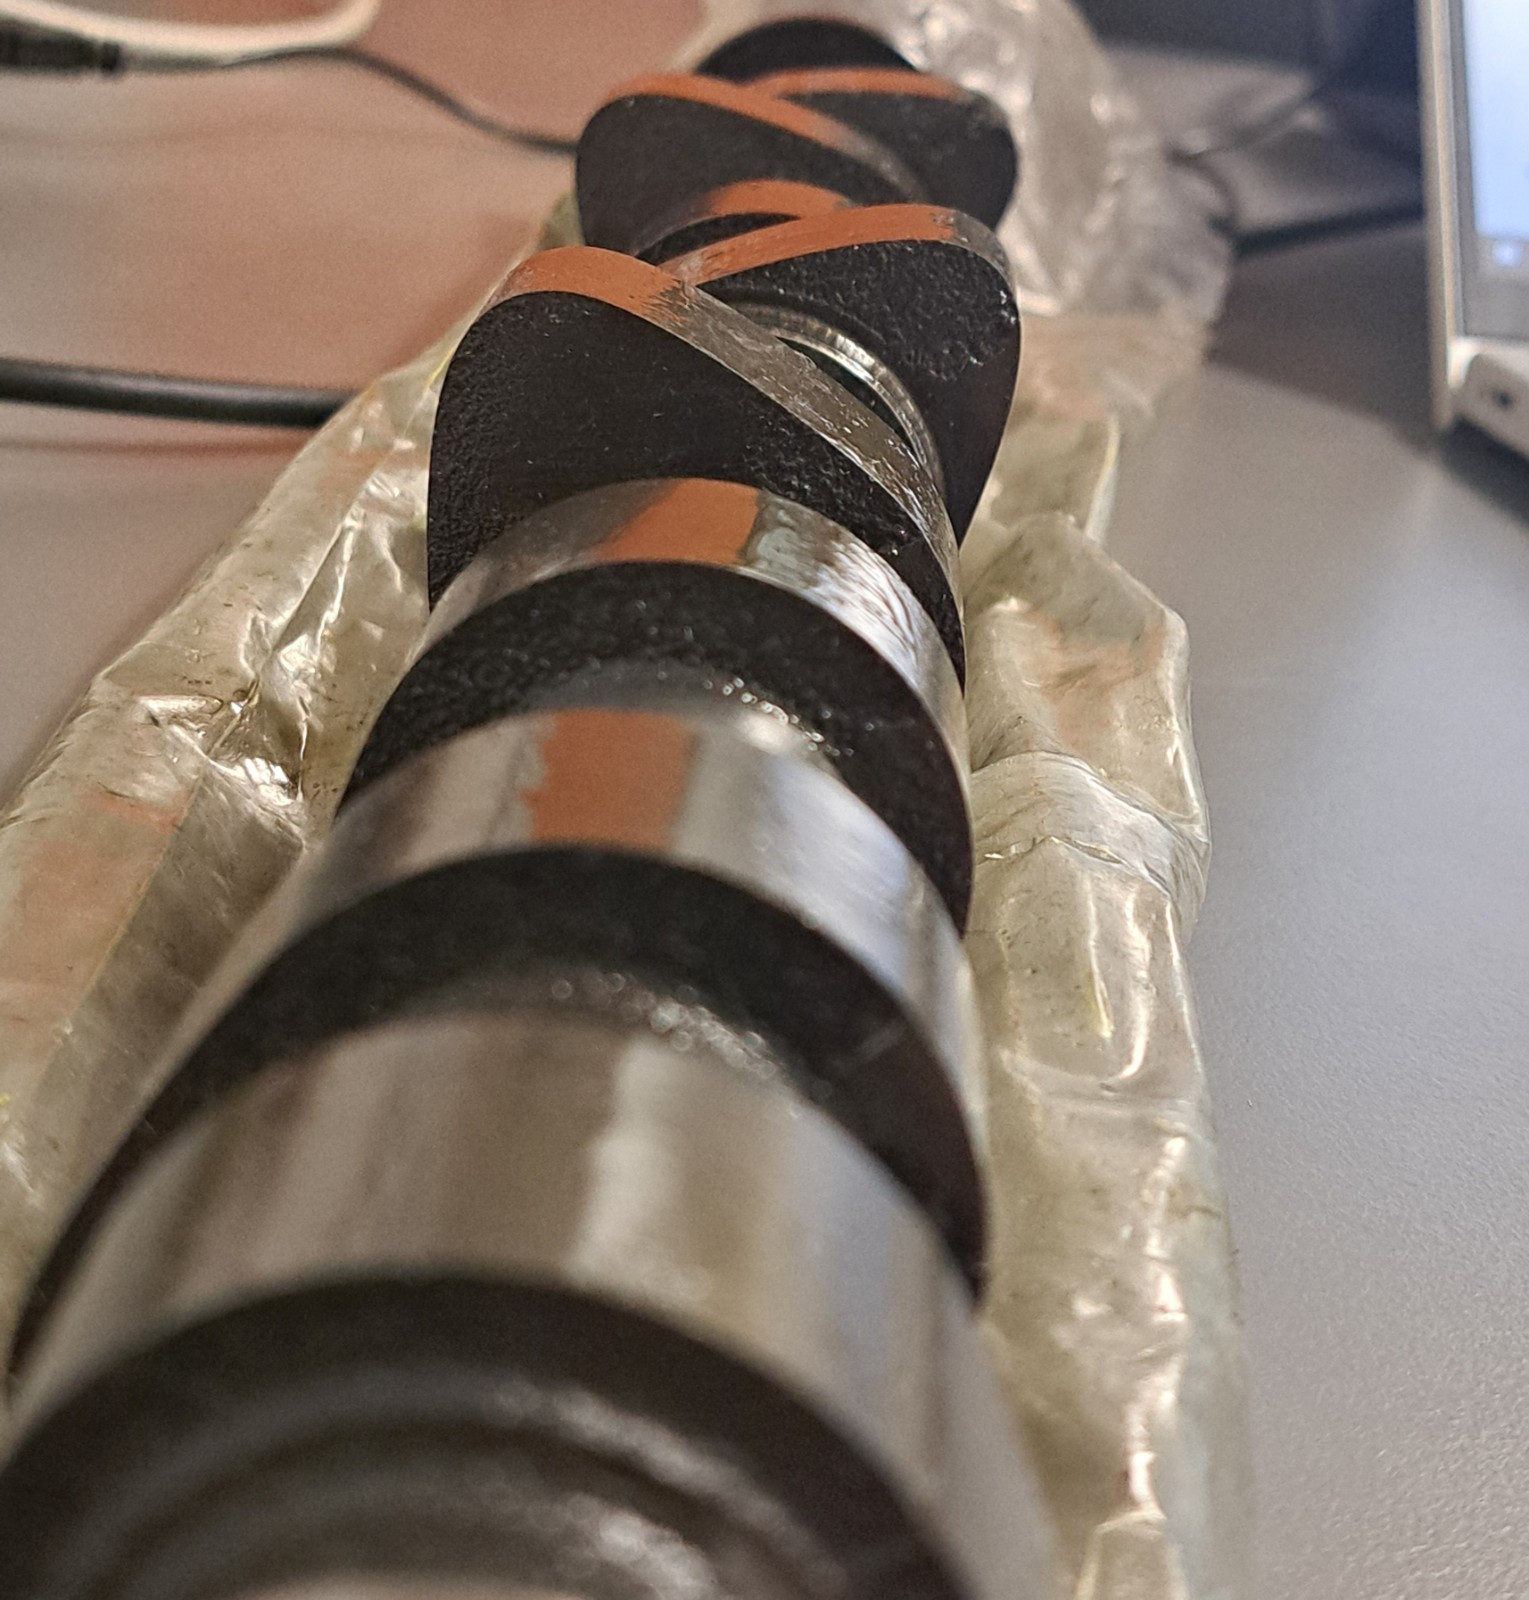
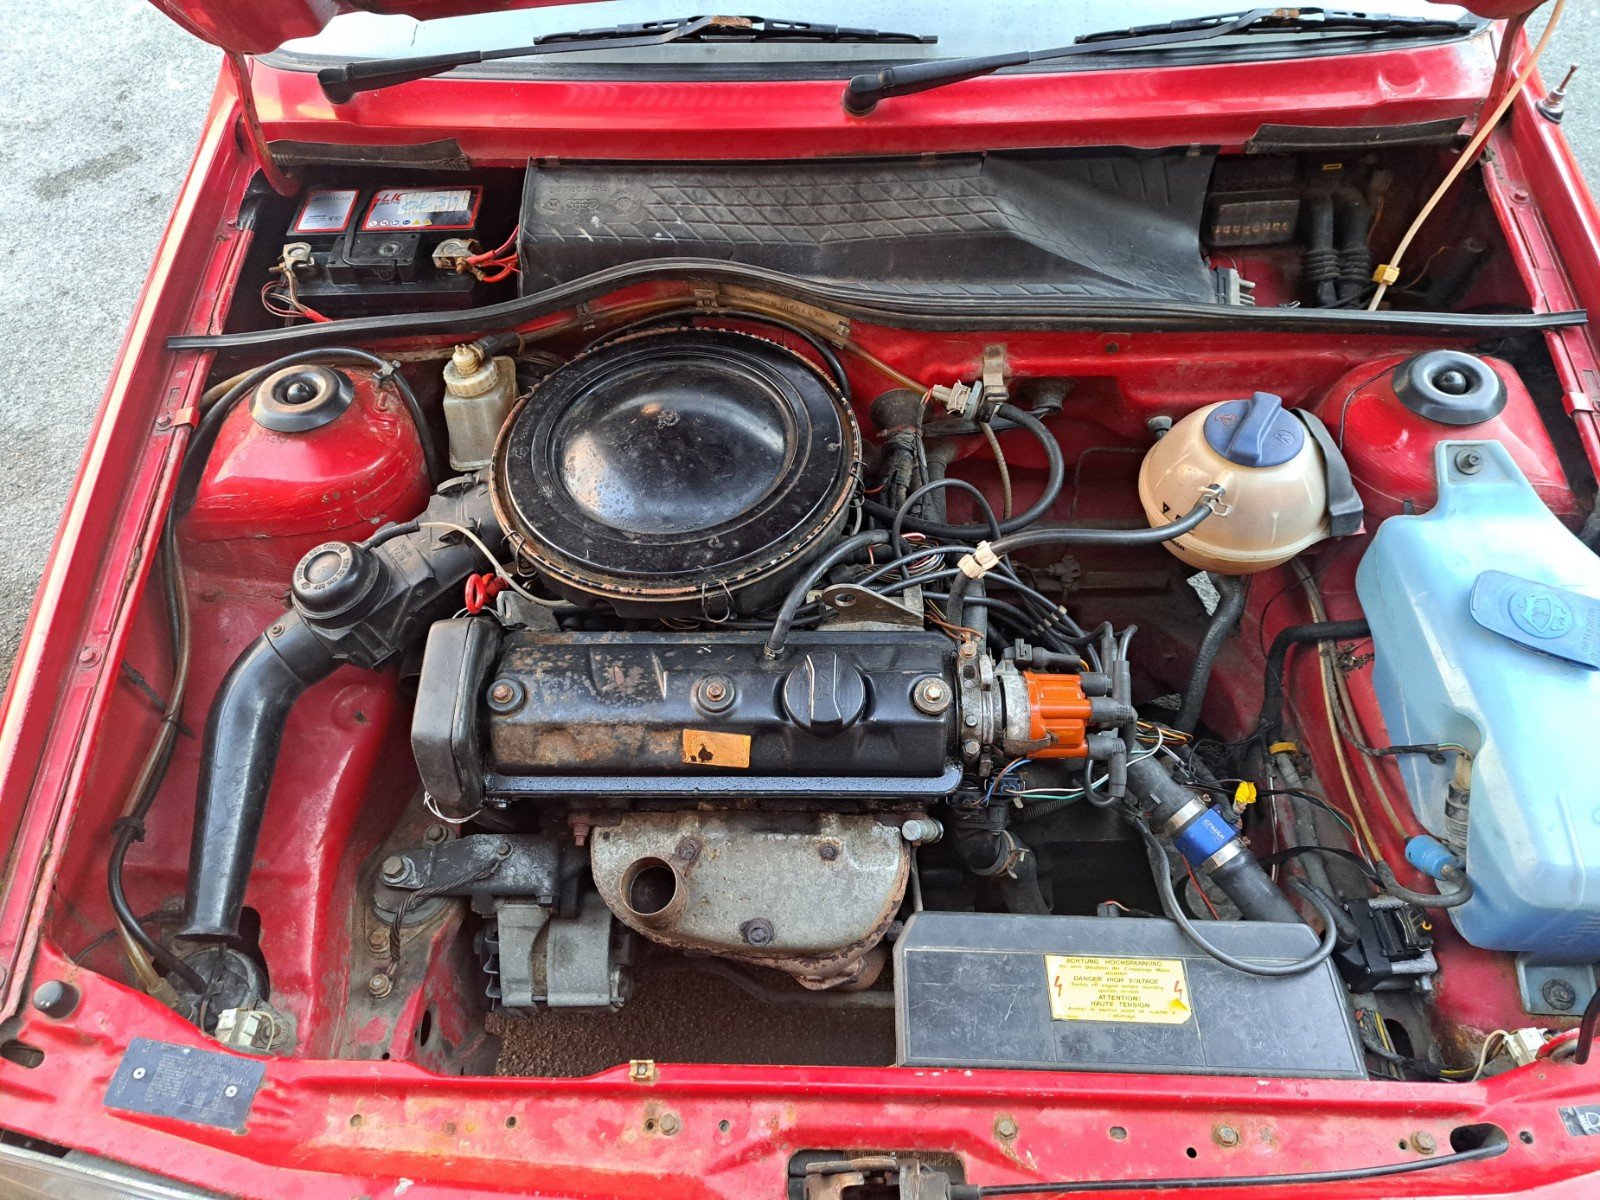
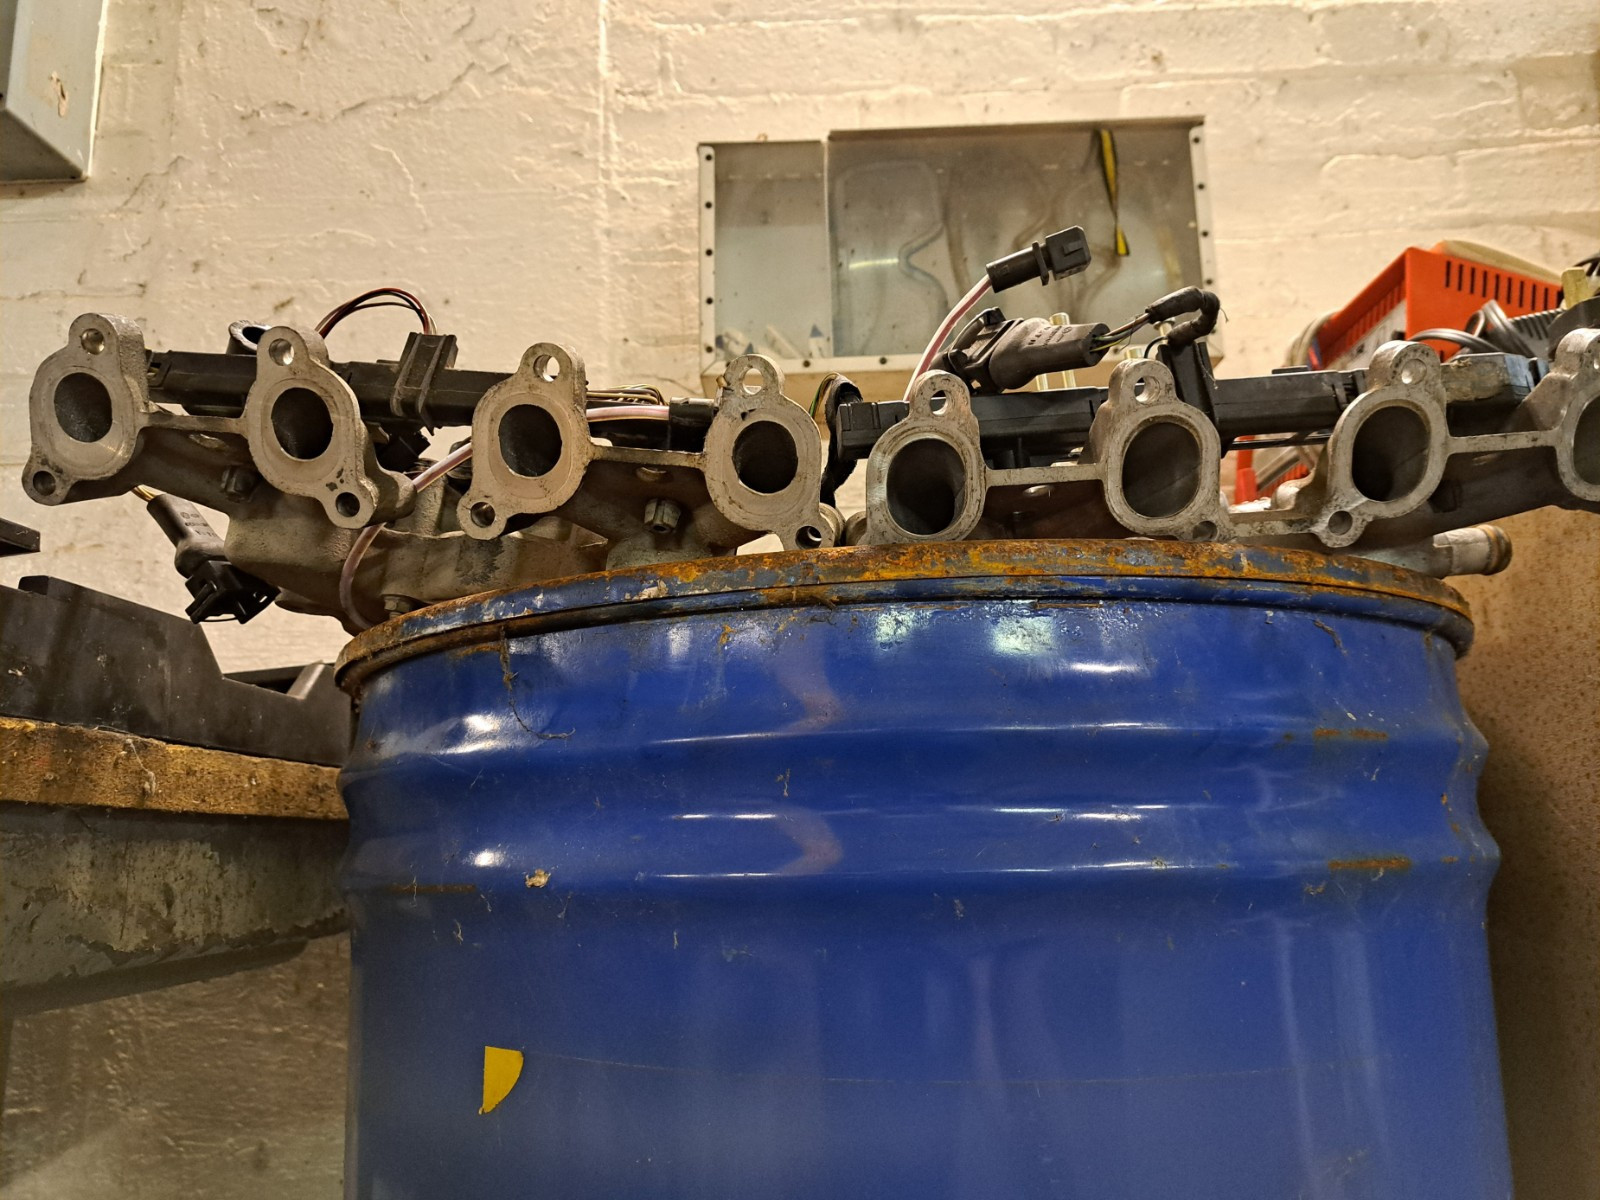
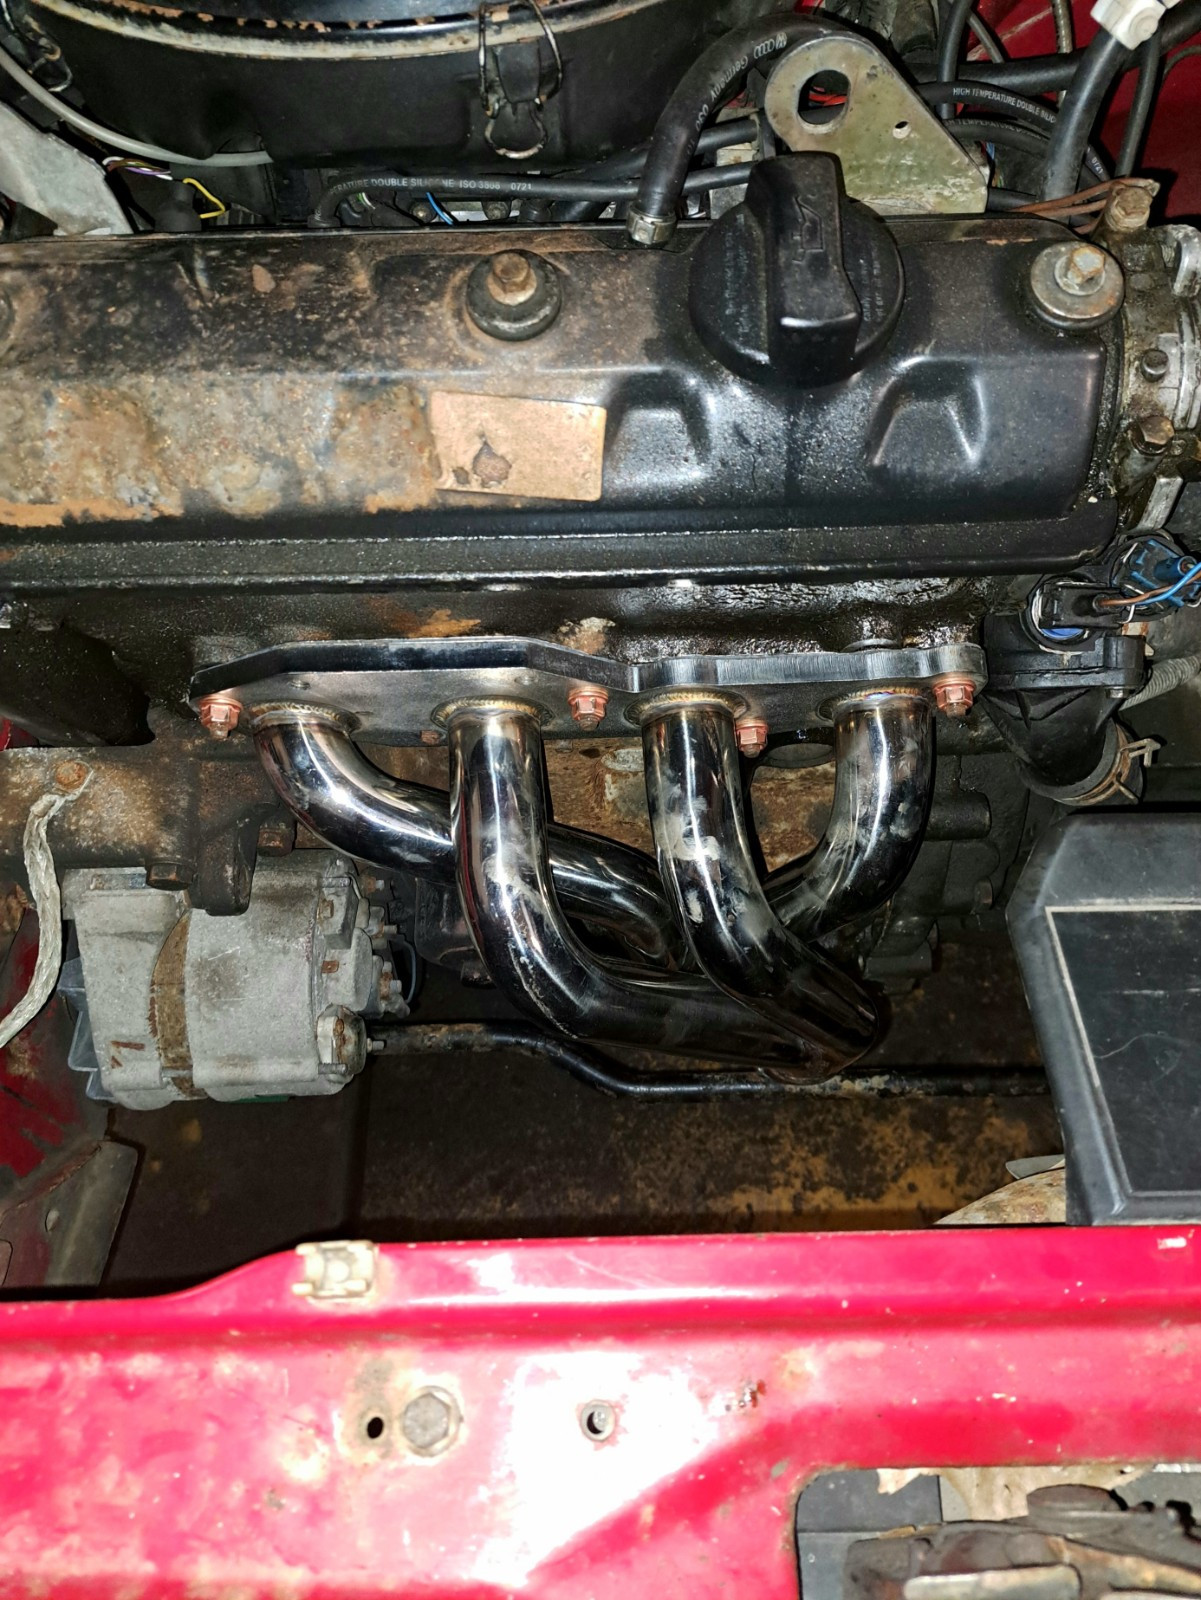
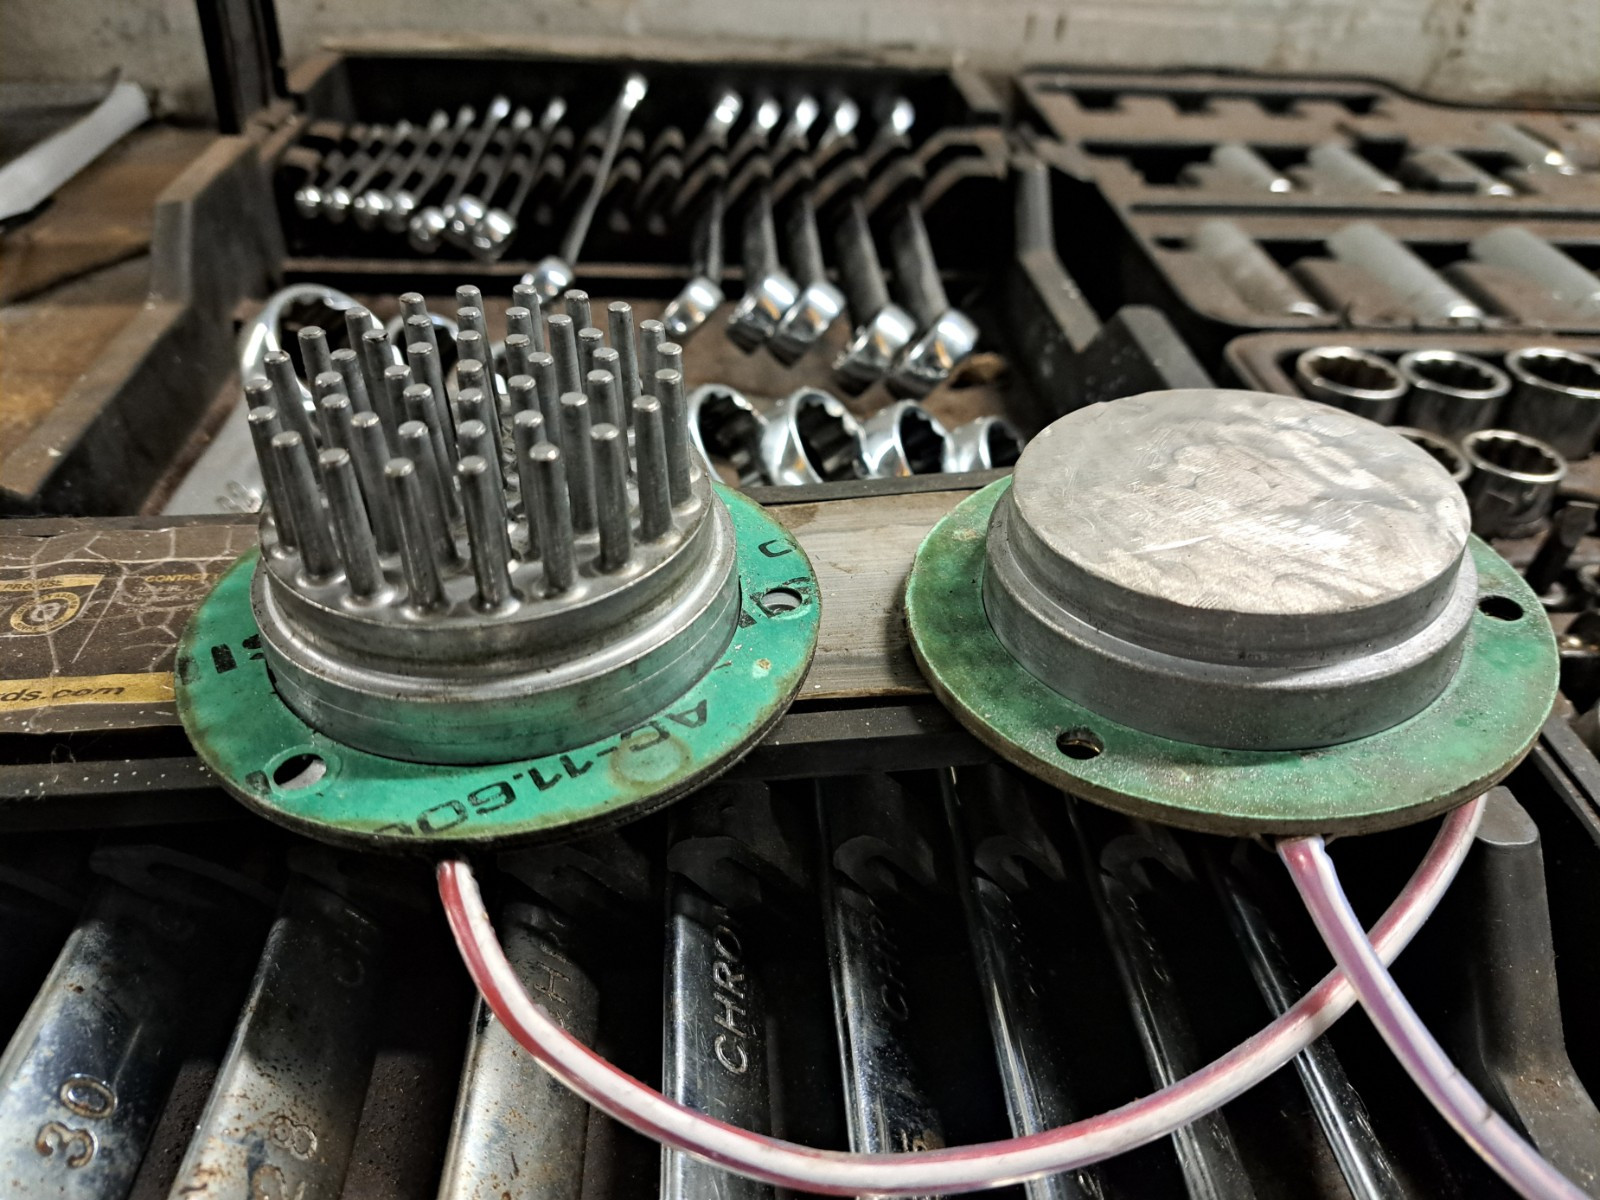
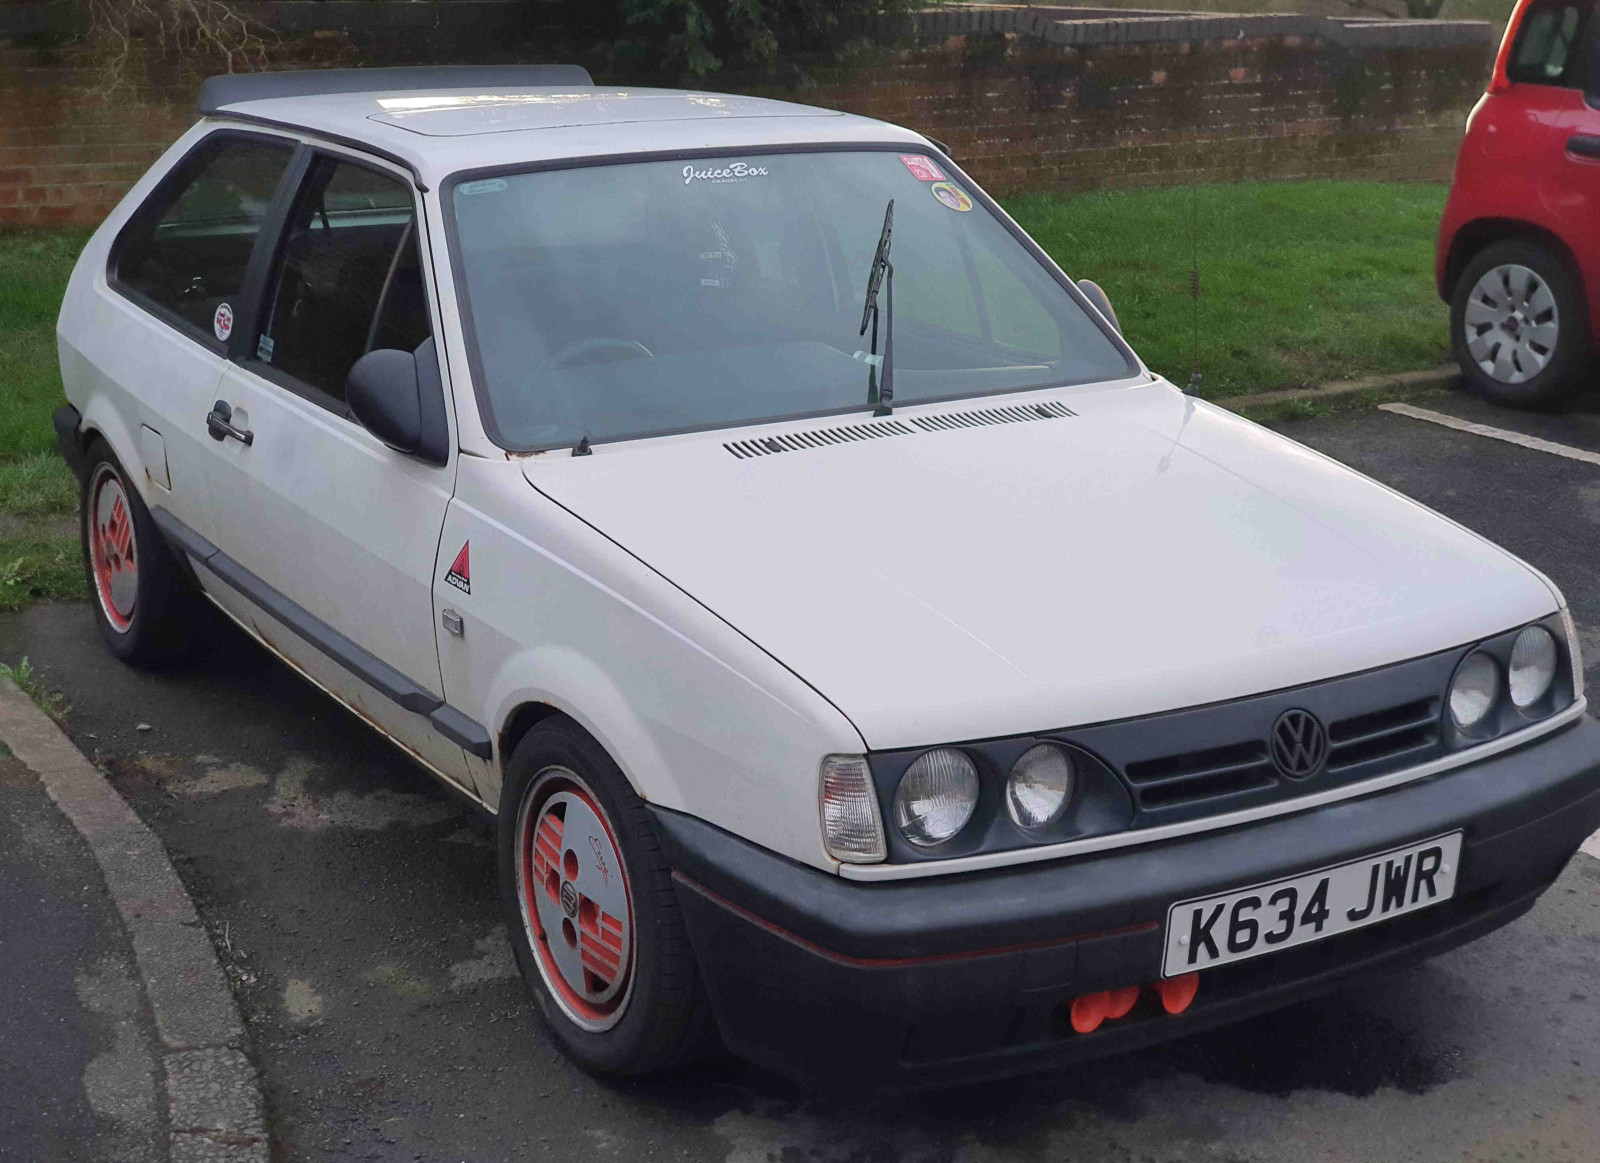
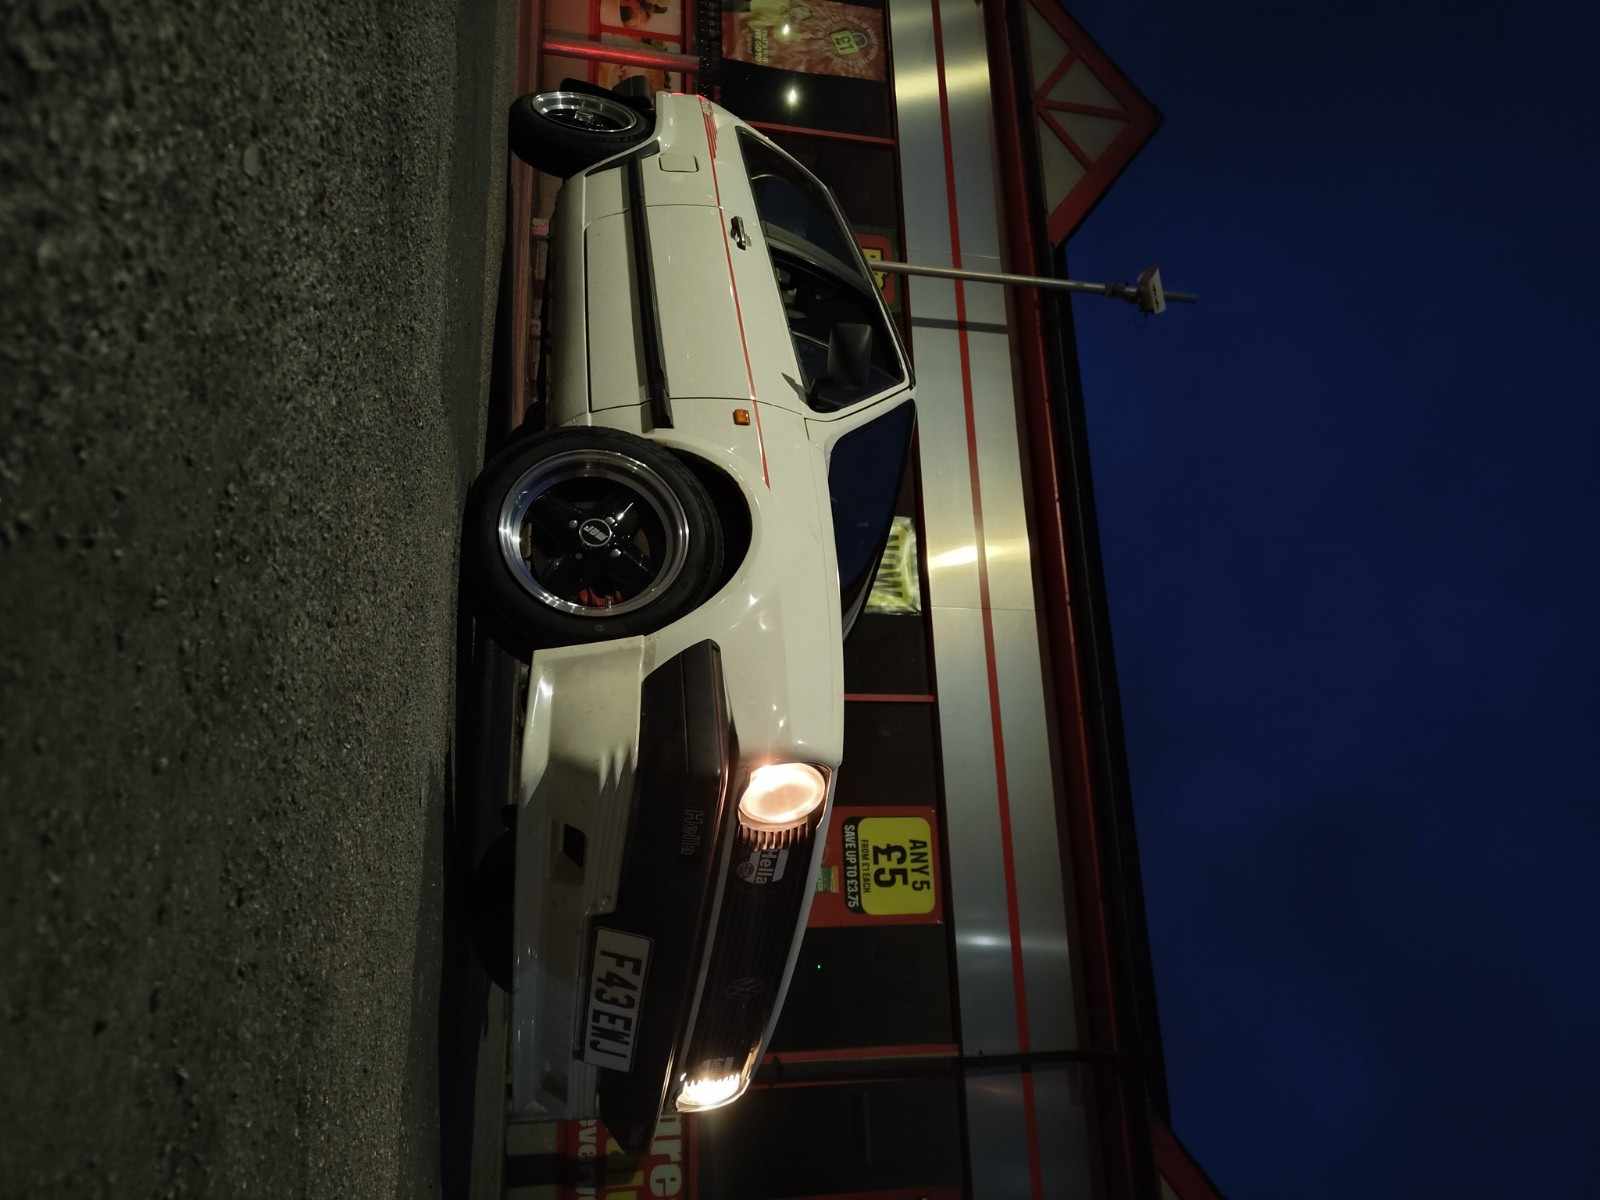
 1 pointSo, As the title suggests, I've set a target and I'm going tonshoot for it. Picked up the Bready in Dec 23. It had an ABD fitted but was running on the 1.0 spi system. Took it to the dyno to see how it was running and surprisingly it was OK. Lambda sensor doing its job and sorting the fuelling. Result of running the 1.0 SPI was great low down torque but out of puff up top. Played with the timing a little and settled on a better ifke abd 61bhp rather than another couple of bhp and a worse idle. Found out the cat was empty which probably helped a bit with the power/torque. Now fitted the correct 1.3 SPI, port matched the inleta little better, a 4-2-1 manifold and have some b2b testing to do on the manifold heater (hedgehog) removal. Aside from this I acquired myself a piper bp300 cam, a spare ABD engine and have begun the strip down to see what's possible. No aftermarket internals available so looking at different options. Most likely current plan is to skim the pistons and deck the block by an equal amount to get the 9.5:1 CR up closer to 11:1. I'll also do some head work and look in to the possibility of larger valves (again nothing off the shelf). I'll add a set of itbs and standalone ecu and hopefully get somewhere near my target. The whole thing would be a lot simpler with the 1.3!!! Some pics below.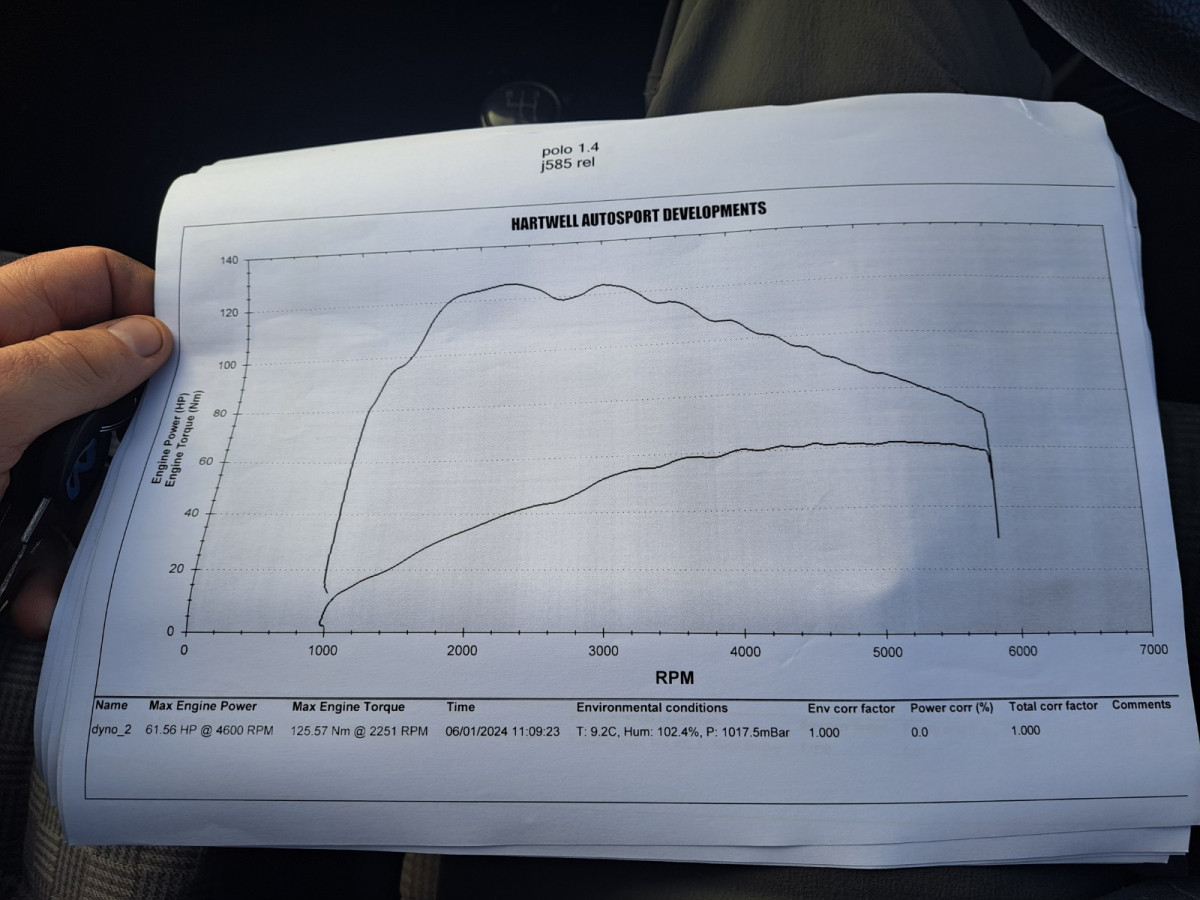
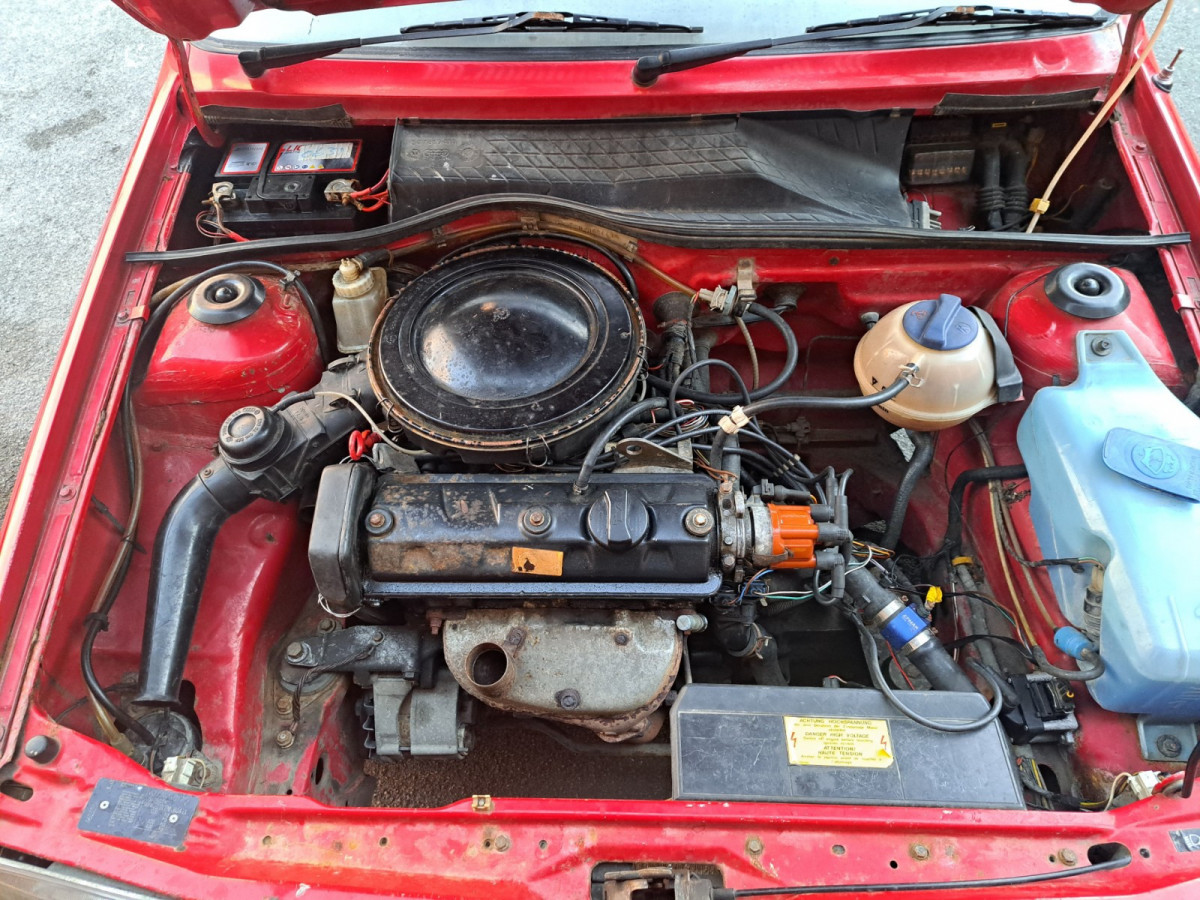
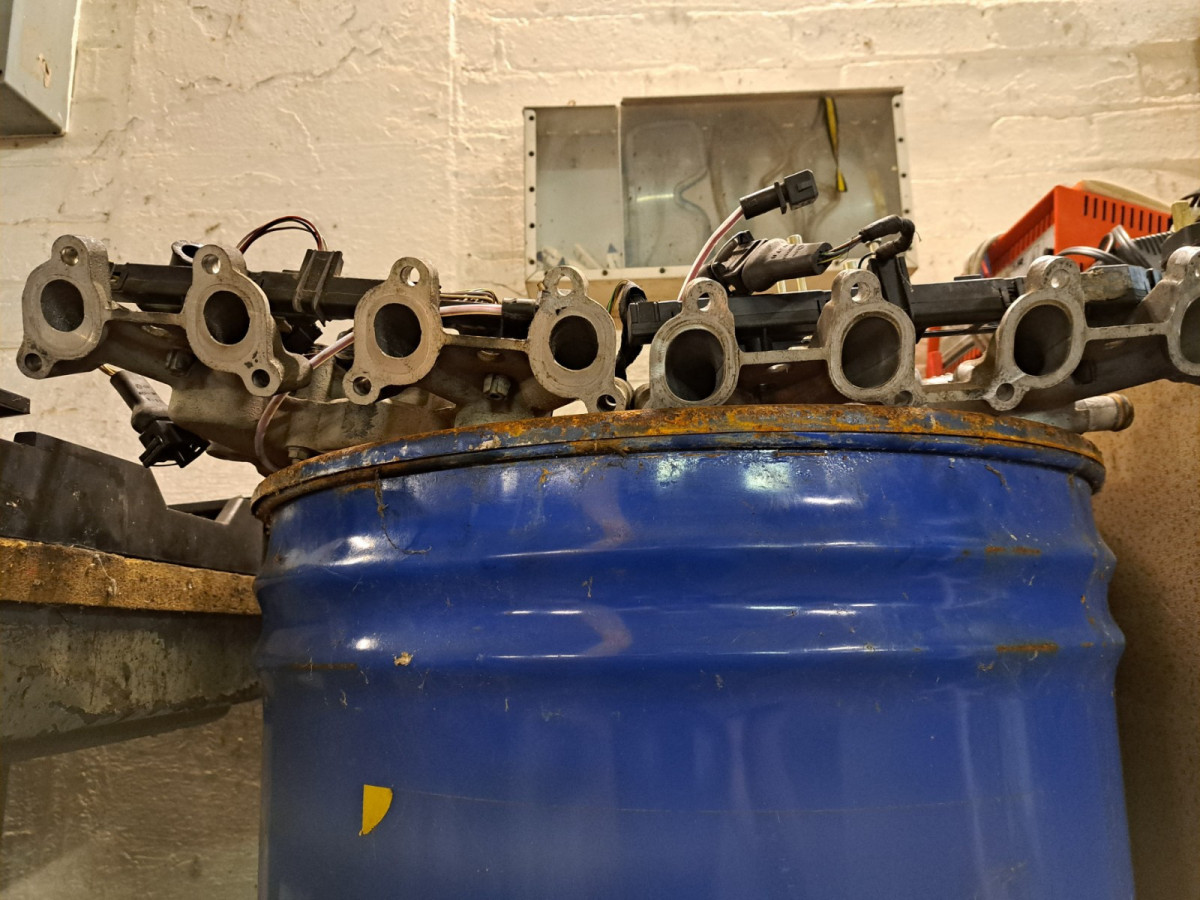
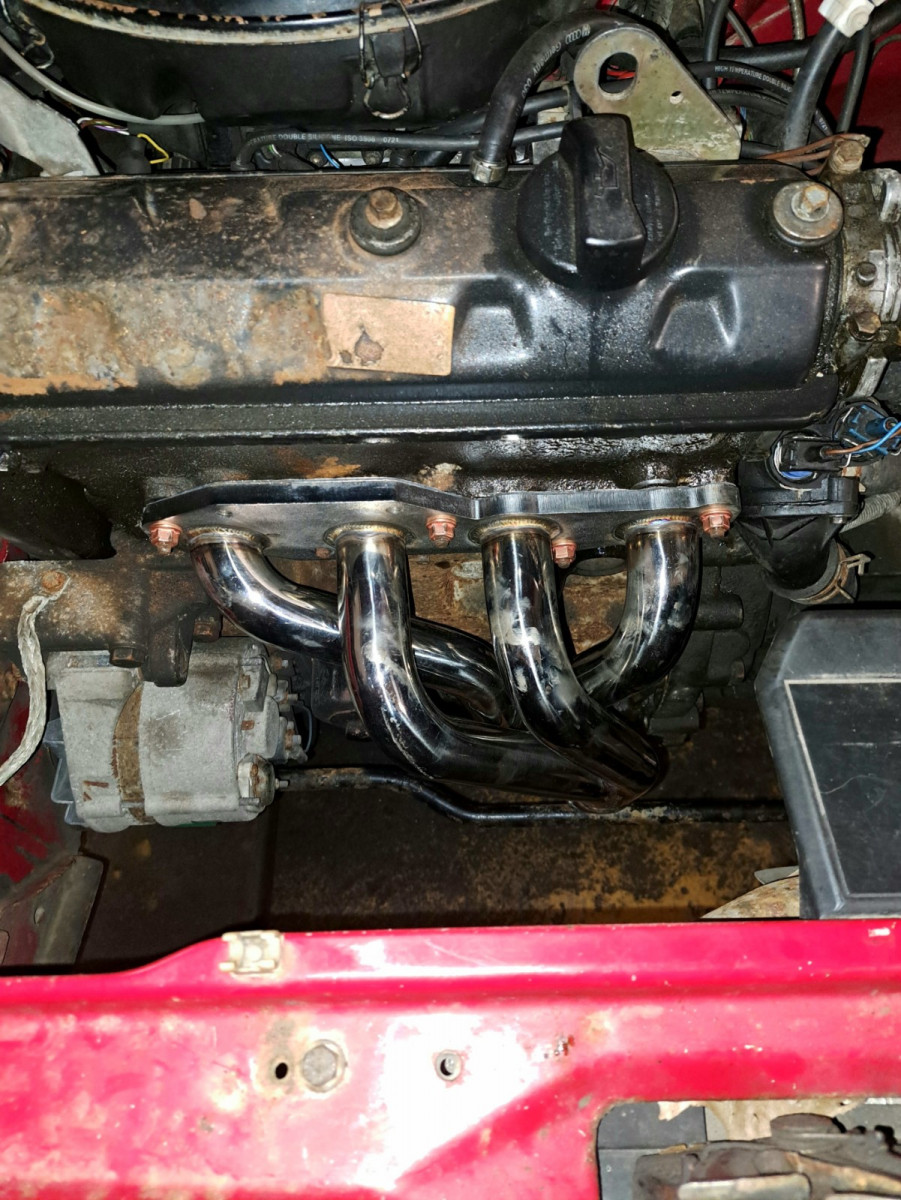
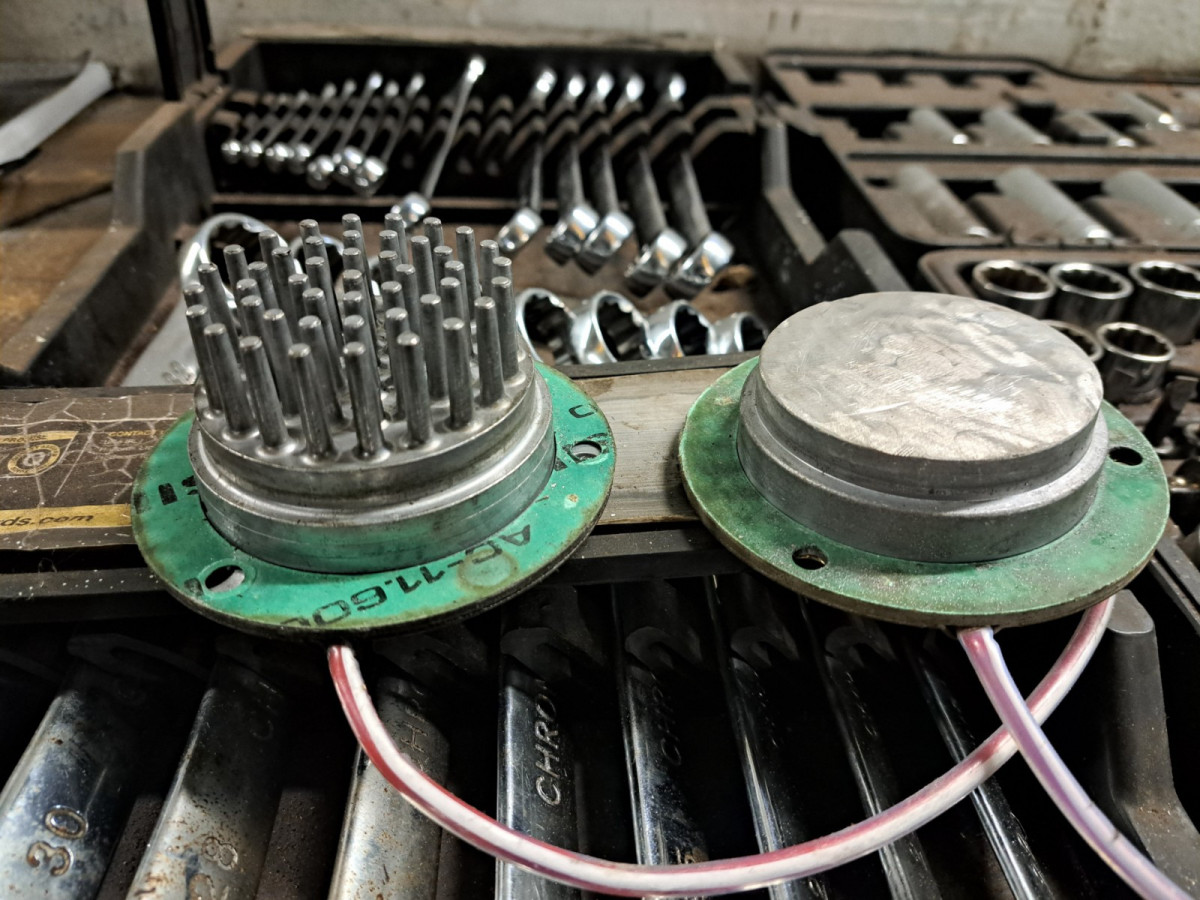 1 point
 -
1 point
-
 Thanks for the further advice dvderlm. Yes, mental and physical health really not good otherwise car would probably still be on the road. So I'm past breaking it myself to be honest. Steel wheels so no value. Hi, mr brightside. I'm in Nottingham. Tyres are 175/65 R13 80T. I've tried to move the car back and forth once a month and keep the tyres well inflated but as it's not been driven on road I have no real guarantees against flat spotting. They look like new, at a glance (need to inspect closer) and have less the 25 miles I guess as was done pre MOT where it overheated on the hottest day of 2024. There are no front fog lights on the car.1 point
 -
 Hi. Thanks, I had looked on eBay but didn’t know where to start or what to trust. And, yes, I’m assuming it is the sharp peaks of the corrugations that have fractured. For £7, it’s the same price as a reel of self-amalgamating tape and a more robust likelihood of a fix, I suspect!1 point
 -
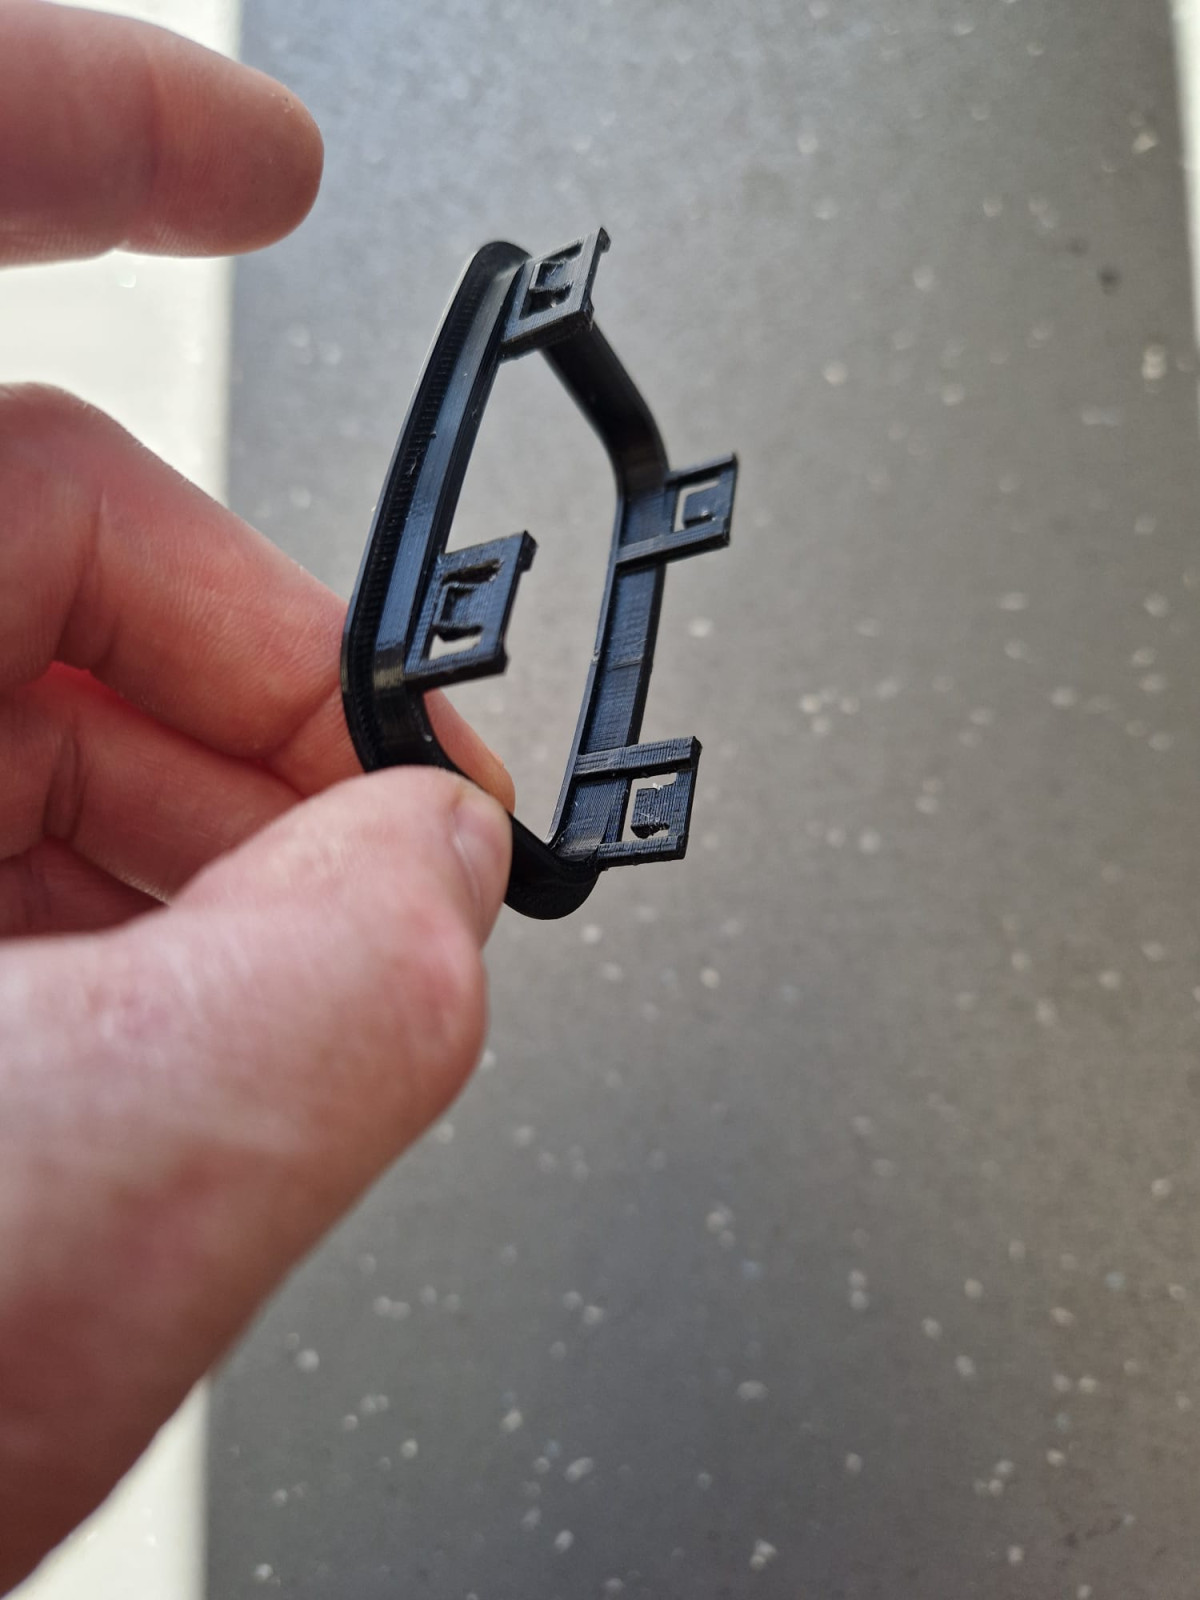
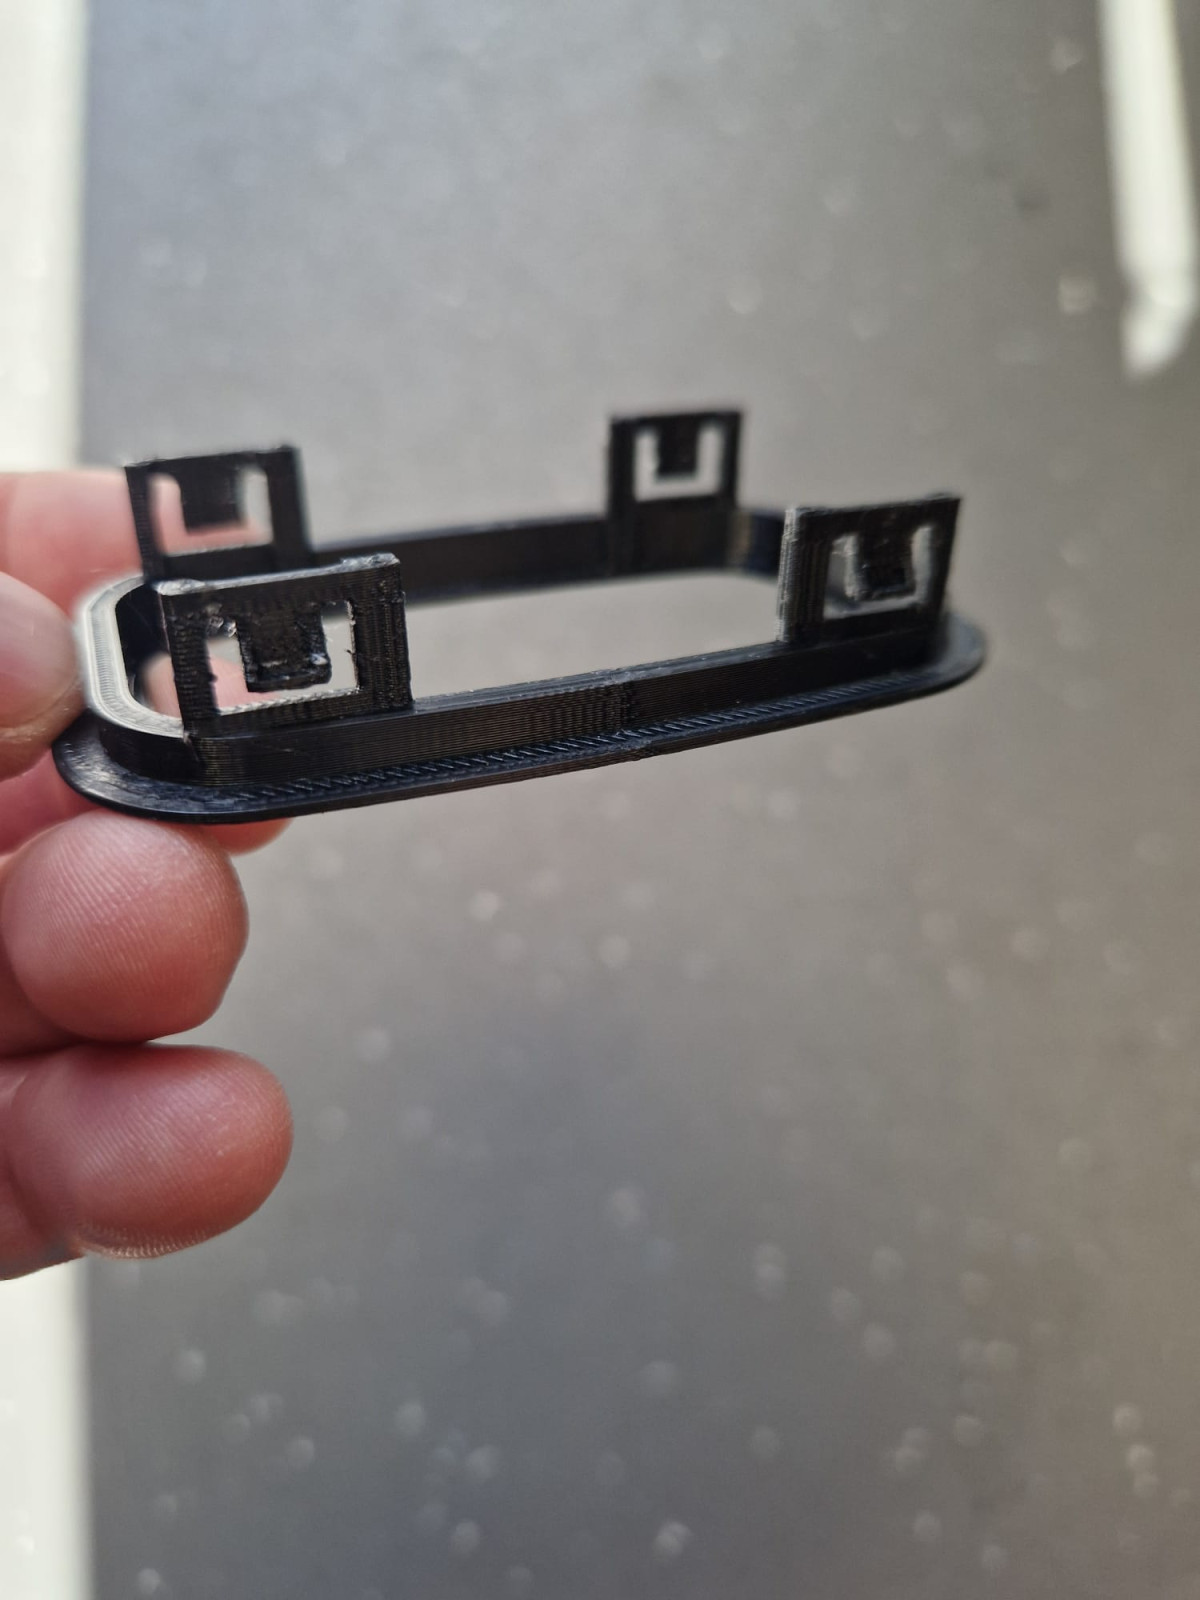
 Hi everyone, I wanted to share an updated version of the connector holder based on Pete’s original model. It took me a few test prints, but I managed to improve the design by slightly enlarging the clips. This makes them more flexible and much less prone to breaking compared to the original part. I printed it in PETG with a 0.16 mm layer height, and it fits well in my VW Polo. Huge thanks to Pete without the original model this wouldn’t have been possible. Hopefully this helps other Polo owners who are dealing with the same issue. Files attached below. Cable_Clip.rar1 point
 -
The drivers seat in a Mk2F GT Coupe is height adjustable. The mechanism could probably be retrofitted to a 6n seat.1 point
-
1 pointIs it the Weber TLA carb? https://www.clubpolo.co.uk/topic/356355-weber-32-tla-carb-vacuum-routing-and-wiring/#findComment-27234891 point
-
 Just wanted to add incase it has not been mentioned on the thread, you can purchase a 1J0 959 753 AG Fob (the two button lock/unlock variant) and it will work with the 6Q0 959 433 E CCM. In order to synchronise/pair the fob to the CCM I had to use the manual teaching method (note I have not yet had the blade cut so used 2 existing keys for this method, you do not need to have a cut blade for the fob in order to manually pair the remote fob): Use an existing working key to turn the ignition to the on position Roll the window down (not sure if this is necessary or more precautionary incase something goes wrong to ensure you can get back into the vehicle) exit the car, close the door With the car still on (key in ignition turned to electrics on) place a second key into the door lock (can use the new fob if the blade has been cut) Twist the key in the door to lock and unlock the car Then press any button on the new fob You should hear an click from the car The fob is now paired and if you remove the key from the ignition and close the door, then press a button on the fob it should work I did also try using VCDS to adapt the AG fob to the car, it did make a click sound for the existing AD fob and the new AG fob, but only the AD (3 button) fob worked, the AG (2 button) fob did not do anything when I pressed to lock/unlock. VCDS also showed only 1 stored remote after doing this procedure, so make sure to use the manual teaching method instead for the AG fob. My assumption is that the VCDS diagnostic key adaptation is very particular about which fob model it will allow to be stored in memory, whereas the manual teaching method is more lenient. (Note that after doing the manual method to successfully pair the AG fob to the car, VCDS still showed only 1 stored remote, however both the AD fob I purchased initially, and the AG fob are both working perfectly to lock and unlock the car) (Incase anyone is wondering, the reason I got the 2 button AG fob after initially purchasing and using the 3 button AD is that I preferred having 2 large lock/unlock buttons as I never used the boot unlock feature)1 point
 -
1 pointit's the same i once had, also the plate number are mixed but they are the same. But non exactly the same car. By the way, it has less km now than the one i had once ! :) :)1 point
-
 1 pointHello! I have polo mk2 with weber 32/34 dmtl conversion And i am wondering what is good jet sizes Currently i have Swapped 57 idle on primary and its perfect idle now👌🏻 On my polo i have 4-2-1 exhaust manifold and custom exhaust, 268 shrick cam, Ram air air filter, and intake manifold is empty and good flow. Also swapped mk3 polo 5 speedgearbox But i am thinking about main jet and secondary sizes. Idle main 57 and Sec is webers orginal cant remember Main jet is 110 and sec 125 Main Air correct 155 and 185 Emulsiontube F22 and sec f30
 1 point
 -
1 point
-
I don't actually have a cigarette lighter. Interior light, Cig lighter & Radio are fuse 11 on mk2. So not sure now, sorry. I thought key needed to be at Acc position for radio but it remembers stations when key removed. So it must have both switched and standby feeds. And interior light does not need key. Will cig lighter work without key?1 point
-
 1 point
 -
 1 pointWell, the good old Haynes manual wasnt quite correct. There werent 4 bolts holding the hot air distributor in. After a chat with a mechanic at the local, formally VW franchise garage, he suggested taking out the pollen filter housing, as it was likely protruding down into the top of the fan housing. I took out the pollen filter housing and reached down into the top of the fan, gave it a push and it all came free. So there were only 3 bolts and the rest was being held in by the pollen filter case protruding into the top of fan housing. Also, the Haynes said that once the hot air distributor was out, you had to start splitting it in half to get the heater matrix out. Whilst looking at the top of the matrix, I noticed a clip in each side. I eased them back and lifted the old matrix out. Cleaned up the inside and hoovered out the old bits of foam, then just slid the new one into place, till the clips locked on. Now just the ball ache of refitting the dash and all the associated stuff.1 point
 -
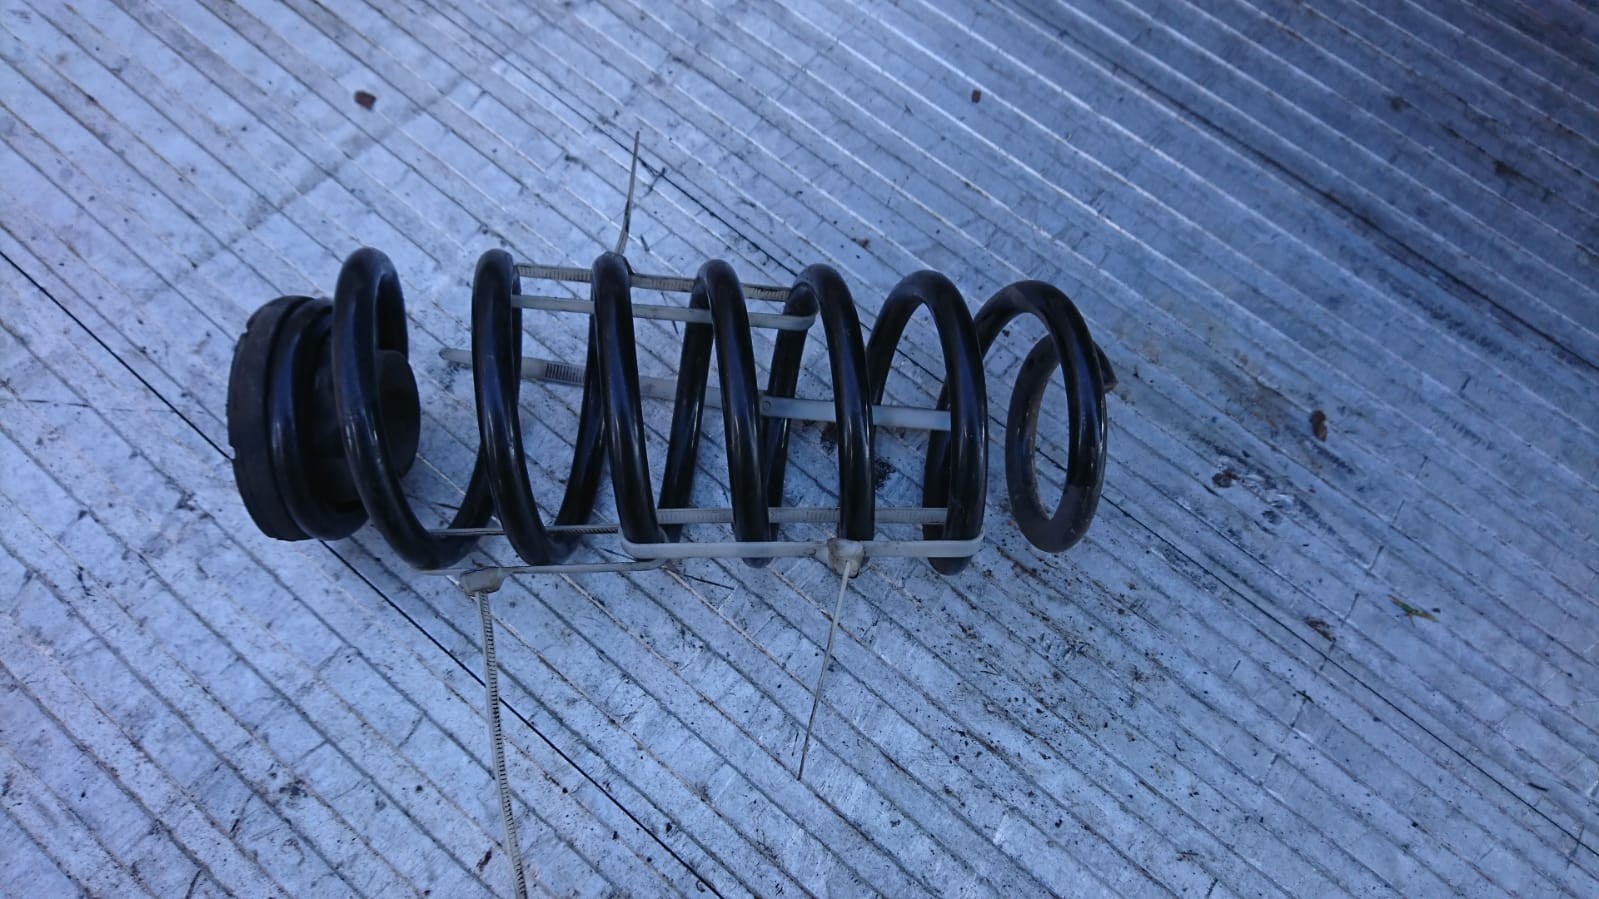
1 pointAfter much trawling through compatibility information and comparing numbers to identify any patterns, and with the valued assistance of the Club GTI forum, i have come to a decision. GT front springs are 871 411 105/951 1xYW, 1xBN paint dots. These are basically unavailable from most brands, though some retailers are listing springs for the GT from manufacturers that i thought to be out of stock. Part nr. 861411105J/952 seems to be the part number that has superseded the above, and checks out fairly consistently in compatibility information, so i think these fit a GT. Part nr. 861411105J has sketchy and inconsistent fitment details for the GT, but patterns begun to emerge in cross referenced part compatibility information, and i think these will go on a GT. I've placed an order on Autodoc for a pair of 105J/952 by Lesjofors, and a pair of 105J by Bilstein (these are the B3), so i can place them side by side and see if there is any difference at all. I can also measure the coil diameters with the verniers. None of the above part numbers are available from VW classic parts. It's been quite a challenge to establish exactly what it is that retailers are offering, and i suspect that the buyers at various retailers have little idea exactly what OEM part numbers correspond correctly to their product.1 point
-
1 pointAn LED can outlast a car. The Xenon bulbs in a 23 year old Octavia Mk1 L&K are also still working. I’m considering getting some LED units to replace the Xenon’s in my A6 from this company HIDS DIRECT StoreD-Lumina D1S D2S D3S D4S D5S D8S LED Bulbs, 20000LM 120W...D-LUMINA D1S D2S D3S D4S D5S D8S LED headlight bulbs are made of high-quality extremely bright LED, 6500K Xenon White, 20000 Lumens high brightness per bulb, +500% brighter than standard xenon bulbs.1 point
-
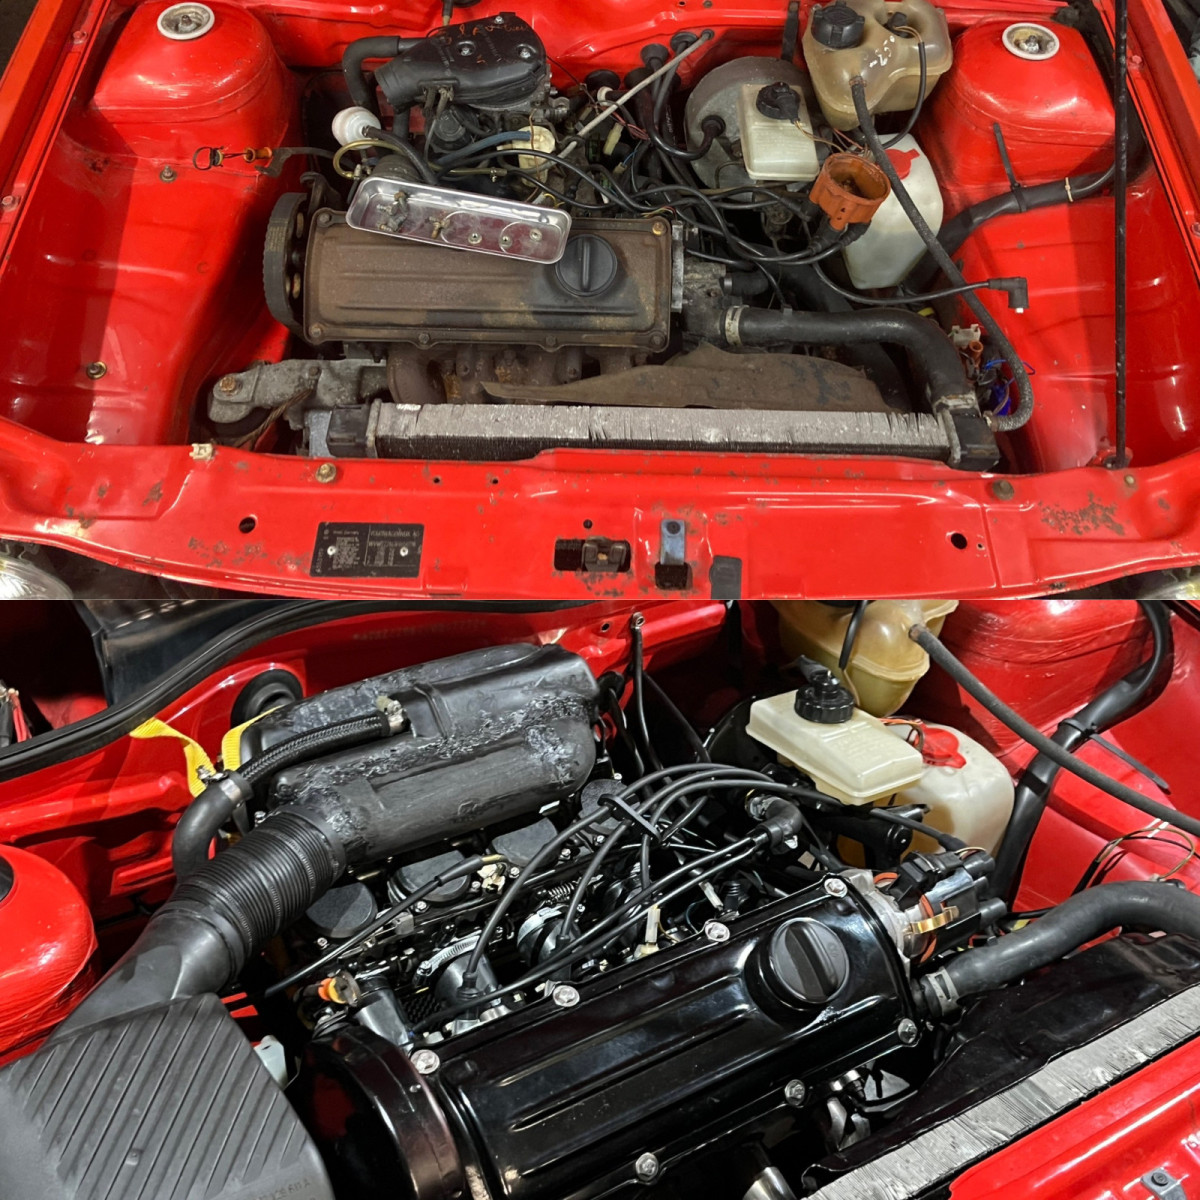
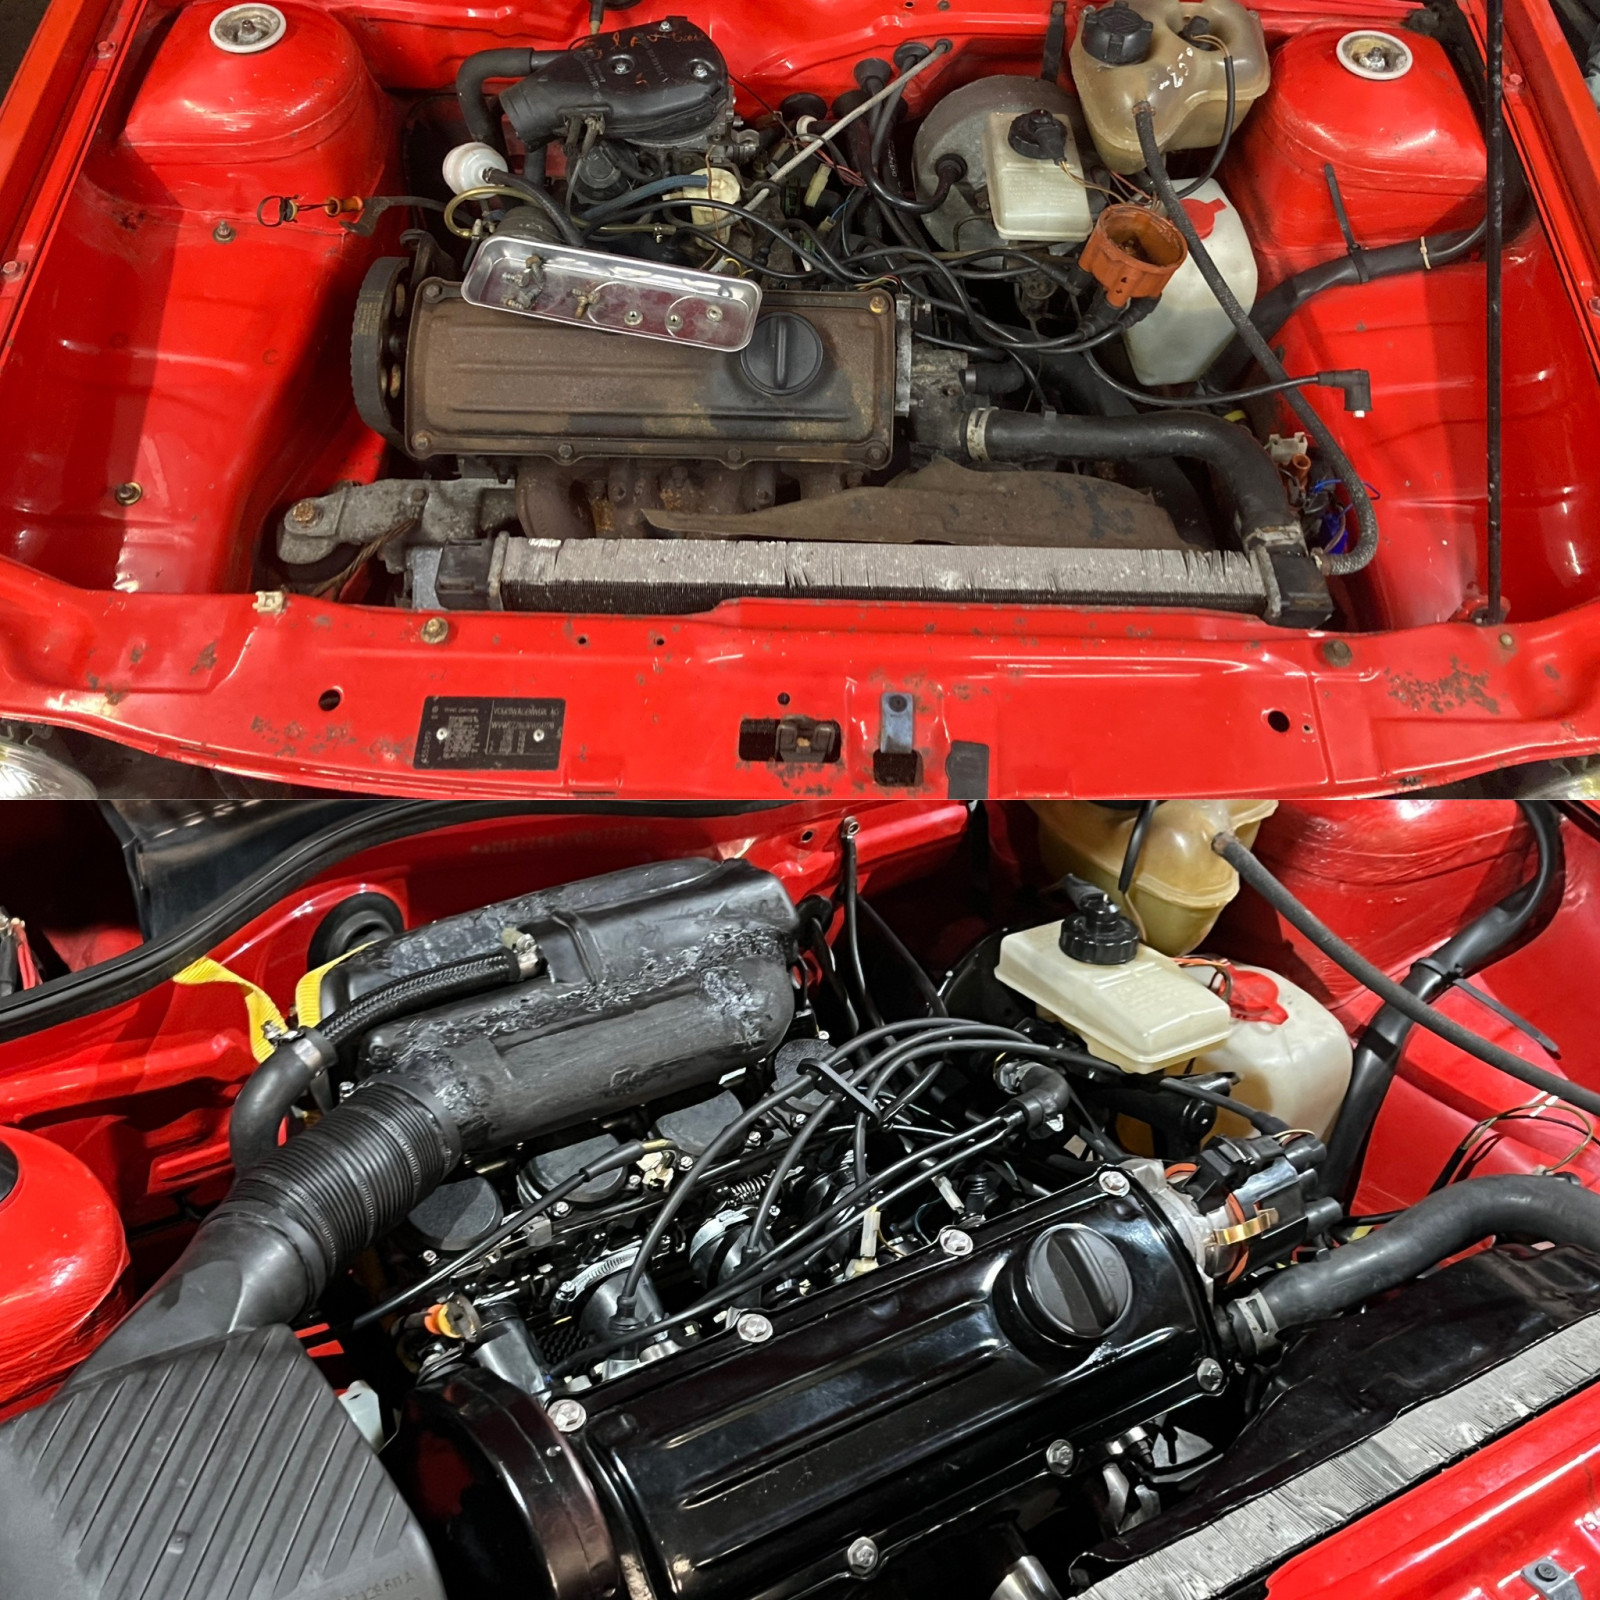
 1 pointNo worries mate. I think you won’t believe what really happened. As I had already tried everything and made sure EVERY (when I say every, it’s really every thanks to the VW manual that covers it and the Dignition) part of the 2e3, I wondered if the carb wasn’t just dirty as heck, and boy was it full of junk. The first time I dropped my fuel tank, there was still 1992 gas in it. Thing is fuel rots, and when mixed with rust makes a sort of goo that gets stuck everywhere no matter what you do. I deep cleaned it at the time but I think the fuel lines were full of junk too. In the end I replaced everything with new lines and a 42L instead of a 36L tank. Right now the car has been running for almost a year flawlessly, I’m running bike carbs with the bike airbox connected to the stock one in which I kept a k&n for road use. I’m redesigning the airbox to print one in ABS that’ll fit the firewall a bit better. Took it to the track, handled it like a champ ! I drive it every morning to work, the manual choke is a pain in the a** to operate but it almost never let me down, and it rips ! Will need to dyno it sometime, i’m thinking 90hp with the GK cam. Had to replace the head gasket in May of this year tho, it decided to unite cylinders 2 & 3… Rn the SP is my daily, currently working on my 79 mk1f gls which is great too. When this one will be ready i’ll focus on the brand new engine meant for the SP with the schrick cam mentioned in the earlier posts. A quick pic of the engine bay as it sits compared to when I got it
 1 point
 -
1 pointhttps://ebay.us/m/XvgN9E I’ve used these in my Ibiza, Octavia, Touareg and now my A61 point
-
1 pointYou'll probably get away with slacking the nut off and retightening it. The ones on my saloon looked like they hadn't even been tightened when they were fitted when I checked them (after about 6 months of owning it). I retightened them outside the mot place and 10k later, they're still fjne1 point
-
1 pointI've got to admit, I've quite often changed the outers but not the inners on the older polos. It always seemed that the outer would wear out long before the inner ever did, so I used to do the outer, see if that fixed the issue, and if not, then do the inner.1 point
-
1 point
-
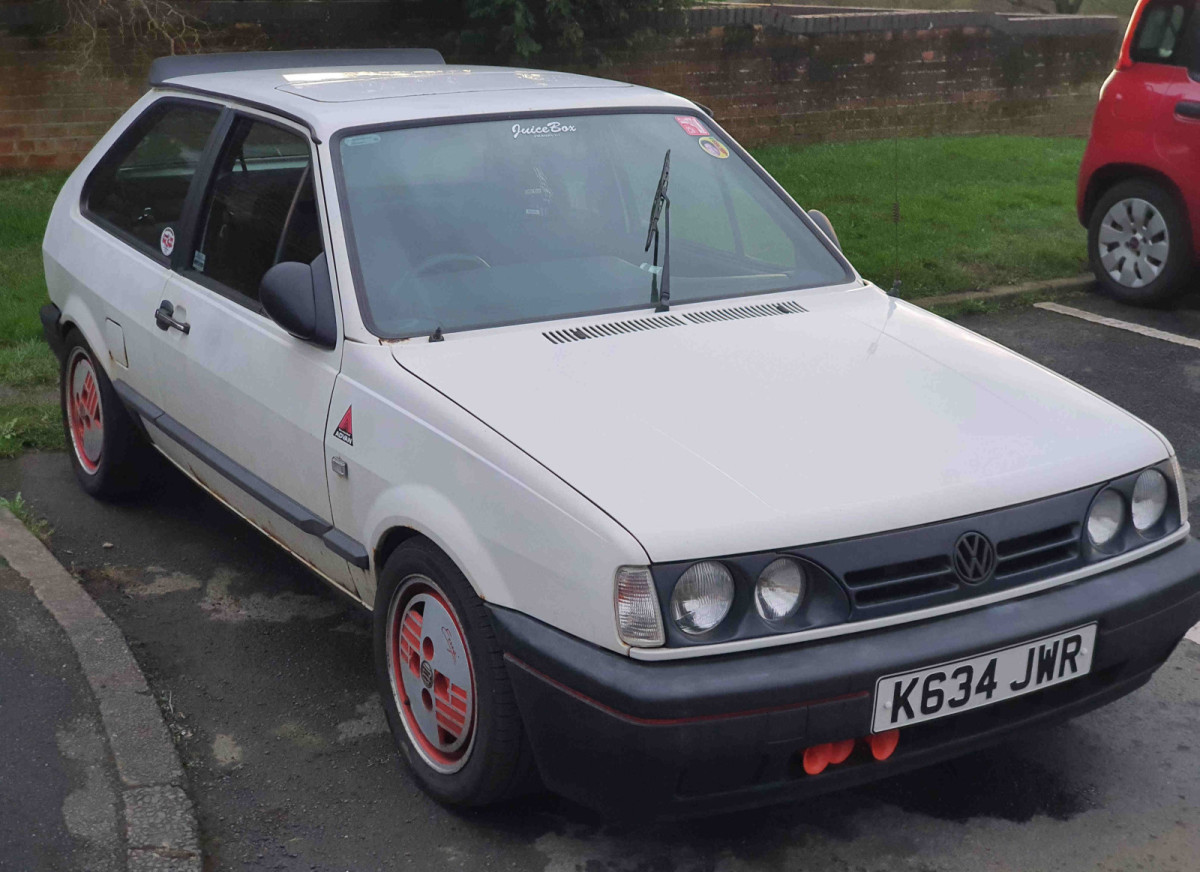
 I do! Life got in the way of updating this thread lol.... I'll have to get this thread up to date someday soon when the Polo goes back on the road! Here's a pic of what the front end looked like before it went off the road last summer.
 1 point
 -
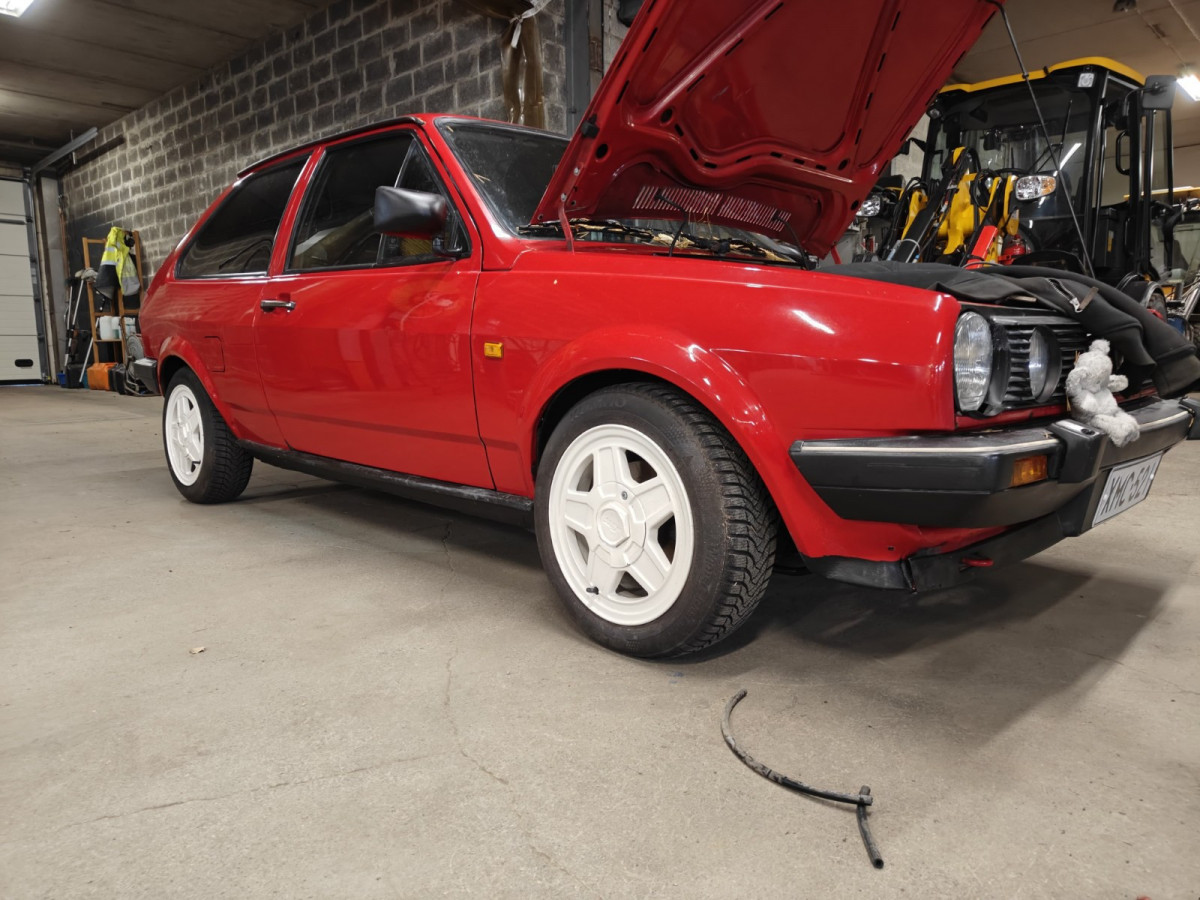
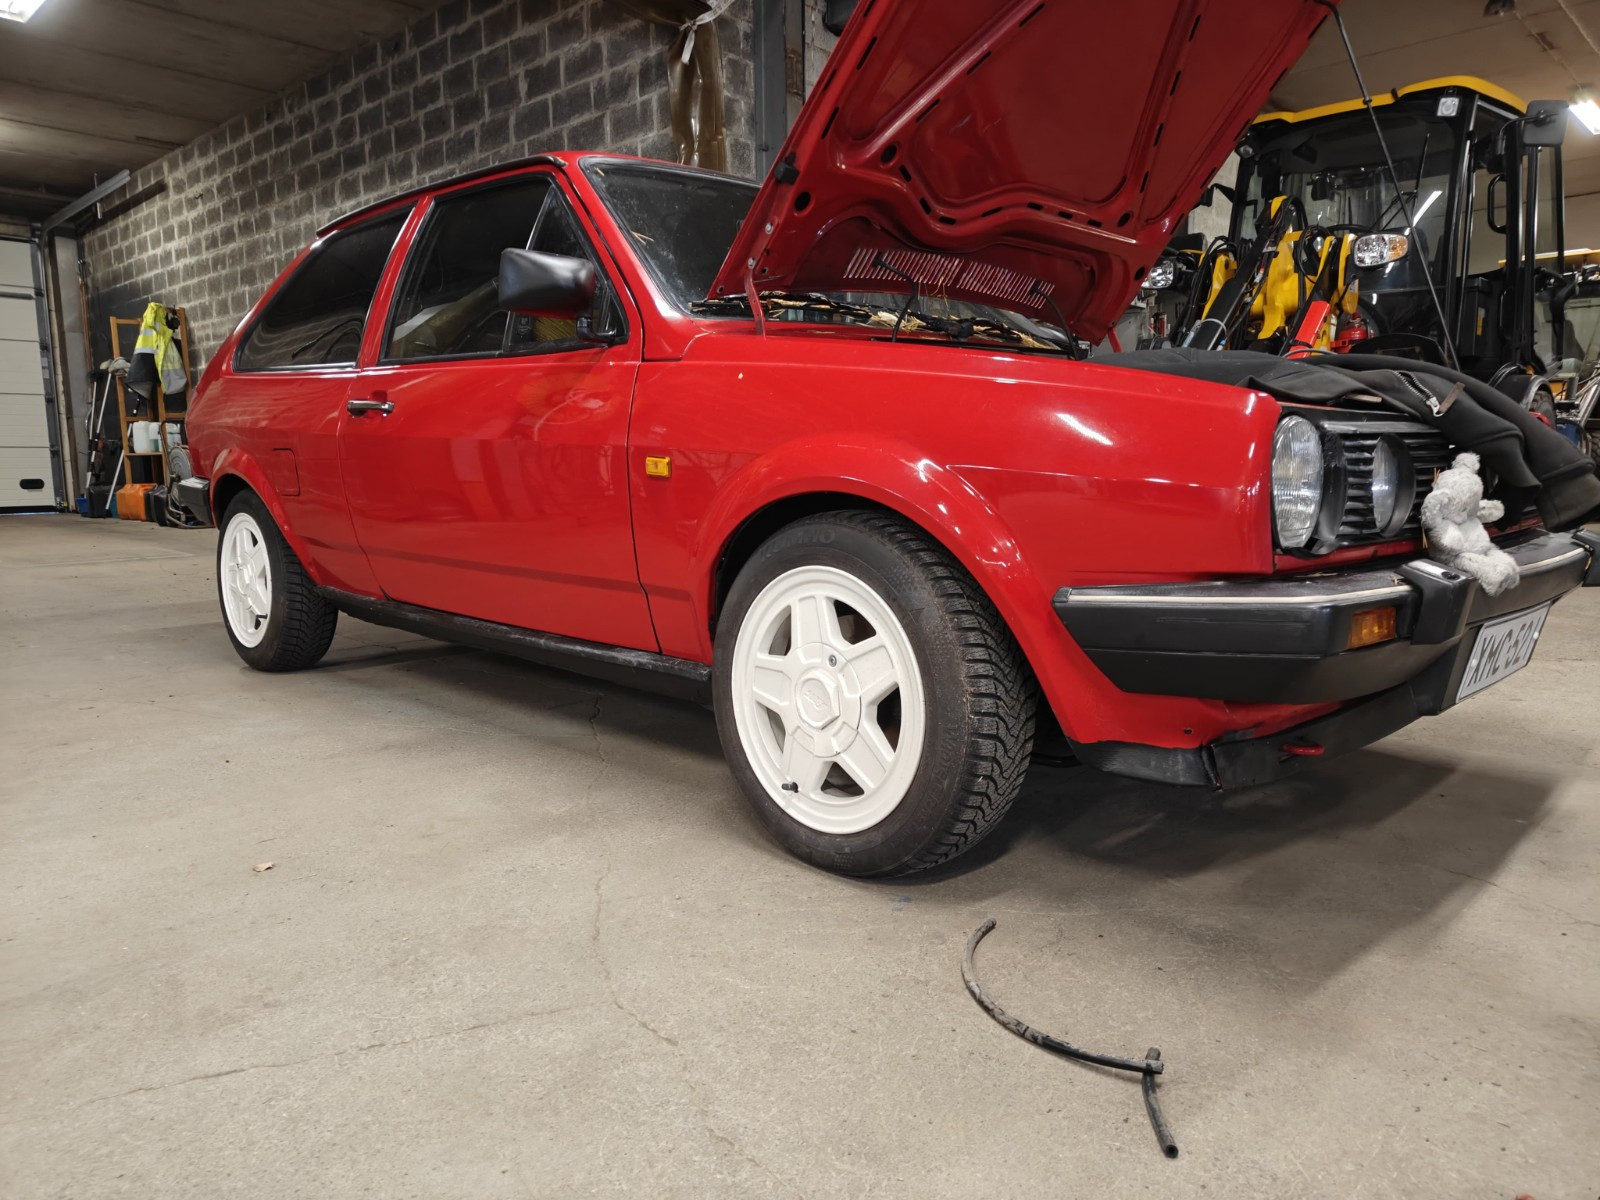
 Hey everyone, just joined the group and wanted to share my Mk2 Polo Saloon project. This is my 1982 VW Polo Classic C in Gambia Red. It’s a pretty rare one - only a handful of this specific C trim level are still registered in the UK, with just 6 currently on the road according to the latest figures. It’s still running the original 1.1L engine and 4-speed gearbox, but the bay’s been fully cleaned and refreshed with loads of new OEM parts. Only non-original bit under the bonnet is a GPI stainless radiator, adapted to work with the original fan and housing so it still keeps that factory look. The car sits on TA Technix coilovers, 15” Rota BM8s with stretched Nankangs and 10mm MTEC spacers, plus a custom stainless exhaust and a Mk1 Golf GTI duckbill splitter up front. Interior-wise, it’s mostly original with some thoughtful upgrades: Fully sound-deadened using 3mm sound deadening sheets (no added insulation) Hidden Pioneer 4” oval speaker under a shaved OEM grille Dash-mounted Pioneer tweeters A pair of 80s Hitachi SX-103 parcel shelf speakers, which I plan to gut and rebuild with modern Pioneer internals to keep the retro look but with modern sound quality Other touches include a Kamei golf ball gear knob, Wolfsburg drilled window winders, wooden lock pins, and a Momo Heritage wooden steering wheel to finish it off. It’s also had a solid mechanical refresh: Febi Bilstein control arms, rear drums, and wheel bearings Brembo front discs Polybush castor-correcting ARB mounts Next up is a top-end refresh; head gasket, timing belt, water pump, and head skim/rebuild to keep things reliable for the long run. It gets a lot of love wherever it goes, and I’m enjoying slowly building it into something unique while keeping the original spirit intact. Feel free to follow my journey on Instagram: @l3owt_ Looking forward to seeing what everyone else is building!
_Original.thumb.jpeg.20b6001fec67c7443a2e95650b402365.jpeg) 1 point
1 point -
1 pointI’d just like to resurrect this thread for a moment as i can’t find a definitive answer elsewhere. Will a mechanical HK 1.3 head go onto a 3F GT block? Do both mainfolds match up? Does the GT dizzy fit properly? Does the stat housing need changing? I gather that the HK head was a favoured one for cam and valve upgrades, preferable to the GT hydraulic head.1 point
-
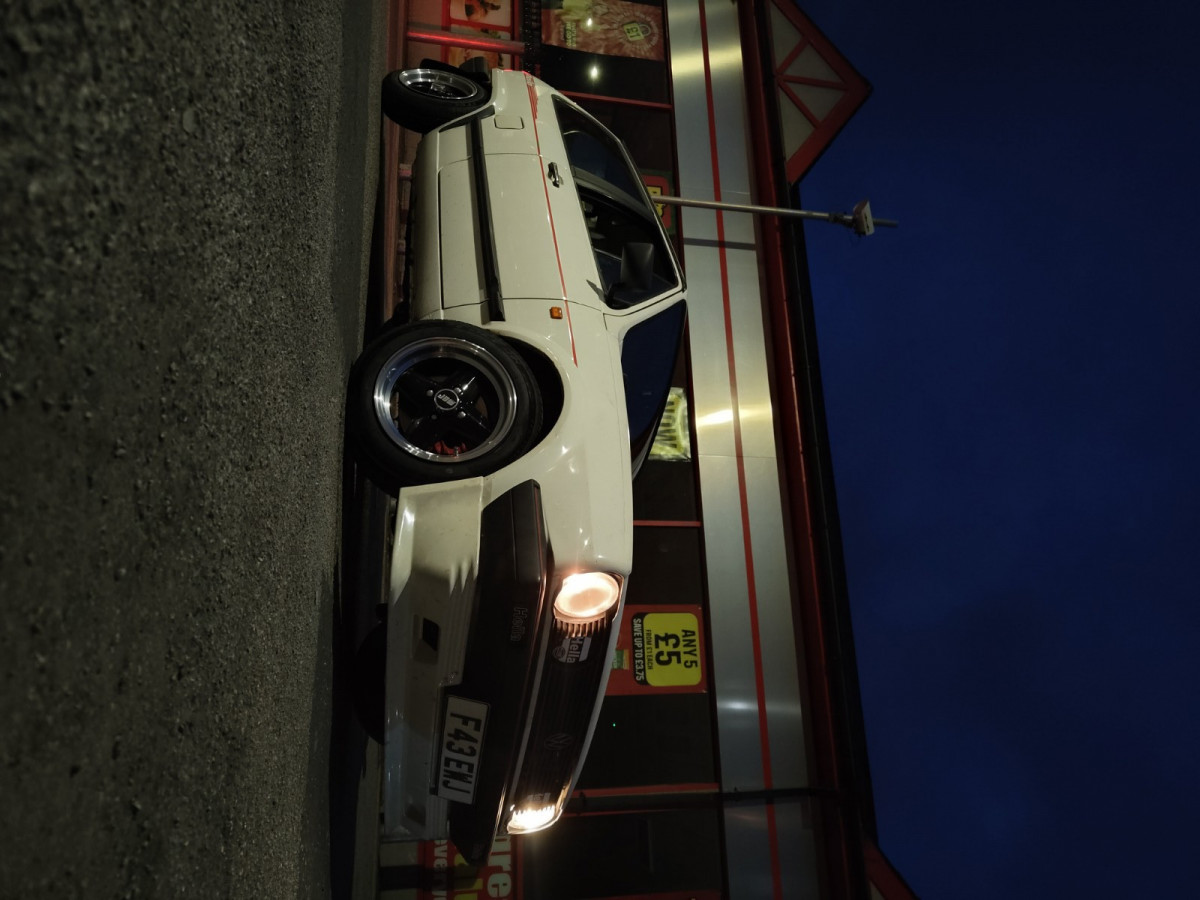
 1 pointHi first time posting on club polo, I've exerted all my options but I've been on the hunt for Kamei-X1 side skirts. I know they're rare & highly sought after but if anyone has any they're willing to let go of or know where some could be sourced please get in touch. Thank you.
 1 point
 -
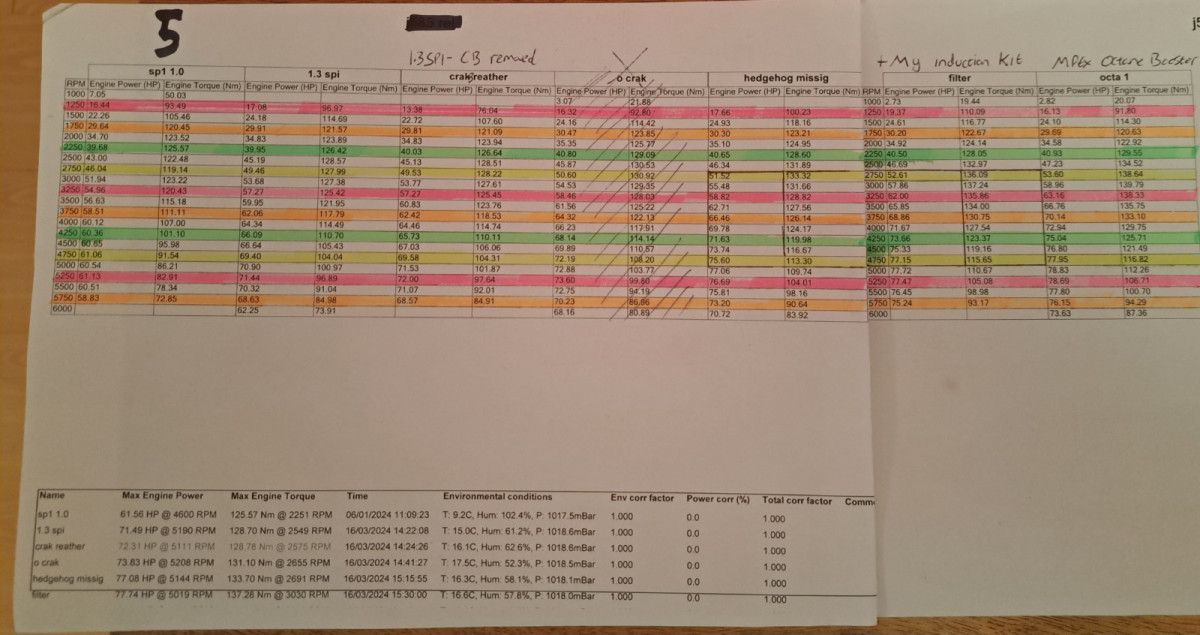
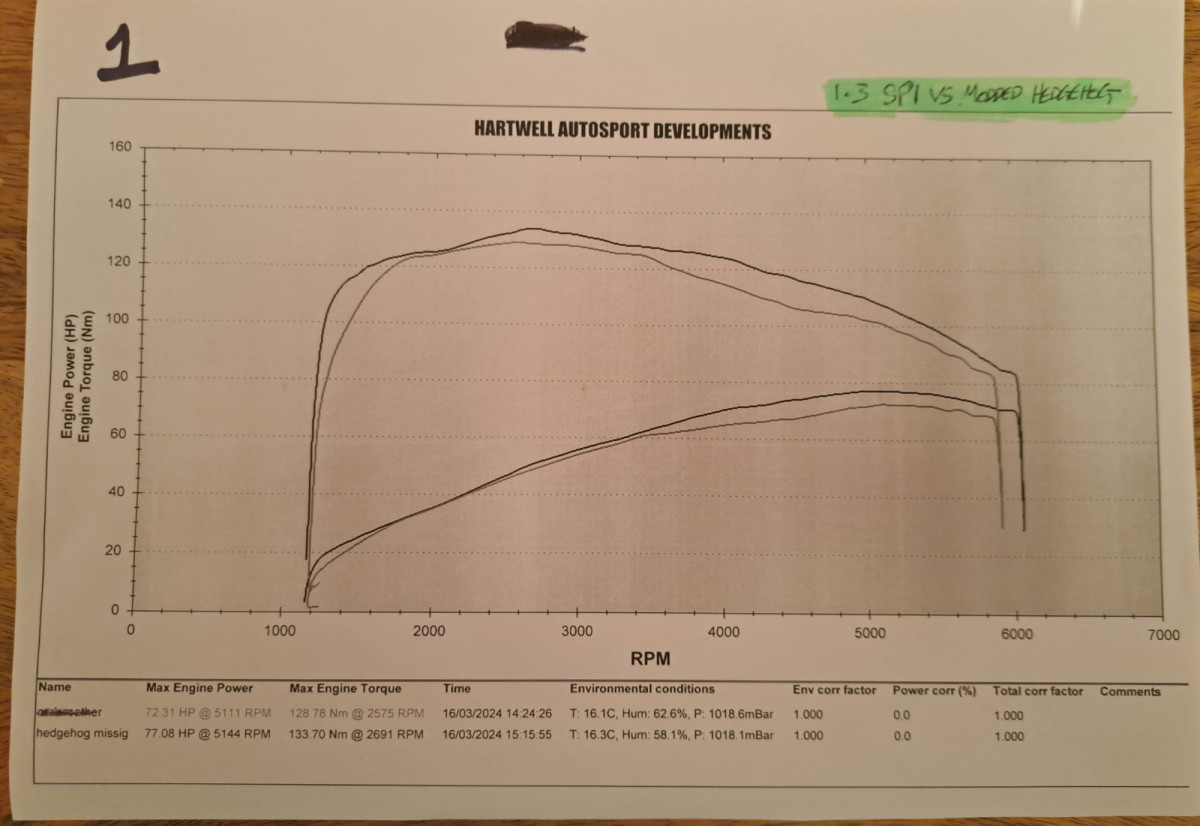
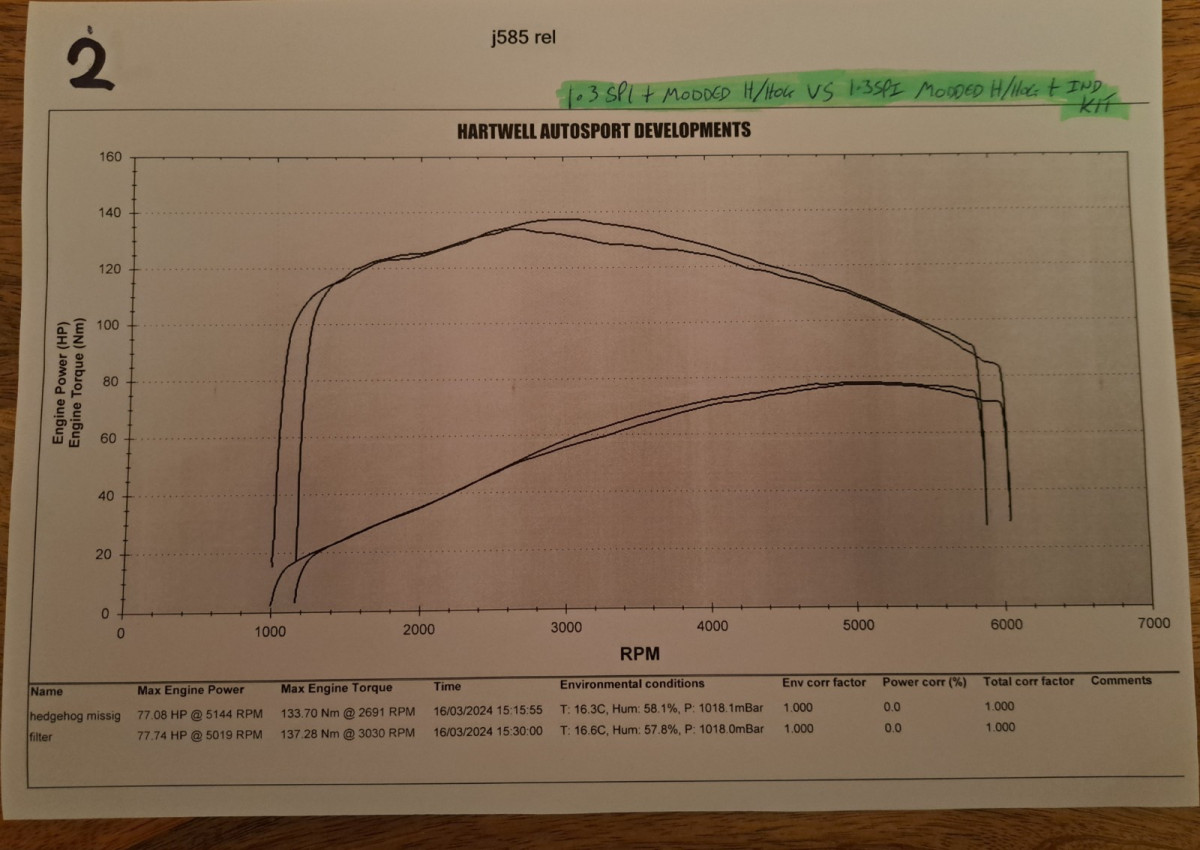
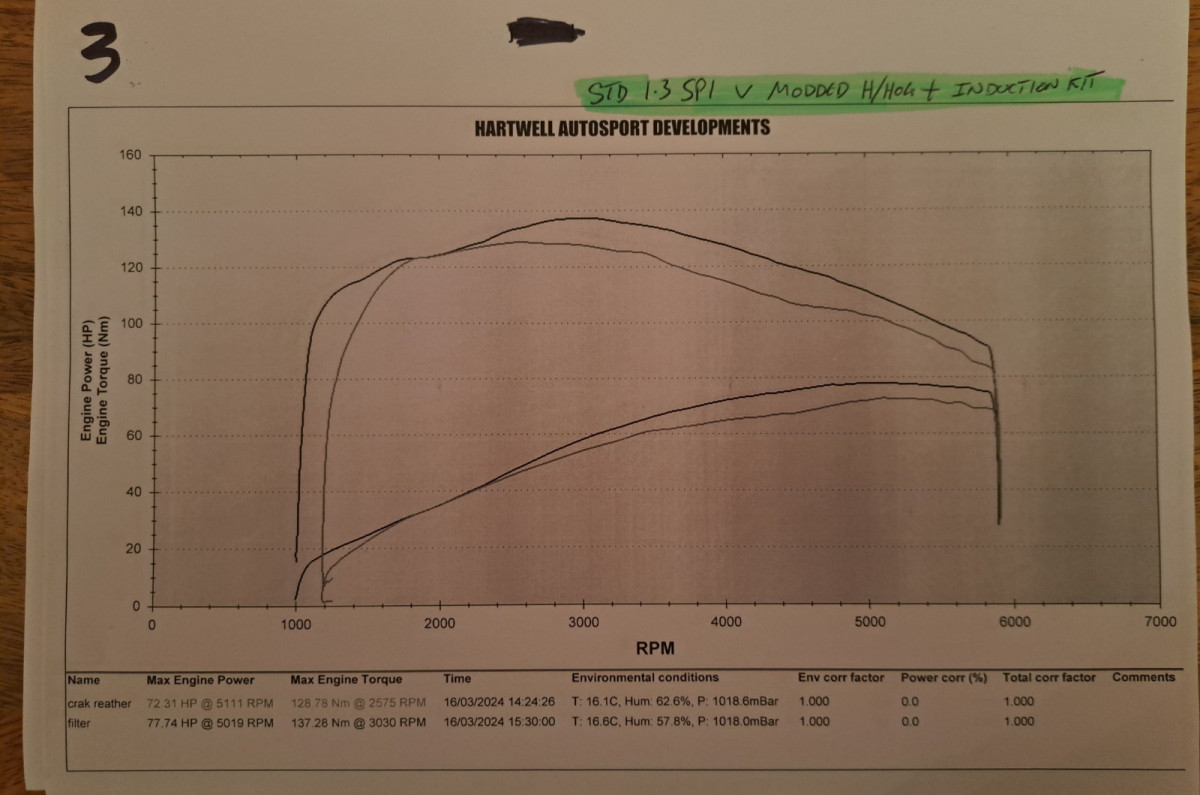
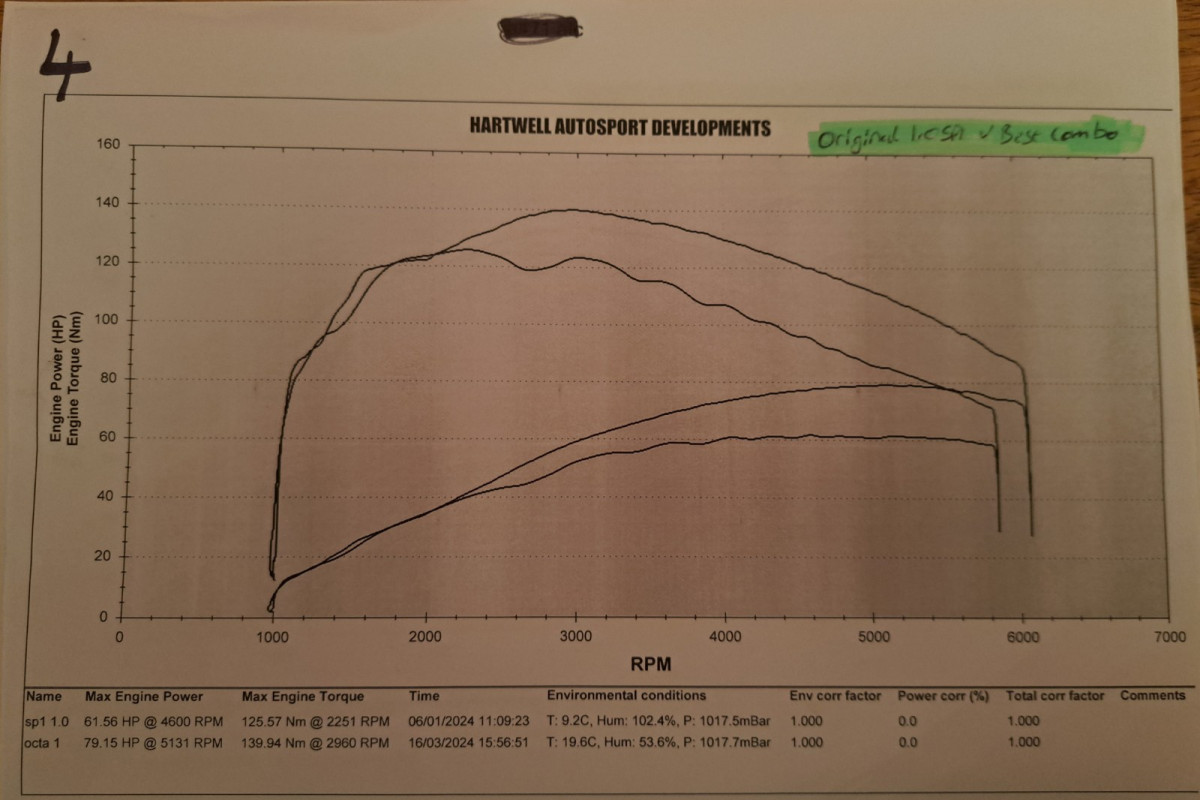
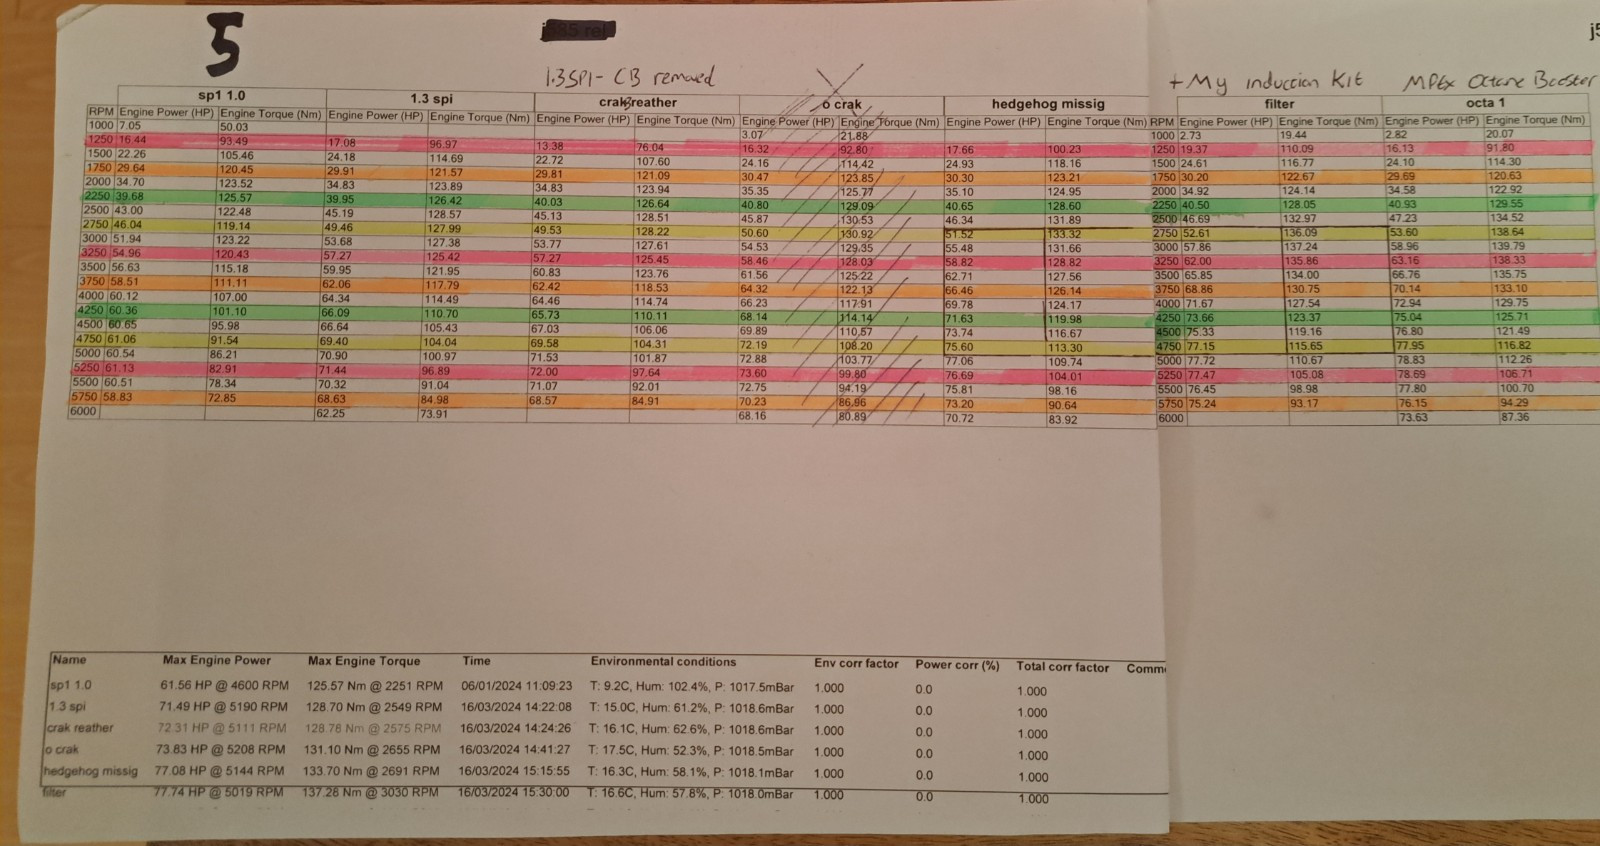
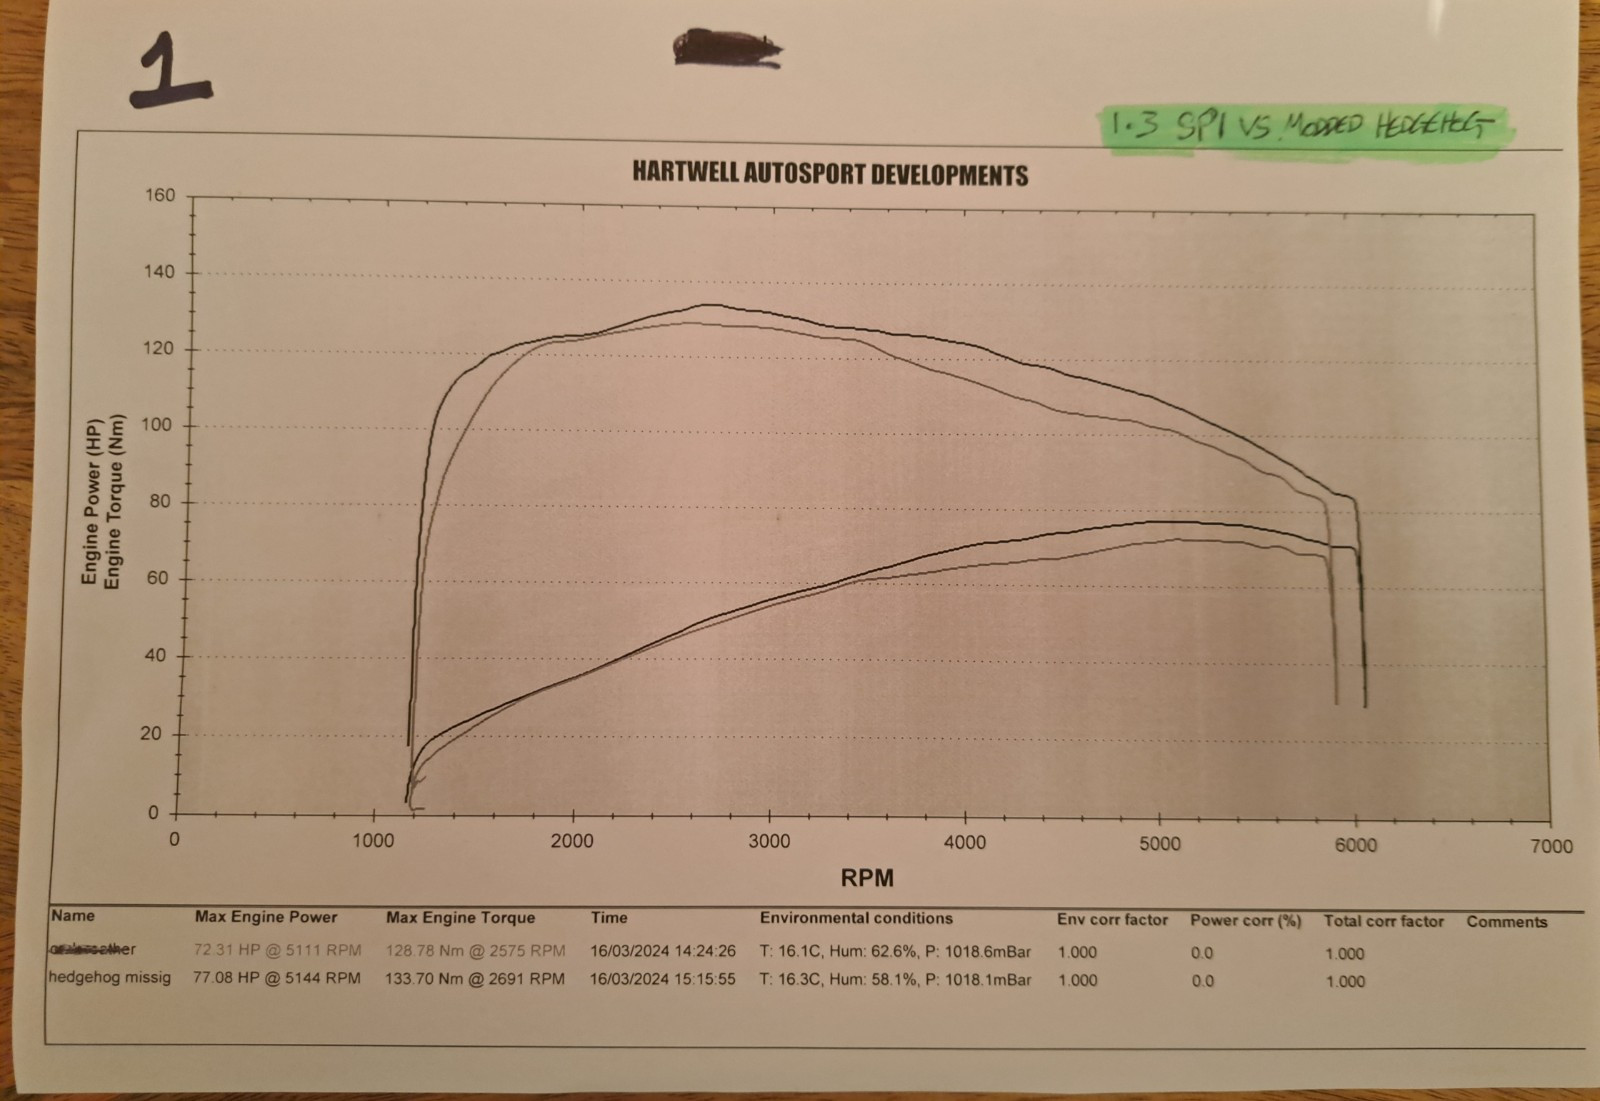
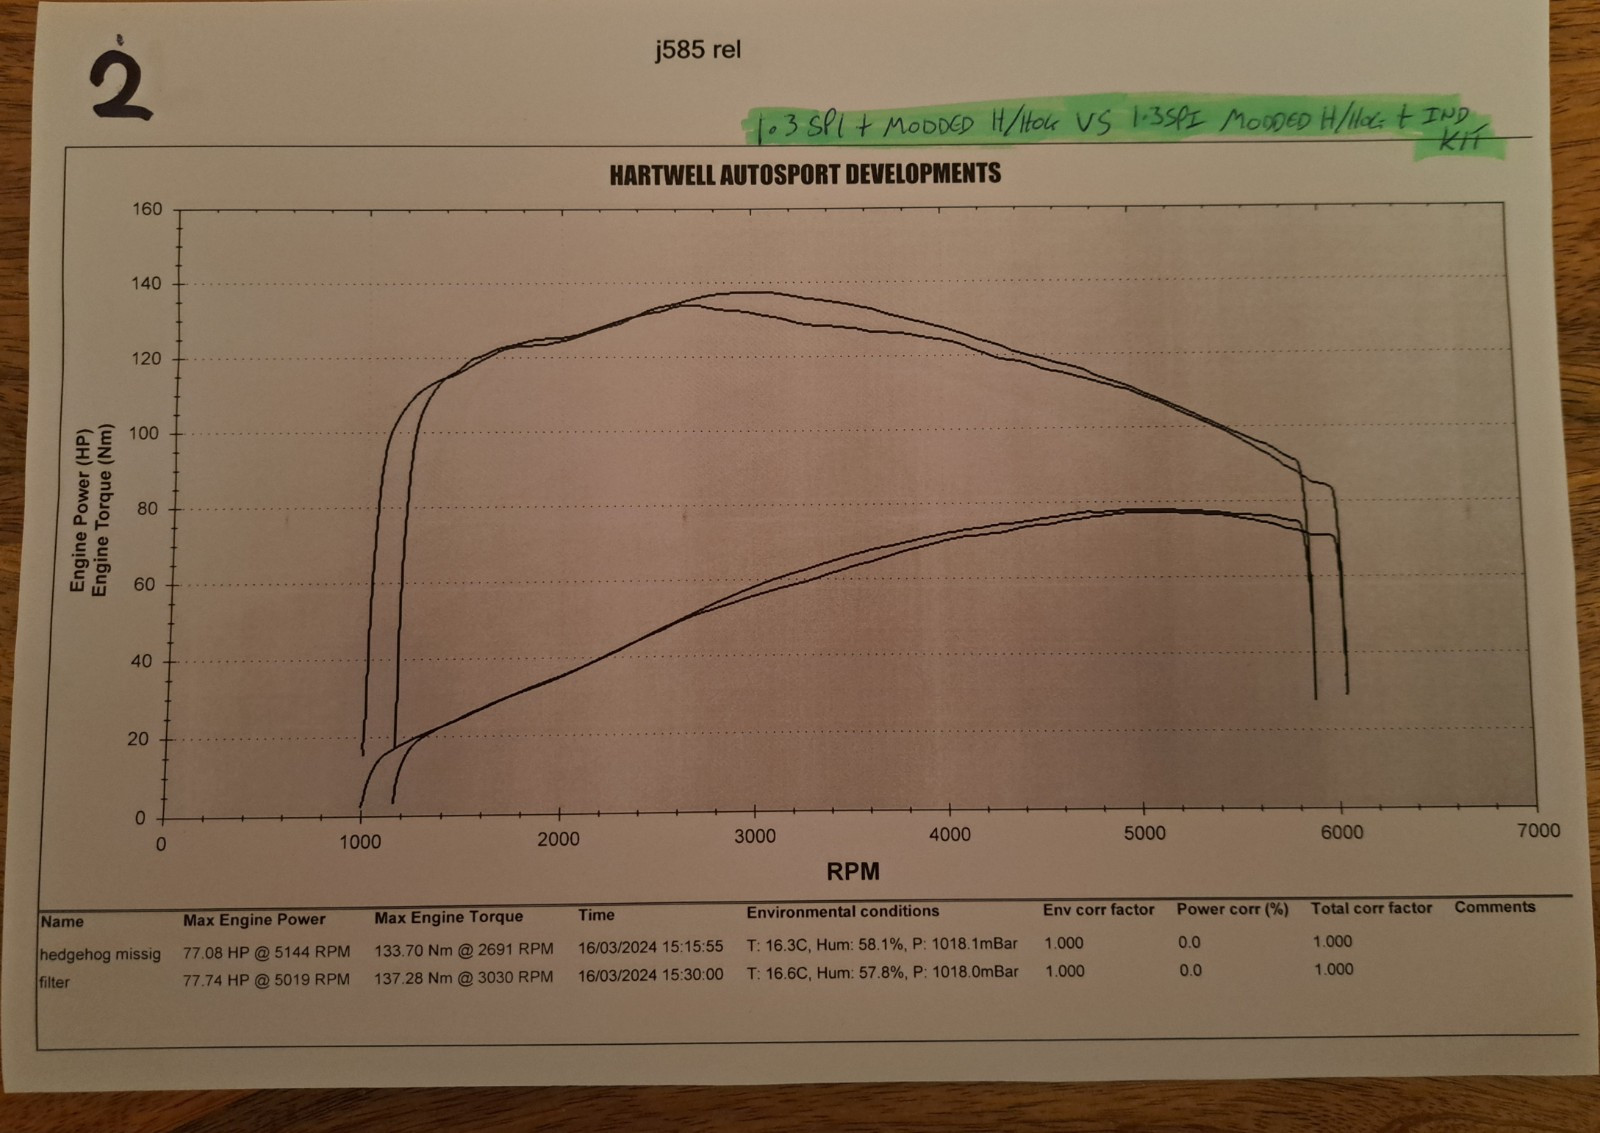
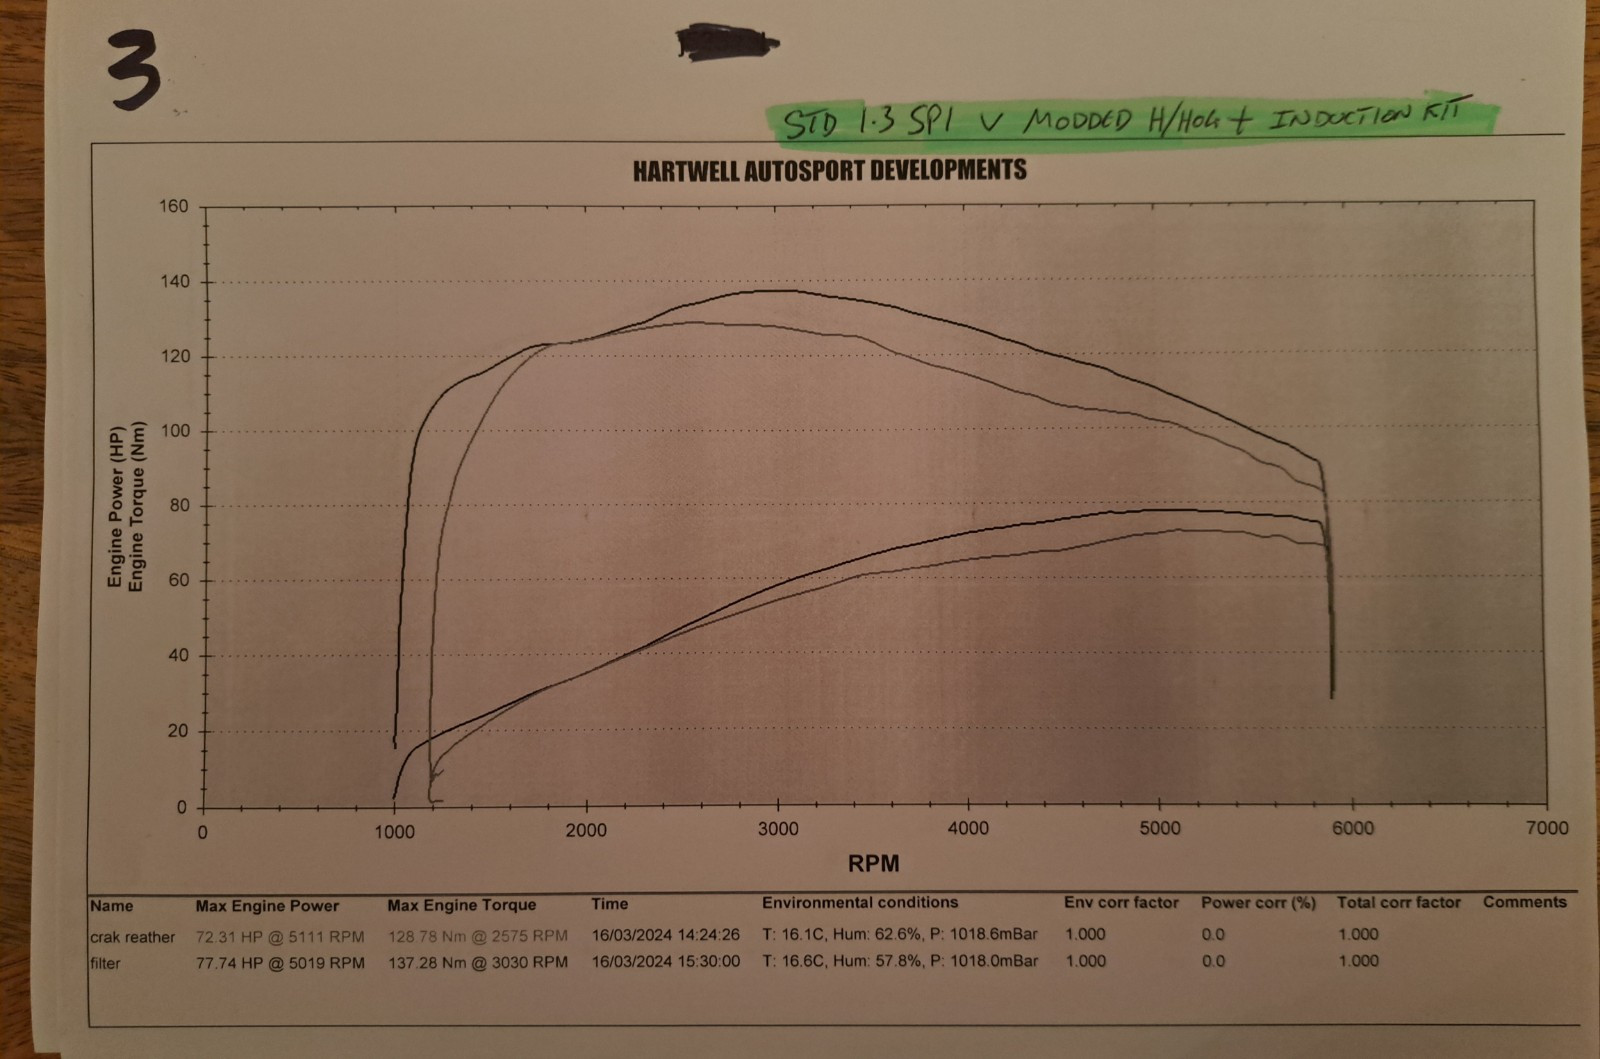
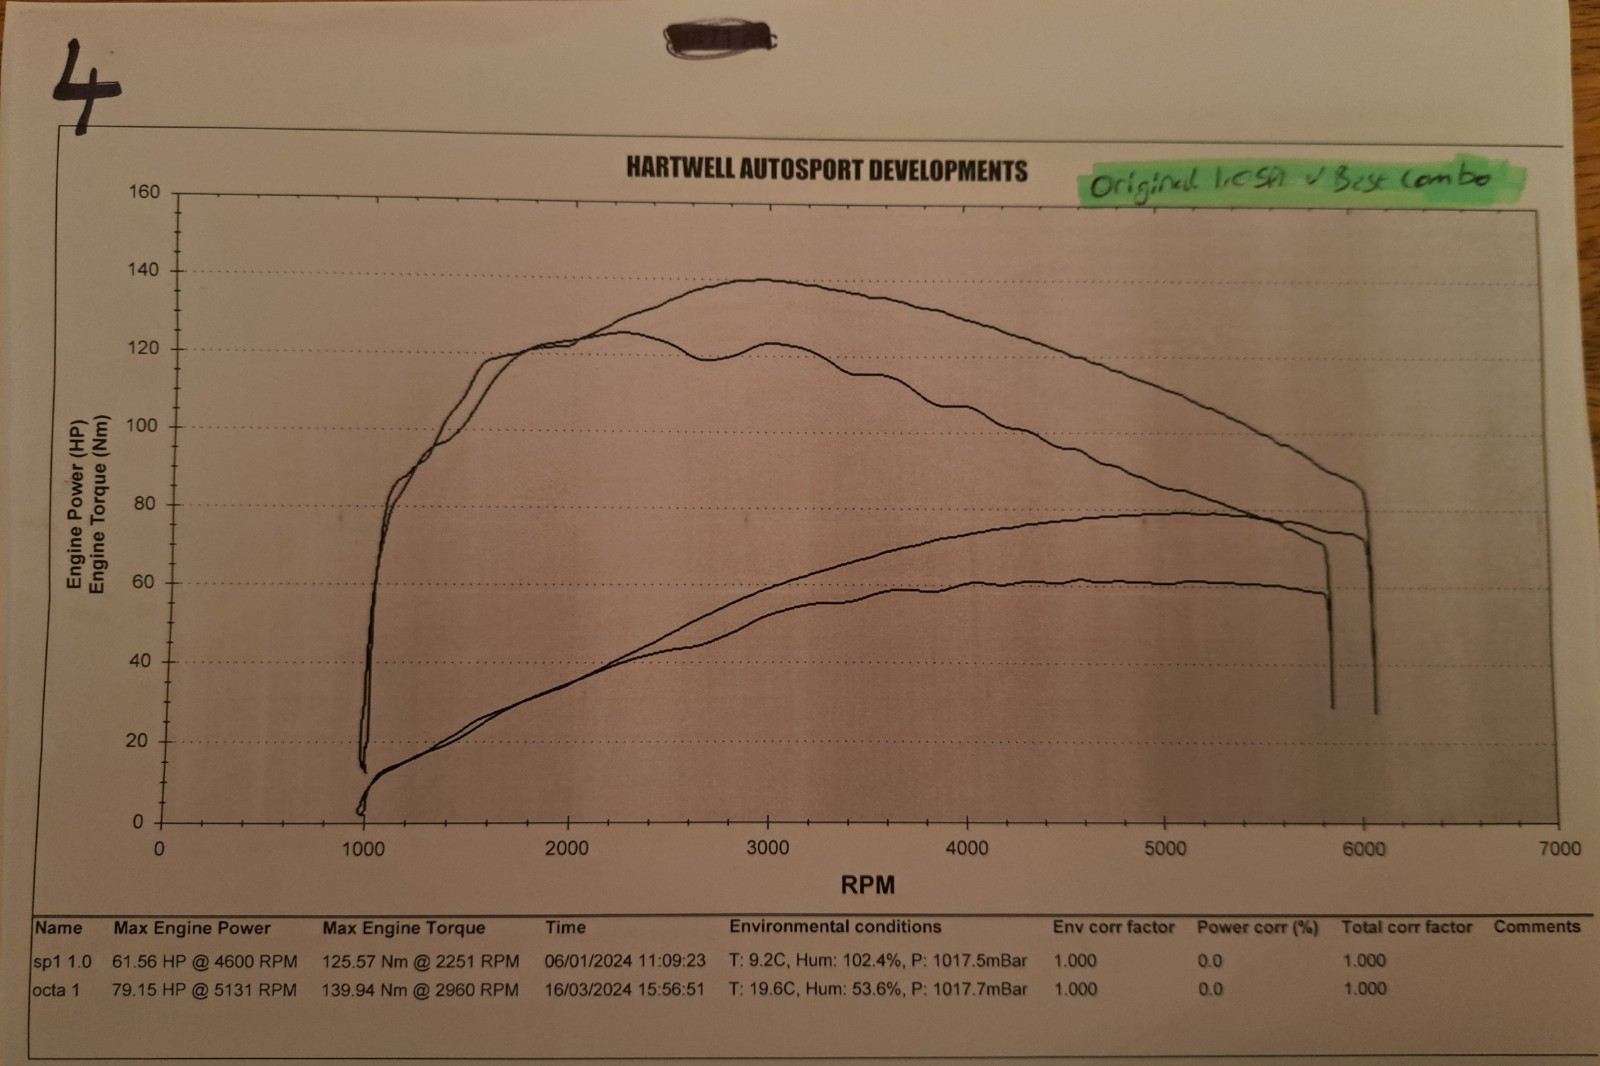
1 pointSome back to back testing of modifications. Dyno graph 1: The lower line (72.31bhp/128.78nm)shows the first run in the spec I arrived with. That is a 1.4 ABD, using a 1.3 inlet/tb and SPI unit with a gravity 4-2-1. Everything else standard. I then fitted the modded hedgehog (shown in pics) and went again. This picked up 5bhp & 5nm at peak buuuut......at some points it's +6bhp & 10nm(4k rpm)! As you can see from the graph it doesn't lose out anywhere. Dyno graph 2: The lower line shows where we ended up in graph 1. The higher line shows the same spec but now with my homemade induction kit added. Peak bhp almost exactly the same however......peak torque up by 4nm but more importantly, there are points we are +7nm (3250-3500rpm) getting rid of the slight dip in torque. You can also see it picks up 4bhp at the same rpm as the torque increase. As you can see from the graph it doesn't really lose out anywhere bar the tiniest crossover at 2250. Quite surprising to me. Even more interesting was the fact that it actually helped the fuelling in the upper rpm range richening it up a tad. I'm guessing the air speed helping better combustion? Unsure of this but its the best reason I can currently think of. Dyno graph 3: This is the overlay of how I drove in, to how I drove out of the day. Dyno graph 4: This shows the original 1.0 SPI system dyno vs the best combo of mods plus a tin of octane booster in the tank. I didn't get a graph print of with vs without octane booster but I did get the number table of all the graphs shown in no.5. Picked up a couple bhp at points and up to 3nm. It seemed to be very consistent too once we'd let it run for a bit to mix it in. This I'm not bothered about I just had it so thought I may as well try it. Disclaimer: actual numbers I'm not fussed by. 79bhp or 72bhp, one dyno will read different to the next. What I'm concerned with are gains. I used the sane dyno, same sainsburys premium fuel, same tyres/pressures and kept as much as I could exactly the same. Hope you've all found it useful. Can't wait to see all the bald hedgehogs now! 😆 Hit me up with any questions and I'll do my best to answer. Peace
 1 point
_Original.jpeg.db77fe13bd2513b6d585f1f123edf66b.jpeg)
This leaderboard is set to London/GMT+01:00