Skip to content

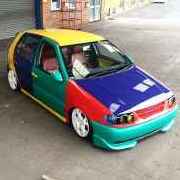
Big Rob's White 6n - Bagged Alienface - BigSexyRoofbox

Featured Replies

skim reading fail i think fella haha.

it does say in the update, my mate painted it not me.

even though I'm a prepper and painter by trade, my mate Als simply gifted so i stripped and prepped it and entrusted him in painting it.

i help him out on saturdays and he pays me by letting me use his workshop and doing work on the car.

lol yer i should read it all of it lol but still credit to your mate :)

  • Replies 901
  • Views 118.2k
  • Created
  • Last Reply

Top Posters In This Topic

Most Popular Posts

  • You don't know the half of it 😉 Possibly ye. Didn't get indoors...again. Obviously not sticking my cock in the right arseholes. Don't think they can appreciate a home grown self built car, that hasn

  • Looks so nice!# Love the colour on those wheels.

  • i dont have any centres on them, there just steels. i didnt have chance to repaint them before i put them on. i sold my G60s for £200, bought these for £50 and then they ended up going on the car

your car is awsome looks perfect

  • Author

He specialises in concourse restorations so he has to be haha when you charge £15k+ for a resto.

Cars not quite perfect...I still have the old faithful bubbly 6n rear arches :(

its not the painter its the preperation pal.

if you aint got a good prep it aint gna look good :)

dont pull you self down thats what i do lol

  • Author

I can paint, but just no where near his skill level.

In the case of the roof, it was all down to the painter hahaha.

I can paint, but just no where near his skill level.

In the case of the roof, it was all down to the painter hahaha.

Meh you did good and watched?

  • Author

I watched and thought, damn I want to be that good haha.

I've been a prepper since I left school at 16 (I'm now 20) but I've only been painted just shy of a year so I've still got plenty to learn in that skill.

Updates in the morning...did a mini shoot today.

  • Author

yesterday i thought it was about time i took some more up to date pictures.

so here they are...enjoy.

IMG_5816.jpg

IMG_5817.jpg

IMG_5819.jpg

IMG_5820.jpg

IMG_5822.jpg

IMG_5823.jpg

IMG_5826.jpg

IMG_5827.jpg

IMG_5828.jpg

IMG_5829.jpg

IMG_5831.jpg

IMG_5832.jpg

IMG_5833.jpg

IMG_5834.jpg

IMG_5835.jpg

IMG_5838.jpg

IMG_5839.jpg

IMG_5844.jpg

IMG_5845.jpg

IMG_5846.jpg

IMG_5848.jpg

IMG_5849.jpg

IMG_5850.jpg

IMG_5851.jpg

IMG_5853.jpg

IMG_5854.jpg

IMG_5855.jpg

IMG_5861.jpg

IMG_5862.jpg

IMG_5863.jpg

IMG_5864.jpg

IMG_5867.jpg

IMG_5868.jpg

my mate was having a shoot done on his car and the photographer liked mine, so he took some snaps and said hell send them to a certain popular modified car magazine :)...not getting my hopes up, but ill be well chuffed if something came from it.

IMG_5902.jpg

IMG_5904.jpg

Looking good dude! :-D

It gonna be expensive to fix the dubsmania damage?

  • Author

It's all fixed. Cost £45.

I bent the lower arm, bent the subframe, split the bush and tore the bolts out of the rear subframe mount.

Will post some pics in the next few days.

Also got some more photos to upload that I've got off the pro photographer.

Blimey, that's not bad going dude :-D

Nicely done though, looking forward to these pro pics

nicw ride mate lovin it where did you get your door cards retrimmed

  • Author

I was pretty lucky Jon it wasn't my sump...my step dad said if it was 1/4 inch higher I wouldn't of done it...but where's the fun in that? Haha.

The doorcards were done by a trimmer at a Jaguar specialist by me...only charged me £15 a doorcard and it is real leather with double stitching.

nice mate dont suppose you got a company name or anything

  • Author

I wouldn't recommend him anymore, he's become unreliable.

Won't return phone calls and won't give quotes.

  • Author

as said above, my mate had a shoot for Golf+ with his Mk2 Golf and the photographer got some sample shots of mine and has sent them off to a magazine :)

these are what he got.

58242773633a0bbacce7z.jpg

582483819623e374a020z.jpg

58248390209a58b873d3z.jpg

582483953067300e41cez.jpg

5824280125ed1884e7efz.jpg

58242752795ec2db12bez.jpg

58242748191c249b3990z.jpg

582427568546d8a143d2z.jpg

5824276299048d7519c4z.jpg

5824834694d536e52389z.jpg

58248338787f4a7f2454z.jpg

Those roof shots are epic, I really like the wide angle interior shot looking upwards, looks top notch :D

need to get the helpers out big man!

  • Author

not going any lower.

I'm happy with how it sits and as a daily id be stupid to go any lower.

Looking stunning as usual man. :thumbsup:

such an awsome choice of colours

btw where did you get your deflectors from i cant find any 3 door ones anywhere

Those new shots are amazing.

The interior actually looks immense, fair play :thumbsup:

not going any lower.

I'm happy with how it sits and as a daily id be stupid to go any lower.

pussy =D hahahaha mines a daily and I'm lower than you, those photographs look awesome!!! just really need to do something about your headlights!! look at chrispys with powerlooks in, makes such a difference

  • Author

seanvw in my eyes, its fine for me...i do weigh 17st so it does drop when i get in haha.

i do have a set of Inpros under my bed but i need to resecure the bulb holders.

dancharge i got them off ebay, cost about £25.

so I've got a week off work [my work shuts down for a week every year]

i decided i could do with cleaning the Alfa's as they were looking pretty sorry for themselves.

this is the drivers seat, as you can see its quite dark and embedded with dirt:

img0402t.jpg

so this is what i used.

Zymol leather cleaner [which i sprayed onto the foam pad and worked into the leather]

Asda's finest soft nail brush for the scrubbing

Warm water and cotton rag to wipe off excess

Meguiers gold class leather conditioner and another cotton rag to apply/take off

img0405v.jpg

Zymol applied and scrubbing beginning:

img0406is.jpg

50/50 of the left hand drivers bolster which for some reason was the worst of any:

img0404e.jpg

after cleaning off and conditioning, this is the drivers seat done:

img0408z.jpg

img0407j.jpg

img0412nj.jpg

this shows the difference between a cleaned and conditioned drivers seat to an untouched passenger seat:

img0409o.jpg

onto the passenger seat.

i had this mark, think it was brush on seam sealer:

img0410xe.jpg

after plenty of scrubbing, alls gone:

img0411gz.jpg

i had this mark on the back seat from where i had a puncture and used the back seat to transport it cause the boot was full:

img0418qe.jpg

took me about 30mins to scrub it off haha:

img0420d.jpg

img0419zx.jpg

all the rears laid out finished:

img0421z.jpg

all didnt go great, i had to go in twice because of the rain...they always say the devil makes work for idle hands.

inspired by my mates air freshner in his Golf, i gave it a crack myself.

XL Magic Tree:

img0414wu.jpg

retrimmed, i know its not great but its not bad for 30mins work:

img0415x.jpg

img0416je.jpg

[the whites just excess glue which I've now cleaned off]

the Polo cant go anywhere with out leaving its mark:

img0401ra.jpg

BEST THREAD I HAVE SEEN ... EVER

Create an account or sign in to comment

Recently Browsing 0

  • No registered users viewing this page.

Account

Navigation

Search

Search

Configure browser push notifications

Chrome (Android)
  1. Tap the lock icon next to the address bar.
  2. Tap Permissions → Notifications.
  3. Adjust your preference.
Chrome (Desktop)
  1. Click the padlock icon in the address bar.
  2. Select Site settings.
  3. Find Notifications and adjust your preference.