Skip to content

Skolo Coupe

Featured Replies

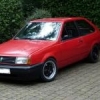
well here is my new polo genesis coupe, its gonna be my runaround while the 6n is being overhauled

its a 93, 1.3l, tornado red, with a tape deck!! retro

after thr first wash, before i got carried away taking the rub strips off

zk4olf.jpg

interior being cleaned

nbtf2b.jpg

all the shite taken out

23t44np.jpg

B.H, Before Hoover

20iz42r.jpg

tidy aul boot

ruquxf.jpg

cleaning under arches

passenger side

nxjmki.jpg

AL-KO shocks :D

308cp53.jpg

took less than a minute to take em off both sides

wbpje1.jpg

under the hood, since been tidied

2ibnars.jpg

ERRR... new shiney cam cover , oxide on head

2me4zyq.jpg

after the fudgewheel

i5sk95.jpg

had a go at restoring the paint with t-cut, check the difference between sunroof without and the roof after t-cut

2zpuyqr.jpg

1zlvryu.jpg

tried to do a 50/50 front (right of pic) is done, door side of wing (left) not done

.jpg

before t-cut, dull no shine

wild1f.jpg

after t-cut, check it out

xp1myw.jpg

another 50/50

jl3tci.jpg

and another

nc0f13.jpg

on to the boot, right side done and shiney, rest dull

20np8h.jpg

getting there

4h4lrq.jpg

up close

2daws3s.jpg

N/S wing suffer real bad fading and huge scratch/dent

16hq7mv.jpg

the door suffered bad aswell plus had tin worm

1z1hhxk.jpg

bottom done, top not

2r7c76t.jpg

mask it off

ir03kg.jpg

Edited by mini_mayhem

  • Replies 167
  • Views 27.3k
  • Created
  • Last Reply

Top Posters In This Topic

Most Popular Posts

  • mini_mayhem
    mini_mayhem

    Well it has been years since an update so: In 2013 I fitted a replacement AFH to cure the burning oil issue, so engine in and tined up, out for a test drive and the diff broke in the box, Change bo

  • mini_mayhem
    mini_mayhem

    Not big update, but the car runs! Over the winter I've got a rebuilt AFH in. I had forgotten how much fun this engine is.   Also managed to get my speedline alloys powder coated, t

  • Author

passenger door rot

29u5co.jpg

i dont want no overspray fool!

vz8nk8.jpg

sanded down and first skim of filler

107ozg1.jpg

door down, found filler, hint of damage

mvhvnr.jpg

primered

wgop02.jpg

o8b86a.jpg

door inserts were also faded so they got a lick of paint

70dxzm.jpg

paint didnt quite match but hey lifes like that

2enn3pt.jpg

rust hole in battery tray alright

it was an english car before

tidied up well in fairness

i'll finish the bay this week

needs afew lilttle bits and pieces nothing major

Looks like it got potential, Looks like its a very clean car underneath all the dust lol, Can tell its been looked after pretty well, Get a machine polisher on it though, Should hopefully restore the paint pretty well for a while.

Max

  • Author

29d8w1u.jpg

2vkjp7d.jpg

ymom1.jpg

the vag gang

the cleaned bay

orjz7t.jpg

34zagci.jpg

wcd7kp.jpg

2hmldl5.jpg

the dreaded battery tray

2yx2629.jpg

as she sat before i took the exhaust and ARB off

the exhaust

w0m51t.jpg

the ARB

4kfnle.jpg

the manifold

242fzgz.jpg

2v1106d.jpg

exhaust and ARB have since been painted, pics soon

  • 2 weeks later...
  • Author

the exhaust painted and some chrome pipe welded on, for that sport look and an extra 10bhp :D

316x2tk.jpg

whxwjn.jpg

debumpered anyone

35lusdg.jpg

I'm liking it alot especially without the rear boot plinth

2nixjr8.jpg

how it may look once done minus the lock barrel

10ctb1y.jpg

taking it off to get at the rust

2hqwi8w.jpg

tip of the iceberg

30j30o1.jpg

33dc8qt.jpg

under washer fluid bottle

30vmx5g.jpg

the real damage

14kw4md.jpg

the bumpers looking sad

2uf629x.jpg

looking good mate keep the updates acoming!!!

great work so far, keep it up

  • 2 weeks later...
  • Author

This is what I've been up to for the last while in between other jobs

rust cut out in front chassis leg

1y7luw.jpg

2hyc4tz.jpg

plate cut, and fitted

vxyqf6.jpg

disaster that was the battery tray

5ldu3c.jpg

bye bye rust!

33wwbyw.jpg

the number plate recess holes welded up

2q83myp.jpg

lock trail fitted

15i6agk.jpg

rear end before

20np8h.jpg

how it looks now

20zpquu.jpg

25um812.jpg

3452100.jpg

fitted vented discs but caliper wouldn't fit so back on solids

2yuafqd.jpg

put new exhaust manifold studs in

znad1c.jpg

tried drilling the sheared stud in manifold

15f4wi0.jpg

but it reshaped the drill bit

2wmfmzm.jpg

its down at the local enginnering shop being drilled out

i also decided to smooth the rear arches

first welded up the holes and then first skim of filler

iqeo2v.jpg

5kfy52.jpg

primed

343rblw.jpg

painted

2zxnwv6.jpg

looking good pal keep us updated :thumbsup:

not bad gettin some loving this 1 like i actually lke it without the boot plinth looks cool

Very hard working chap arent you mate, Wish i had this much spare time!

Great work so far, id de-wiper the back, makes it look so much better.

  • Author
Very hard working chap arent you mate, Wish i had this much spare time!

Great work so far, id de-wiper the back, makes it look so much better.

i use the rear wiper too much to get rid of it, i live in Ireland, :) plus if i did de wiper it i wold have to smooth out the hole to match the shape of the boot lid,

i only get to spend a few hours here and there, then have to take time out to update the forum.

cheers lads, all the comments are appreciated

isn't there going to be a legality issue with plate lights and such?

looks very nice though.

  • Author
isn't there going to be a legality issue with plate lights and such?

looks very nice though.

lite bolts will sort it

Loving that boot. Never seen one done like that before!

lol at the brake fail, you need VW2's to fit vented discs ;)

  • Author
Loving that boot. Never seen one done like that before!

lol at the brake fail, you need VW2's to fit vented discs ;)

i have them now, but wont change to vented til next time i need new brakes,

i did the plinth to clean up the boot, enhance the lines

  • 4 weeks later...
  • Author

well it is running finally, got a fuel pump and a fresh battery and one it was alll fitted it fired up on the first turn of the key.

the ehaust is fitted, also the rear arch splats (bumper sideof the arch) have been removed.

german font plates will be here tomorrow

paint starting to fade again, :(

its much nicer to drive than my 1L 6n

Excellent work, nice to see someone getting stuck into a car without pissing about with flash wheels and stickers.

Advice: Try not to square mask areas when you are spraying, try and soft (no hard edge of tape) mask/blend in the colour.

Also where you've deleted the trim on the arch I would consider protecting it with something like a textured stone chip, I did mine like you have and it has chipped and rusted.. I don't have mud flaps which doesn't help.

P3070361.jpg

Looking very good so far buddy!

  • Author

@ mac coll thanks for the advice, any thread i could read to help with spraying? I'm not too worried as it will be getting a full respray when i get cash,

@James Q , thanks man

german font plates are fitted with light bolts, car has been fully service and now only needs tyres and time for nct.

  • Author

lads just found out tiny pic is no longer accepting international uploads, also they have removed some of pictures hence why they are missing, shame as i have no intention of uploading them to photobucket again, sad loss.

  • 1 month later...
  • Author

hopefully fitting a 6n splitter soon along with new ht leads and dizzy cap and rotor arm.

i've also added front mud flaps as i was sick of cleaning the car so often.

the rear are are starteing to get stone chips so they will need sorting.

cd player added along with cooling fan to allow it run with heating on

  • 1 month later...
  • Author

i'm now rocking Mk2 gti seats, such an improvement.

i went cloth over leather just cos i prefer them

  • 2 weeks later...
  • Author

it was some mission to get the two top mounts changed, but its done. next time i do that i will do everything, lows, polybushes, wheel bearings, clean and paint, prob during the summer

Looks great. You need to stop masking so close to where you're spraying you'll end up with a patchwork car. Best thing to do is mask another 3-4" further out that you are doing, stick the tape down but then peel the inside edge up all the way round. This will help feather the paint in.

Matt

Create an account or sign in to comment

Recently Browsing 0

  • No registered users viewing this page.

Important Information

We have placed cookies on your device to help make this website better. You can adjust your cookie settings, otherwise we'll assume you're okay to continue. Terms of Use Privacy Policy Guidelines

Account

Navigation

Search

Search

Configure browser push notifications

Chrome (Android)
  1. Tap the lock icon next to the address bar.
  2. Tap Permissions → Notifications.
  3. Adjust your preference.
Chrome (Desktop)
  1. Click the padlock icon in the address bar.
  2. Select Site settings.
  3. Find Notifications and adjust your preference.