



Leaderboard
-
foreststu
Club_Member1Points117Posts
Popular Content
Showing content with the highest reputation on 01/04/24 in all areas
-
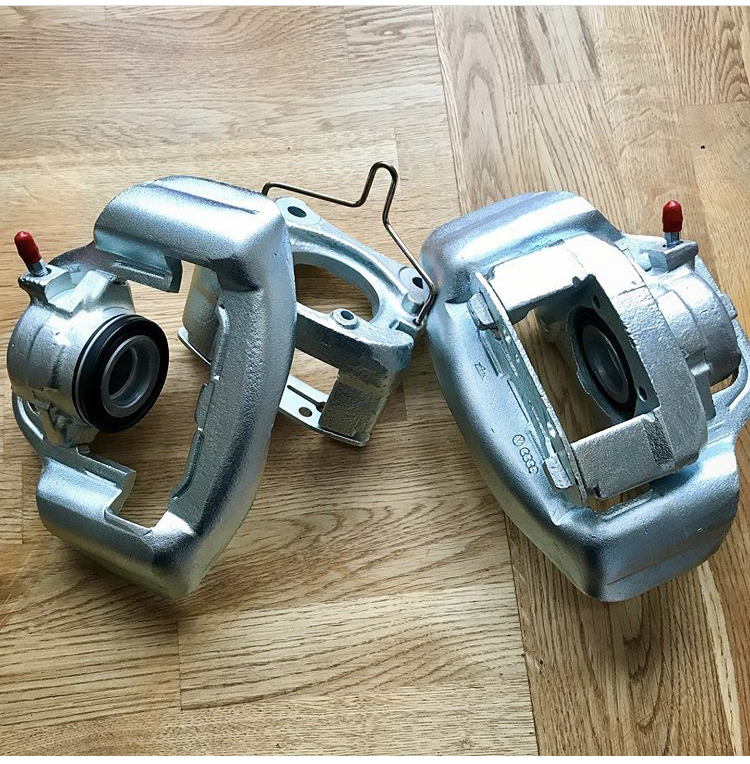
1 pointThird winter upgrade: Air Ride Getting the Polo over the threshold of my garage has always necessitated some carefully placed pieces of scaffold plank to avoid me catching the fuel pipe clips or other low-hanging parts of the underside. This has only become more tricky since going a bit lower on the 14" wheels with 55 profile tyres. I've always fancied doing air ride to help with getting into the garage but also for the look when parked up so I've jumped in! I picked up the TA Technic air bags which have a dual-bellow on the front and sleeve bag on the rear and are based on a late Mk2F front strut design. I was originally going to use the Air Lift Performance manual dual paddle-switch manifold and twin-needle pressure gauge pod but a new digital 3P Management System came up at a good price and that was the system I really wanted. The 3P system has a wired remote from the manifold and also bluetooth so it can be controlled from a smart phone app when the engine is on or if it is in 'show mode'. Because the front struts are late Mk2F design I needed to change a few things starting with moving from Mk1 14mm ball-joint track control arms to the Mk2 17mm ones. Also, as mentioned in a previous post, discs with a much shallower hub-return which also mean't moving to VW1 type Mk2 brake callipers. In addition I also had to change the strut brake hose guide; the Mk1/Mk2 type have a tab on the side of the strut and the hose sits in this with a grommet around it. These late Mk2F type have the same design as some (maybe all) Mk2/Mk3 Golfs which use a rubber piece with a slot on one end to slide onto the strut and a hoop on the other end for the brake hose. There were a few other things which are the same but I used new ones: hubs, hub bearings, top mounts, top caps. The TA Technix struts are (1/8" BPS) whilst the Air Lift Performance leader lines are (1/4" NPT) so to connect I used a 90-degree 1/8" BPS then a straight 1/8" BPS to 1/4" NPT adapter for the leader line to connect to then a 90-degree 1/4" NPT to 6mm Push-To-Connect (PTC) all sealed with Loctite 586 instead of PTFE tape or the dry red sealant which comes on the Air Lift Performance parts (removed with a small wire brush). Use a few P-clips to take the weight of the leader line off the joint and also to keep it out of the way of the wheels. Inside the front struts I'm told the bump stop is segmented so can be cut off so the bag will compress more when aired-out. Whilst the car was on jack stands I jacked up the strut below the track control arm and wasn't quite able to bottom out the strut onto this bump stop on the drivers side so had to remove a small crescent of the inner wheel-well overhang on the chassis leg, this has already been partially done by a previous owner presumably one of the times it was lowered on coilovers. This now gives plenty of room around the drive shaft for the car to drop onto the front strut internal bump stops. If I wanted to reduce the height of the bump stop to get lower I'd have to do an inclined notch. The installation of the rear bags was very similar to the front except that the stand-off spacer on top didn't leave sufficient damper rod for the stock rear rubber top mount bushings so I ordered a pair of shorter ones (M10 clearance 20mm diameter and 20mm length). The kit came with a rather long Air Lift Performance aluminium tank which probably wouldn't have been my choice but I made it work. I wanted to still be able to keep the spare wheel and be able to get it out without disconnecting any air lines. I used a Fab53 bracket to mount the manifold on the seat-back using rivnuts as high as I would whilst still being able to fit the parcel shelf. I then made a bracket from some flat aluminium which allowed the tank to sit beneath the manifold with the drain-port pointing down again mounted to the seat-back with rivnuts. I mounted the compressor to the boot floor with an anti-vibration kit with the factory-fitted steel-braid swivel line curved to allow the rear seat-back to still move forwards enough to move the air tank out of the way when lifting the spare wheel out over the central threaded bar which holds the spare wheel down. All of the air line fittings are 1/4" NPT PTC and the lines curve down to the rear seat-back hinges so that again the seat-back can move without snagging them. The rear air lines exit straight into the rear wheel-wells using a hole with a grommet. The front air lines go under the back seat, under the drivers-side rear side-card into the rear quarter cavity then down and out exiting near the fuel tank breather pipe and then following the fuel line to the front and accessing the bags via the steering arm holes. The wiring also exits under the rear seat then under the carpet along the drivers-side sill and up behind the dash with the battery connections and ignition live going though the into the engine bay behind the battery. The wired remote control sits in the under dash tray and the excess wire is coiled-up and cable tied behind the dash. I slit the boot carpet so that it can be removed without unbolting the compressor. When setting up the 3P system I increased pressure until the car didn't rise anymore and set that as the all-up preset which is 50 PSI on each corner. Then I set a drive height with was around the same height as I was at when lowered static which is 20 PSI in the front and 28 PSI in the rear. The car drives well, not bouncy or hard and when aired-out sits with an even gap between the rim and arch so happy with that. Merry Christmas and a Happy New Year to you all!1 point
This leaderboard is set to London/GMT+01:00
